Facebook offers two choices for post advertising… Boosted Posts or Promoted Posts. Which one you choose depends on how helpful your posts are to your audience and how it moves you closer to reaching your marketing goals.
Use the tips below to help you decide which posts will help you the most.
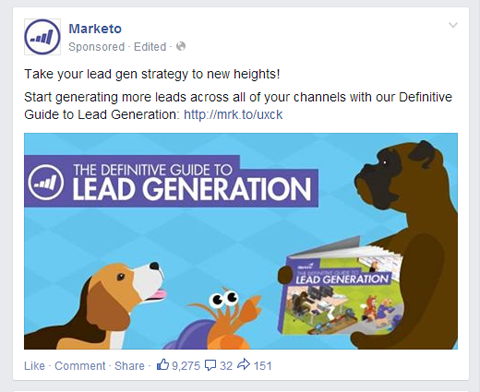
An example of what a boosted or promoted post looks like in the news feed.
Only promote your own content. Even if you’re sharing a good tip from another website, don’t boost it if it links to someone else. Why pay to send traffic to someone else’s site?
Pick content that’s helpful for your audience. Promoting sales messages from time to time is OK, but primarily choose content that will benefit your audience.
Promote content that gets your fans on your email list. If you’re offering something for free with an opt-in, definitely promote that content so you can transfer as many fans to your email list as possible. This includes giveaways, free webinars, free ebooks and any other type of freebie.
Remember the 20% text rule on photos. If your post has a link in it and the link pulls in a photo that has too much text, you won’t be able to boost or promote it. Use Facebook’s Grid Tool to determine if the image has too much text.
The example below wouldn’t be approved because it has too much text in the photo. Plan your post images ahead of time so you don’t get stuck with a post you can’t promote.

Follow the 20% rule when boosting or promoting your post.
Below I’ll show you the difference between boosting and promoting so you can get the most bang for your buck.
When to Boost a Post
Boosting a post is very easy to do and available for any post on your page’s timeline. All you need to do is click Boost Post in the lower right corner of your post.
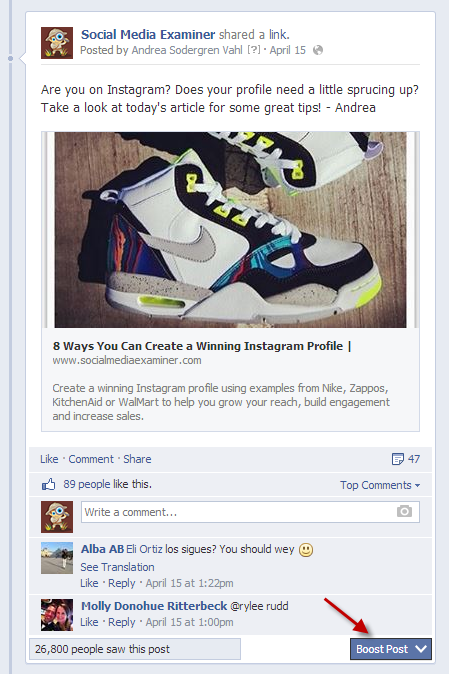
Boost a post with the click of a button.
When you click Boost Post, you have the option to choose either pushing the post to“People who like your page and their friends” or “People you choose through targeting.” You’ll also be able to set your budget.

You can choose your target audience and your budget.
One problem with choosing the first option—People who like your page and their friends—is that your fans’ friends may not be interested in your business and you may be wasting your money by pushing your post out to them.
If your goal is to engage your current fans, don’t choose the first option. You’re better off using a promoted post and choosing that the ad only go to your community.
However, if you’ve already boosted a post to fans and their friends, you can still change your audience. Just go to your Ads Manager and turn off the segment of the ad that goes out to friends of fans.
If your goal is to drive some targeted traffic to your website, then choose the second audience option—People you choose through targeting.
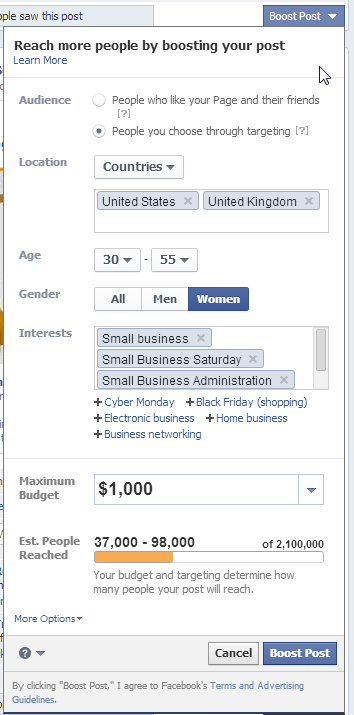
You can add targeting with a boost post option.
The targeting option lets you select which people you want to reach, as well as their location, age, gender and up to 10 interests. (This is the same as promoting a post with targeting options, except that promoting a post allows more targeting options in the Ads Manager area.)
When you choose a targeted boosted post, it’s typically to drive traffic to your website (where you have a strong call to action or purpose). Even though you’re sending people away from Facebook, you’ll still pay for the engagement on the post (likes, comments, etc.).
The boost post ad with targeting is a quick way to set up an ad, but if you really want to focus on driving traffic to your website, I suggest setting up conversion pixels and doing a website conversion ad.
When you’ve set your audience and budget, you can click More Options and choose whether you want to spread the budget out over a few days (with a maximum of 7 days) and/or change the account that’s being charged.
The ability to change the charge account is handy for people who manage other people’s Facebook pages. Of course, you must be an ads admin of someone else’s account to switch the charge to their account.

The More Options menu lets you choose duration and payment method.
When you boost a post, the ad results show up in your Facebook Ads Manager. From there you can monitor the ad, run more detailed reports and watch the performance.
Notice in this boosted post that the bulk of the ad spend went to showing the ad to friends of fans.

You can turn off the Friends of Fans Boosting in your Ads Manager.
If you dive deeper into the stats on this ad, the ad received 12 post likes from friends of fans, which essentially is a waste of money. Those people are not connected to your page and will never see your posts again (unless you boost a post to them again and they happen to see it).
When to Promote a Post
The other way to push a post into the news feed is to use the Ads Manager (or Power Editor) to promote a post. The benefit of promoting a post is that you have more targeting, pricing and bidding options.
To get started promoting a post, just go to https://www.facebook.com/ads/create/ andselect Page Post Engagement. Use the drop-down menus to choose the page and the exact post you want to promote.

Create a promoted post through the Ads Manager.
When you click Continue, you’ll see that the Page Post Engagement option gives you more targeting options and you can even use a conversion pixel if your post is sending traffic to your website where you’ve installed a conversion pixel.
In the Connections area, you can choose that your ad only be shown to the people who like your page, but be aware that the default settings for locations limit who sees this ad unless you enter additional countries.
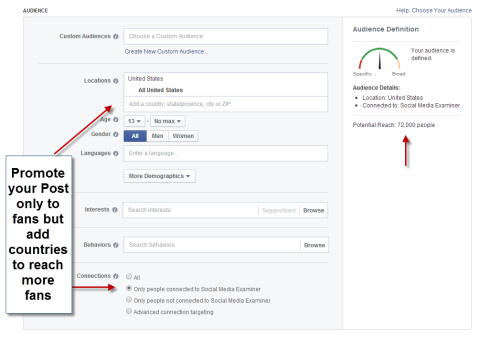
Watch your targeting options to make sure you reach all of your fans.
You also have different bidding and budgeting options with a promoted post. You canchoose cost per click or spend a certain amount per day or even switch between models if you want to.
I’ve been seeing good results with using the Facebook bidding models (bid for page post engagement, bid for website conversions and others).
As with boosted posts, your promoted post ad results will show in the Ads Manager so you can watch how your ad performs.
There is one last type of ad you can create as a promoted post via the Ads Manager: adark post (or unpublished post). These types of posts are good for people who are comfortable with Power Editor and want to do some additional testing on multiple ads.

Create an unpublished post (also called a dark post) if you’re using Power Editor or need to split test.
Why use a dark post? One advantage is that it doesn’t appear on your page’s timeline. It uses the structure of a promoted post, but your community won’t see it organically (i.e., as a regular update in their news feed); instead they’ll see it only as an ad.
That’s particularly handy if you’re doing split testing for several types of posts and you don’t want to inundate your audience with similar posts all in a row.
Dark posts are also a good solution if you’ve made a mistake in a timeline post (e.g., your image had too much text) and you don’t want to delete it and repost a corrected version just so you can promote it.
Conclusion
Be clear on what you want to achieve with your ad.
Many marketers are using the boost post option because it’s easy and accessible. It’s located right on your page’s timeline and can be done with two clicks. But it’s not always the best option to reach the perfect audience.
In my opinion, most people should be using the promoted post option because it allows more control over who sees your ad and how you pay for it.