Welcome to Google Doc Formatting. In this section we will cover the following topics:
Format text
Create lists
Align and indent paragraphs
Line and paragraph spacing
Paragraph styles
Copy and clear formatting
Tab-stops
Columns
How to Format Text
Formatting text in Google Docs allows you to change the appearance of your text and make it stand out or blend in with the rest of your document. Some of the basic formatting options available in Google Docs include:
- Changing the font: You can choose from a wide range of fonts to make your text look a certain way.
- Changing the font size: You can make your text larger or smaller to suit your needs.
- Changing the font color: You can change the color of your text to add emphasis or make it easier to read.
- Bold, italic, or underlined text: You can make certain words or phrases stand out with bold, italic, or underline formatting.
- Aligning text: You can align your text to the left, right, or center of the page.
Google Docs allows you to format text using either use the formatting options in the toolbar at the top of the page or by using keyboard shortcuts.
Apply Bold, Italic, or Underline
Bold, Italic, or Underline formatting can be used to draw attention to important information or to add emphasis to certain words or phrases in your document.
- Bold text makes the text appear in a thicker, darker font. This can be used to draw attention to certain words or phrases or to make them stand out from the rest of the text.
- Italic text causes the text to appear in a slanted, italicized font. This can be used to emphasize words or phrases or to indicate the title of a book or movie.
- Underlining text causes a line to appear underneath the text. This can be used to emphasize words or phrases or to indicate the title of a book or article.
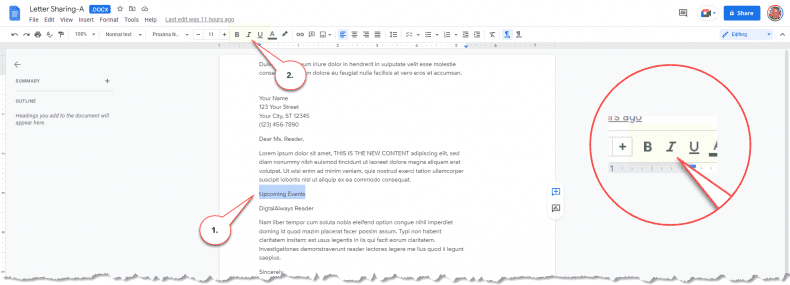
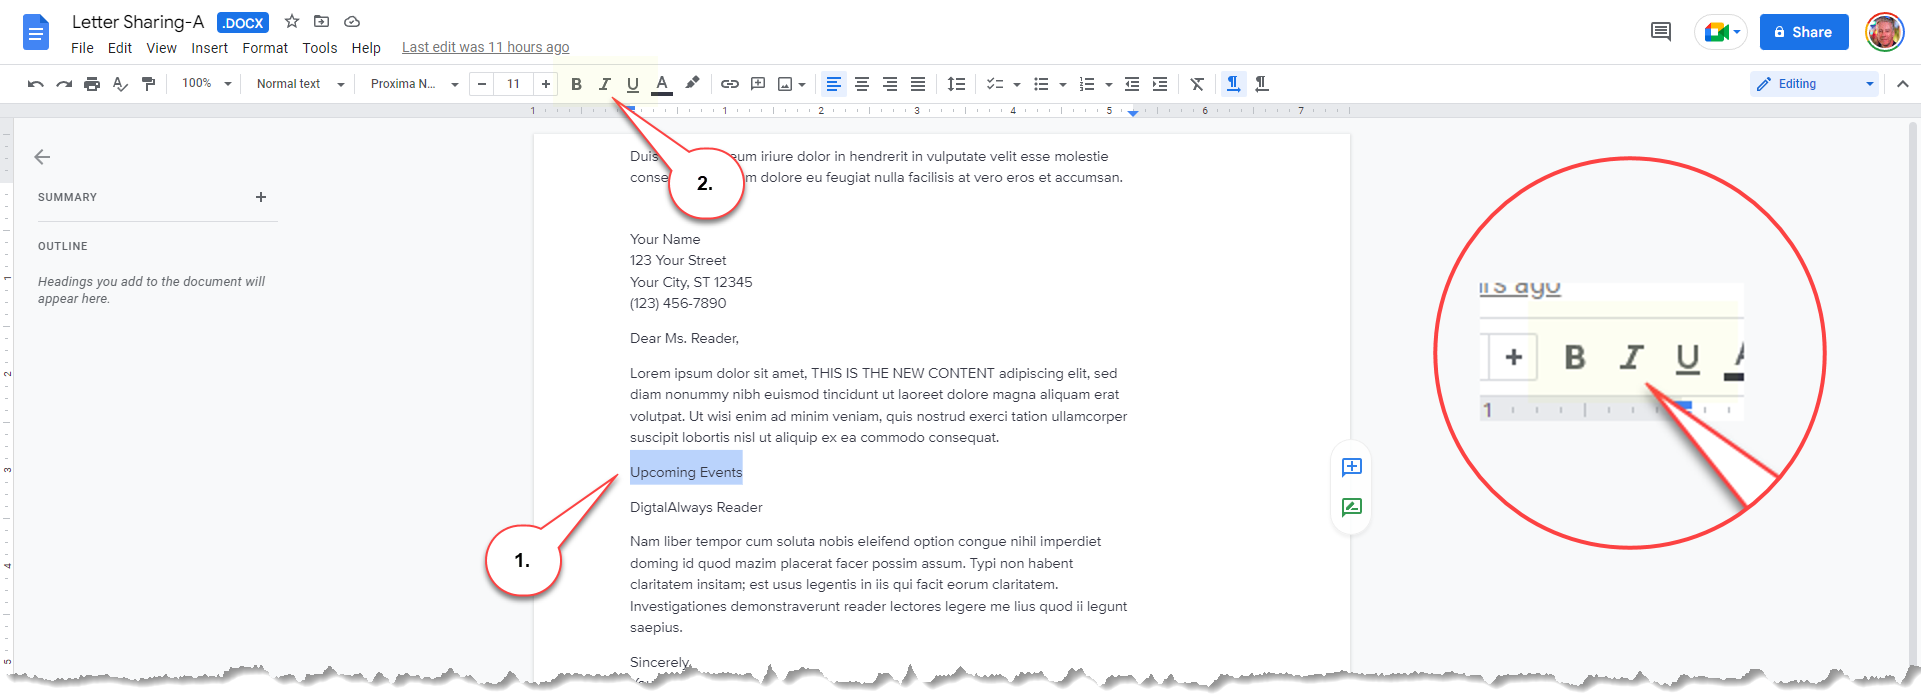
Select the text you want to format.- Click a formatting button.
Shortcuts:
- Bold: Ctrl + B
- Italicize: Ctrl + B
- Underline: Ctrl + U
Change the Text or Highlight Color
Changing the text color or highlight color allows you to draw attention to certain words or phrases, make them stand out from the rest of the text, add visual appeal, or comply with branding standards.
Changing the text color will change the color of the font itself, while highlighting text will add a colored background behind the text. Both options can be used to add emphasis to certain words or phrases or to make them easier to read.
You can use different colors to convey different meanings or to add visual interest to your document. For example, you might use red to indicate a warning or green to indicate that something is correct.

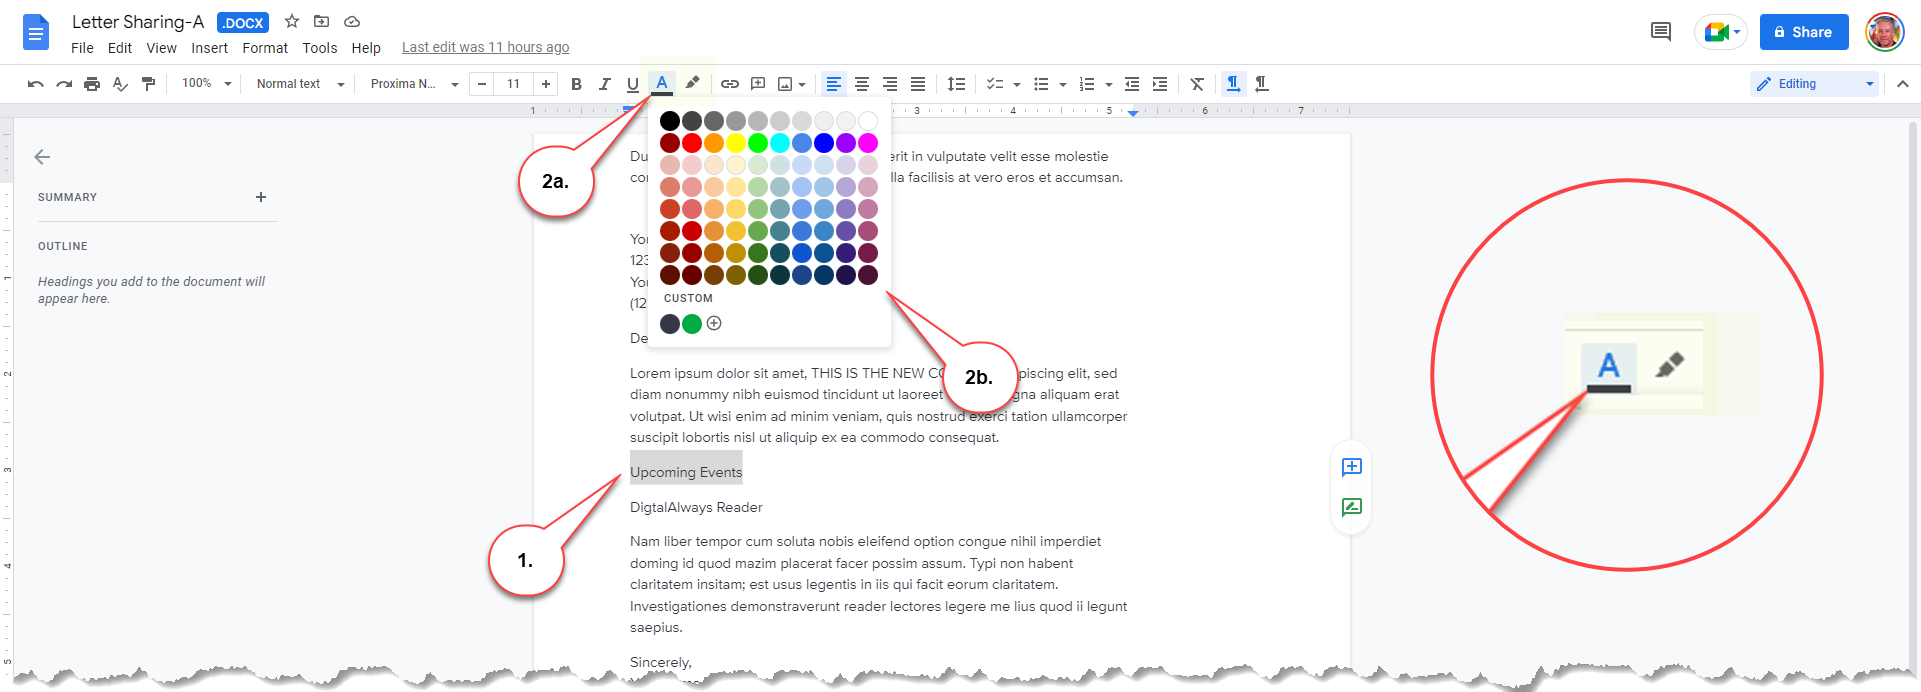
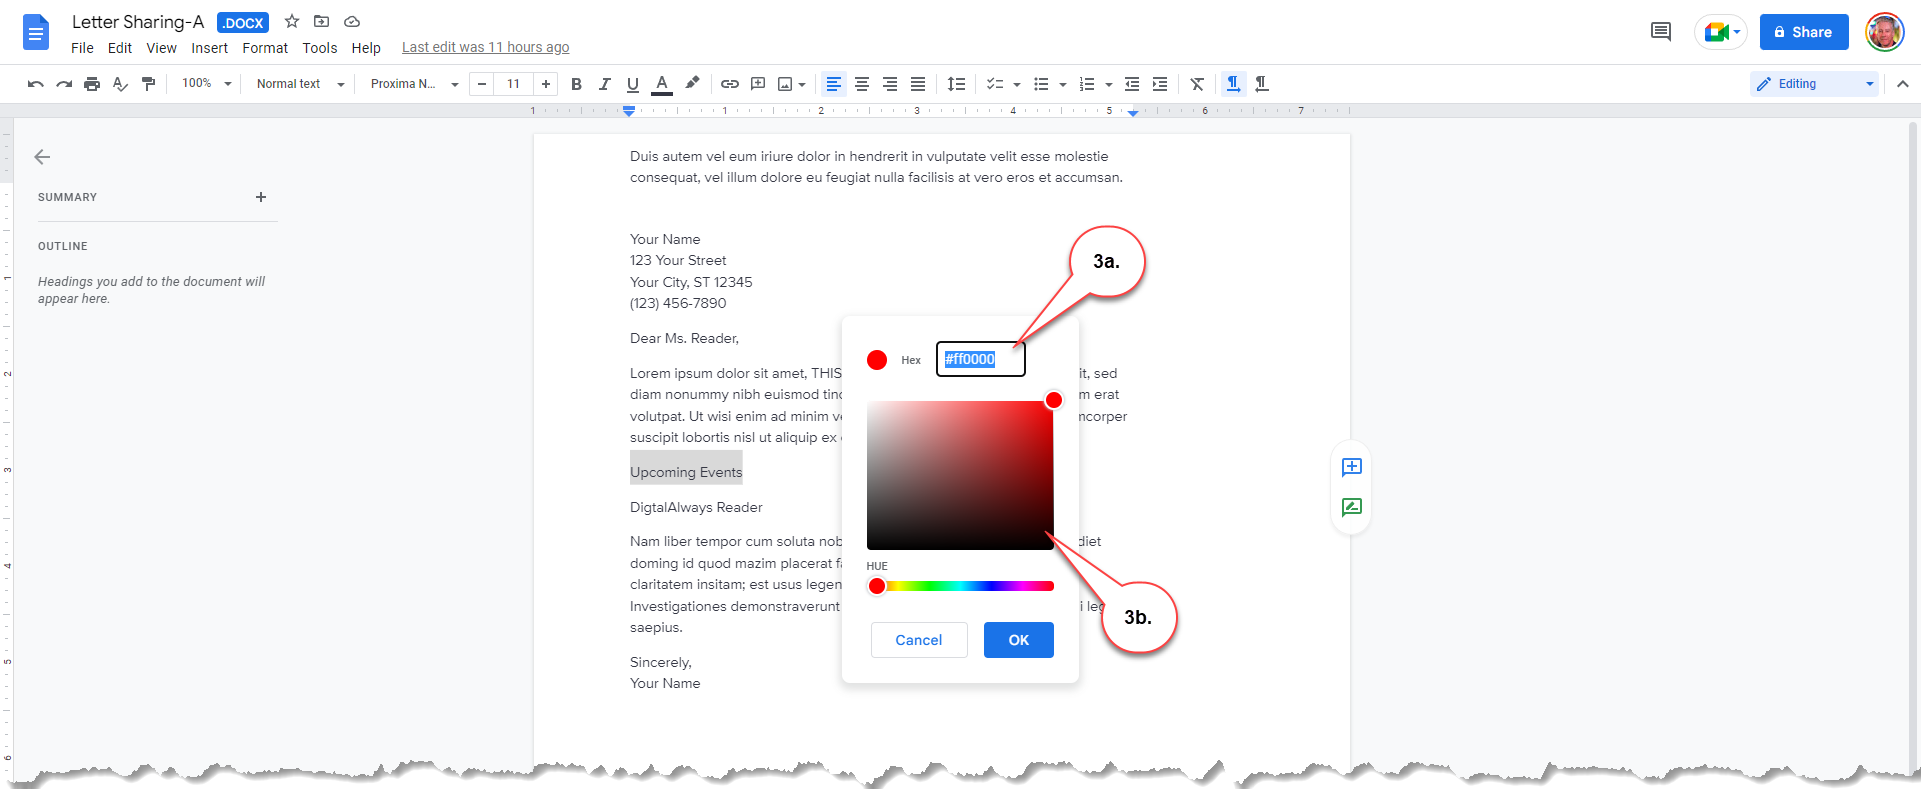
Select the text you want to format.- Click the Text color button (or Highlight color button) and select a color.
You can also add custom colors using HEX values in the Colors dialog box or use the paint palette and select a pixel with a mouse click.
Use Additional Formatting Options
There are additional formatting options that can only be accessed from the Format menu.
Select the text you want to format.- Click Format on the menu bar, select Text, then choose a formatting option.

In addition to bold, italic, and underline, you can apply strikethrough, superscript, or subscript formatting.
Change Font
Changing the font can be a useful way to add personality to your document or to make certain words or phrases stand out. Different fonts have different characteristics, such as size, weight, and style, and can convey different tones or atmospheres.
For example, you might use a formal, serif font for a business letter and a fun, decorative font for a party invitation. You can choose from a wide range of fonts in Google Docs, including classic serif fonts, modern sans-serif fonts, and more decorative options.
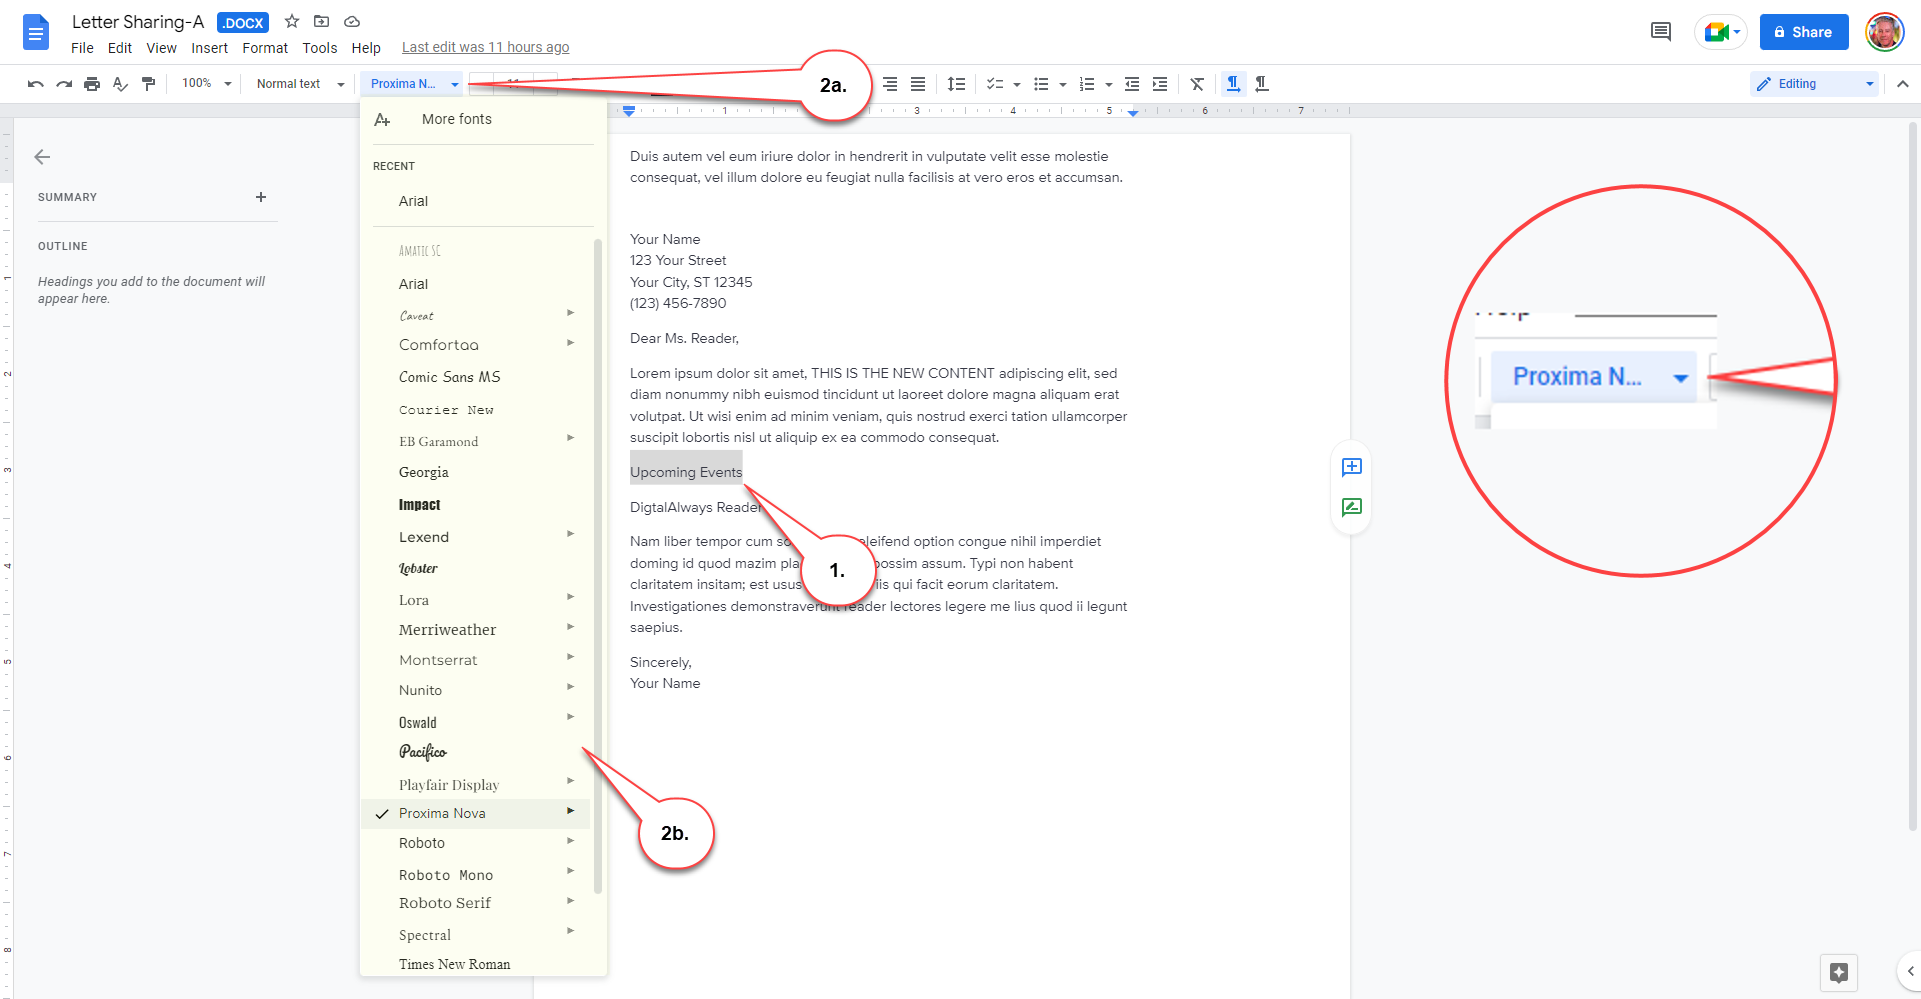
Select the text you want to format.- Click the Font list arrow for a drop-down of available fonts, then select a font family. The text is now set to the selected font.
When selecting a font family, be sure to choose one that is appropriate for the tone of your document. For instance, it is not advisable to use casual script fonts in a professional document. In addition, using too many fonts in one document can make it appear cluttered, unprofessional, and harder to read.
Basic Font Types
| Generic Font Family | Examples of Font Names |
| Serif | Times New Roman Georgia Garamond |
| Sans-serif | Arial Verdana Helvetica |
| Monospace | Courier New Lucida Console Monaco |
| Cursive | Brush Script MT Lucida Handwriting |
| Fantasy | Copperplate Papyrus |
Change Font Size
Changing the font size can be a useful way to add emphasis to certain words or phrases or to make your document more visually appealing.
Using different font sizes to differentiate between titles, headers, and body text is a common way to organize and structure a document. By using larger font sizes for titles and headers and smaller font sizes for the body text, you can make your document easier to read and navigate. For example, you might use a very large font size for the main title of your document, a slightly smaller font size for subheadings or section titles, and a standard font size for the body text. This helps to create a hierarchy of information and makes it clear to the reader what is most important.
You can also use font size to emphasize certain words or phrases within the body text. For instance, you might use a slightly larger font size for important terms or definitions.
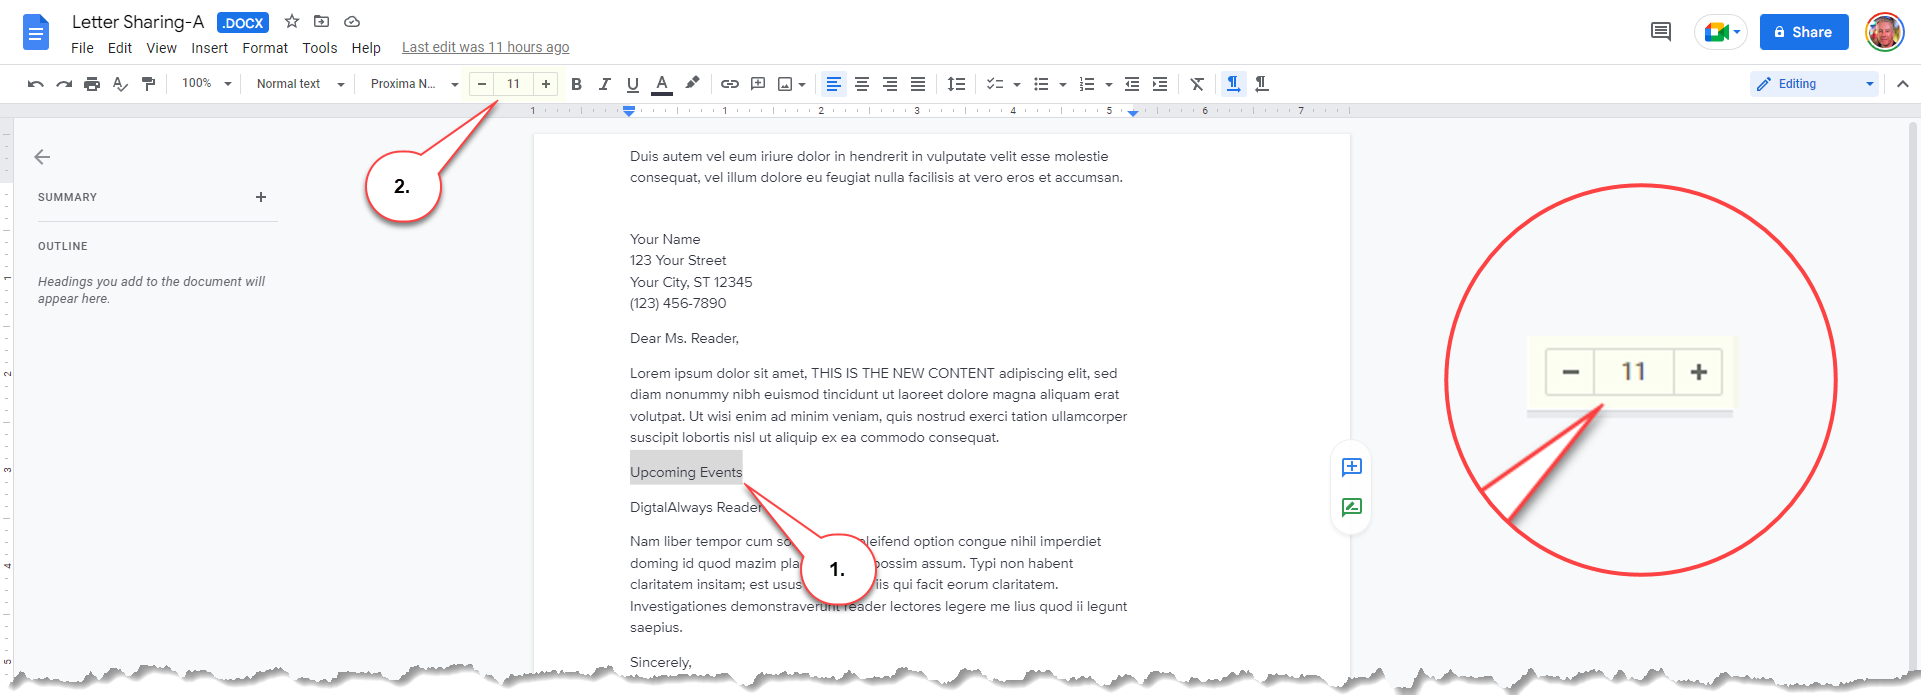
Select the text you want to format.- You can type in a new font size (or click on the – / + buttons, or click on the Font size list arrow to access the drop down menu).
Note: Fonts are typically measured in a point (pt) size, which is the vertical measurement of the lettering. There are approximately 72 (72.272) points in one inch (1/72th of an inch) or 2.54 cm. The larger the number of points, the larger the font.
How to Create Lists
Lists are a useful way to organize information in a document and make it easier to read and understand. They can be used in a variety of documents, such as reports, presentations, and articles. Lists help break up long blocks of text and make it easier for the reader to understand and remember the information.
Bulleted and Numbered Lists
There are two main types of lists: numbered lists and bullet point lists.
- A check list is a list of items in which each item is preceded by a check mark or open square symbol. This list type is useful when you want to present items in a non-specific order, but want to add a visual sense of actionable items or urgency in your items.
- A bullet point list is a list of items in which each item is preceded by a symbol, such as a dot, arrow, or a square. This list type is useful when you want to present items in a non-specific order or when you want to create a visual separation between items.
- A numbered list is a list of items in which each item is preceded by a number. This list type is useful when you want to present items in a specific order or when you want to emphasize the importance of each item.
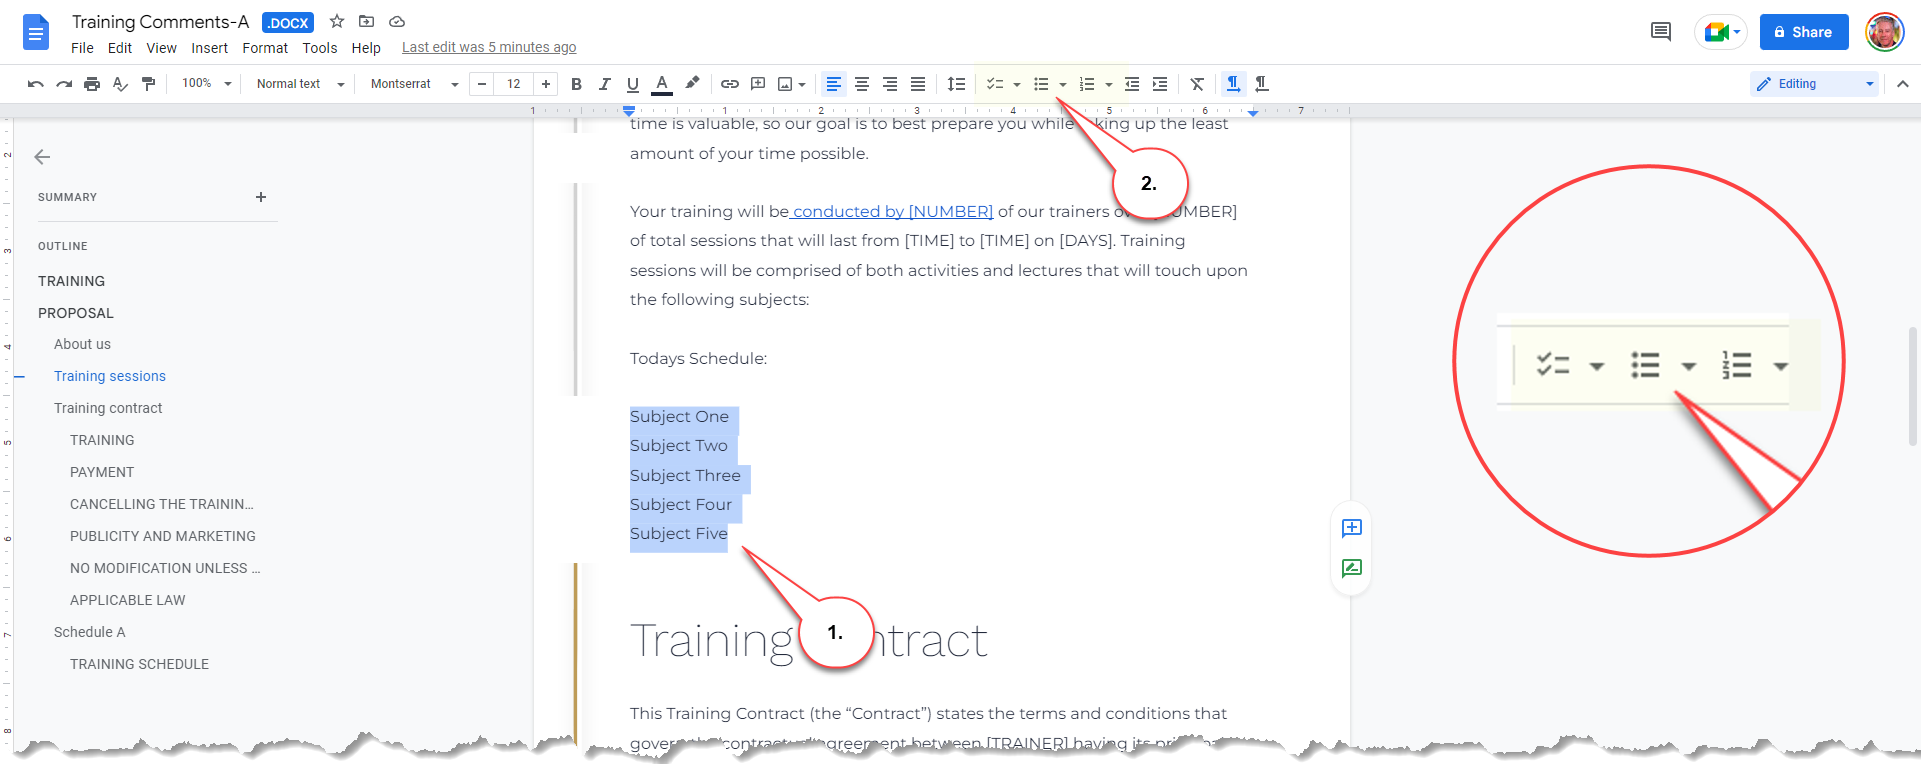
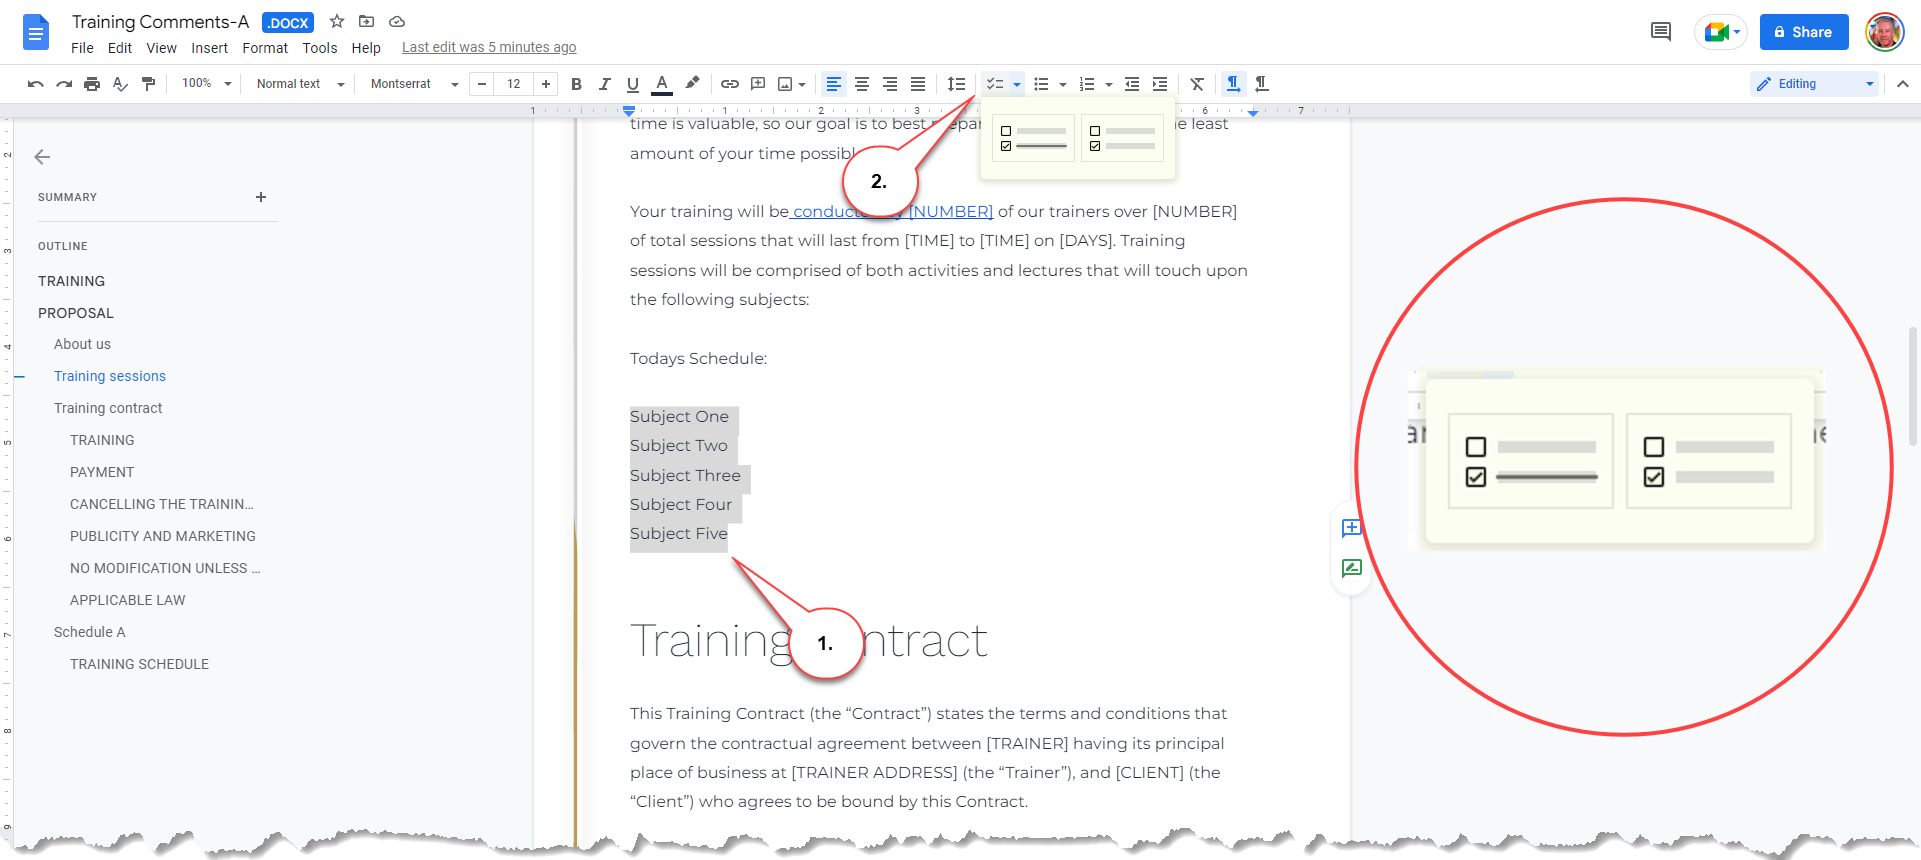
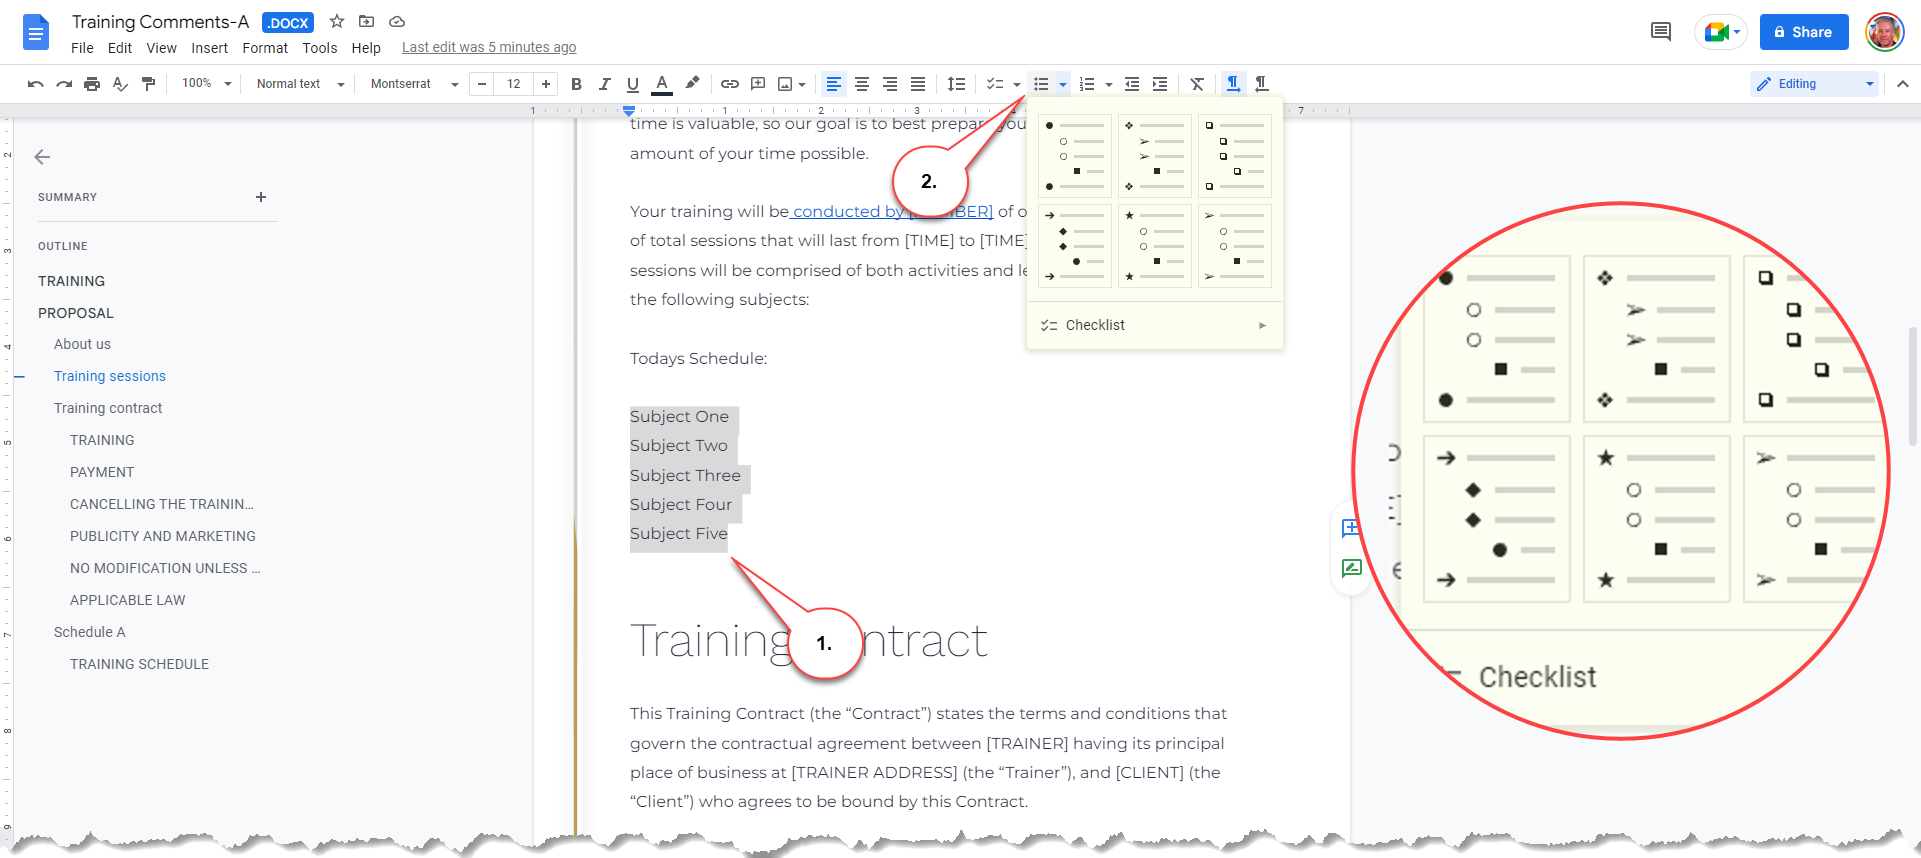
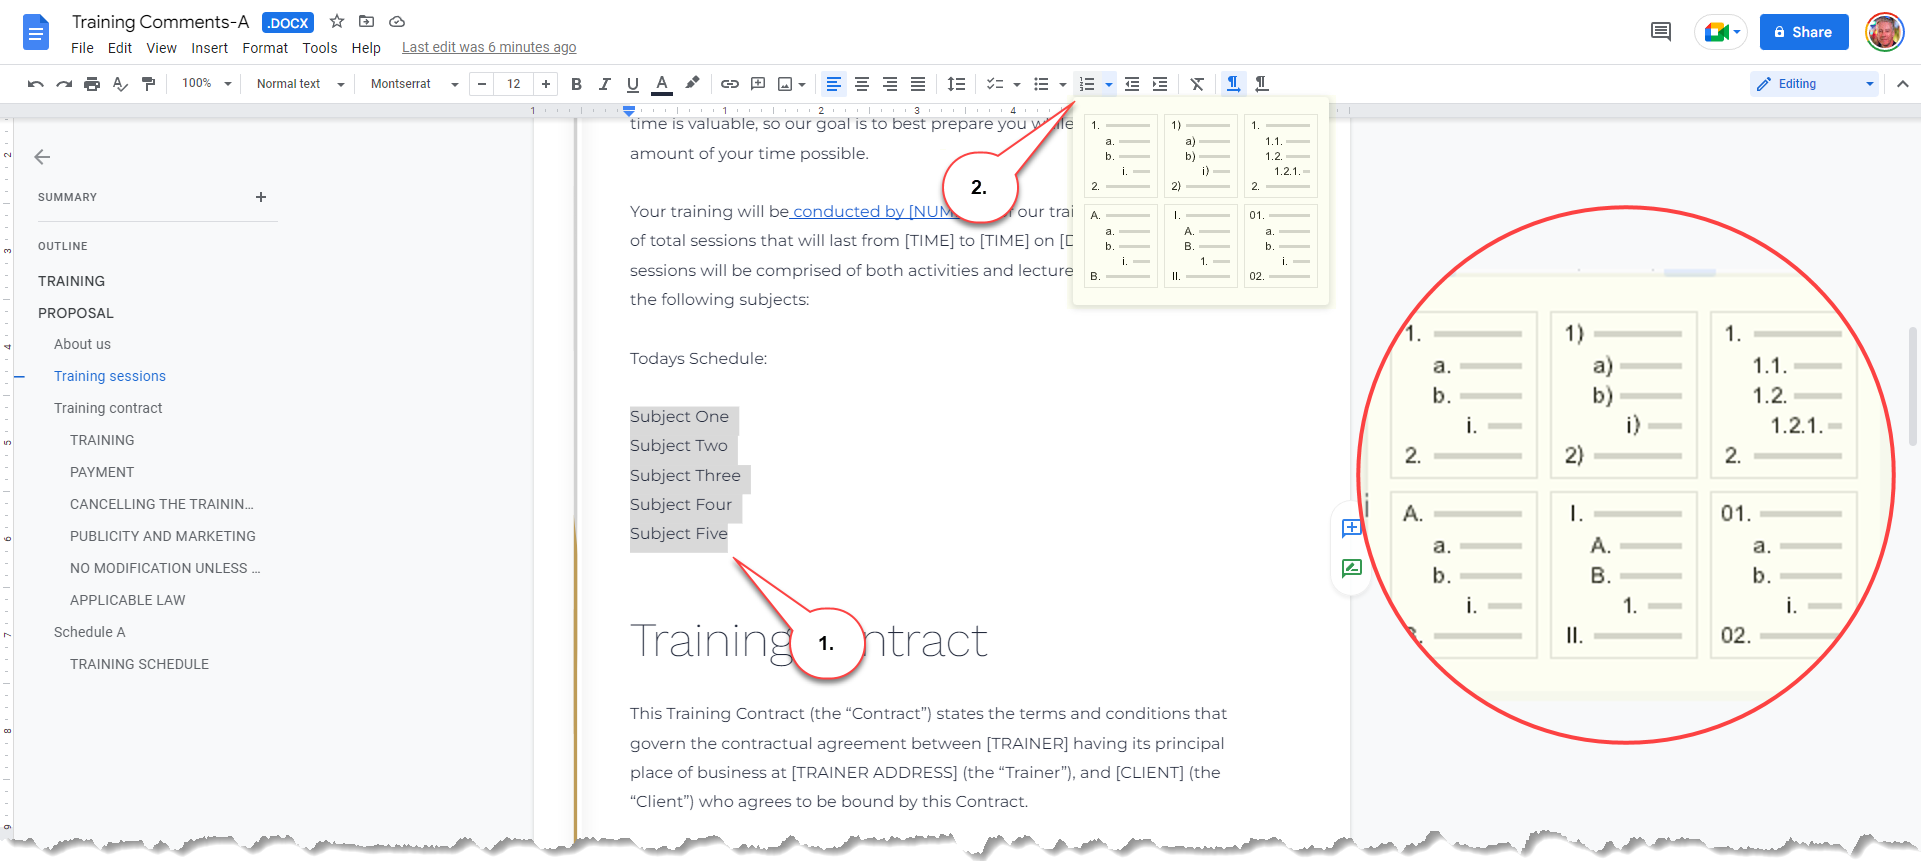
Select the text you want to make a list with.- Click one of the list type buttons: Check list, Bulleted list, or Numbered list.
Check list: Automatically insert checks or check boxes before each list item; best interactive materials.
Bulleted list: Automatically insert a shape before each list item; best when sequence doesn’t matter.
Numbered list: Automatically insert numbers before each list item; best for sequences.
Change List Style
Lists have default styles, but you can customize these styles by accessing the drop down menu and choosing of the other styles.
Check list styles
Bullet list styles
Numbered list styles
Change List Levels
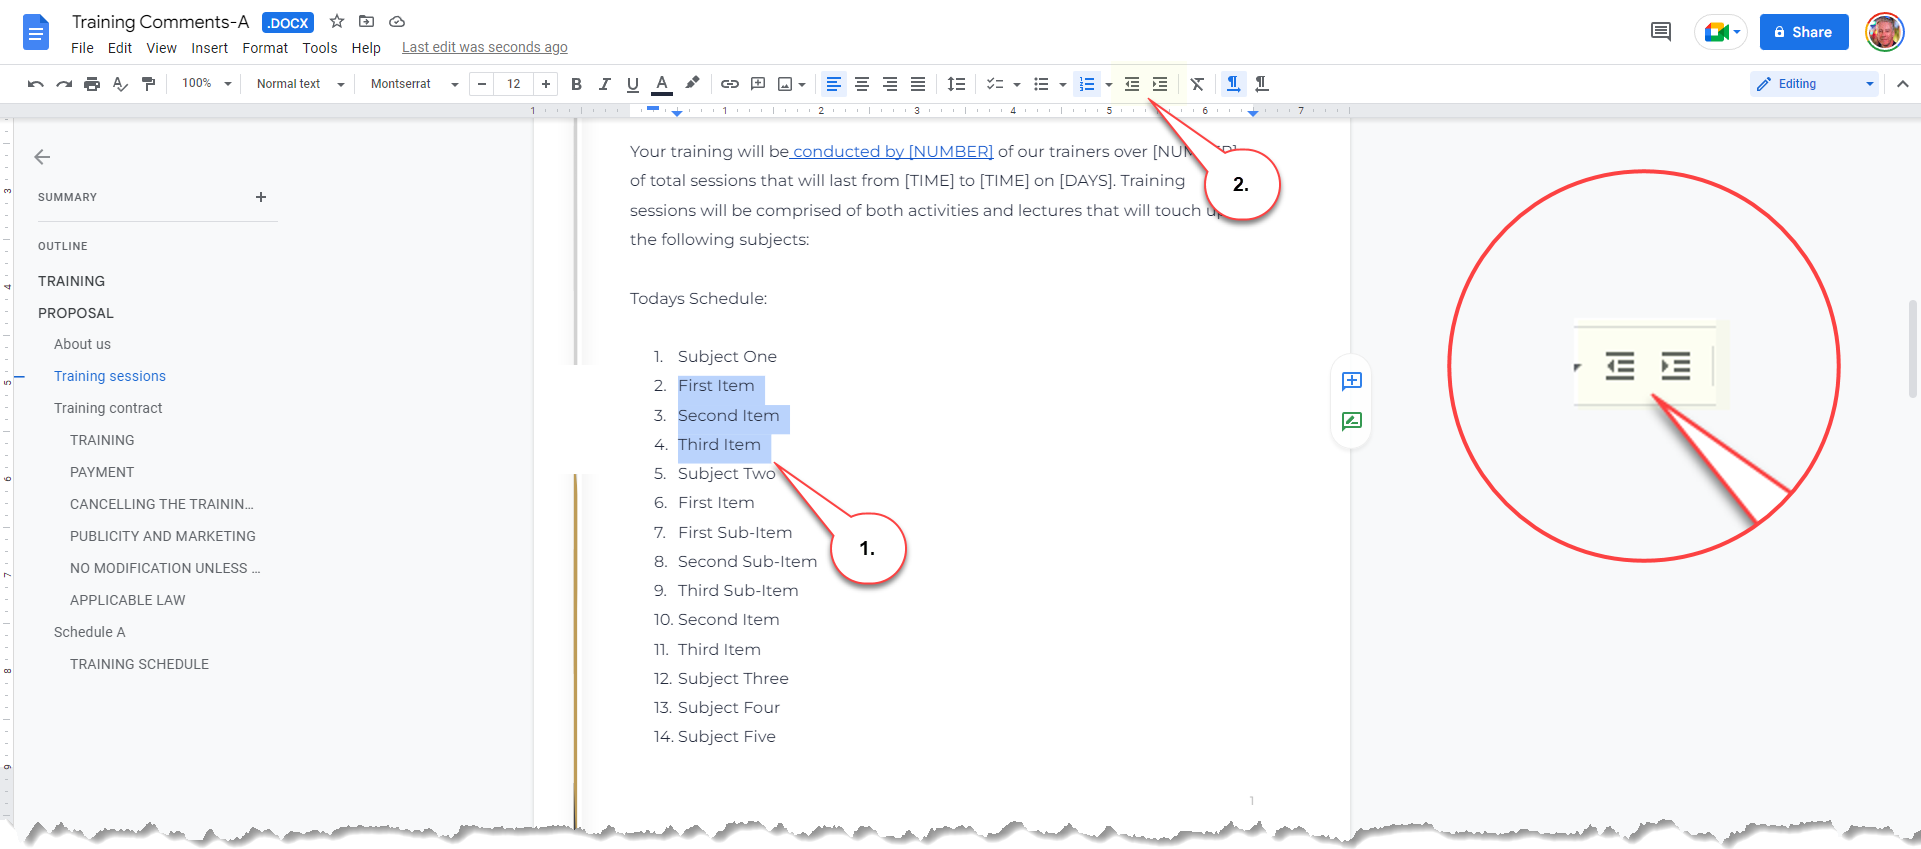
Lists can have multiple levels (indentations), which allows a specific list item to be grouped with the higher-level item. List level changes can be applied to a single item, multiple items, or the entire list.
Select the text you want to indent.- Click either the Increase indent or Decrease indent button.
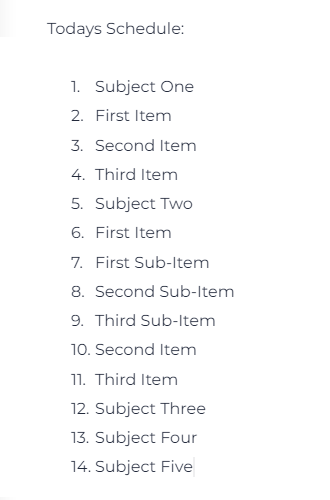
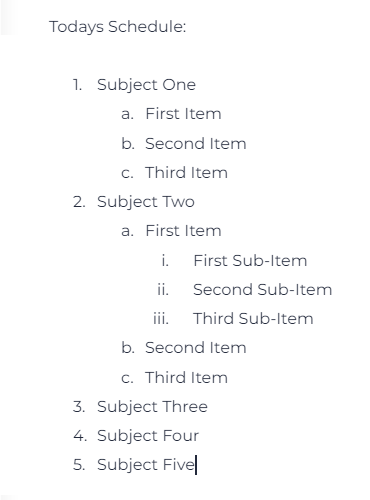
Example: Formatted List Comparison
| Numbered List | Numbered List with list levels |
 |
 |
How to Align and Indent Paragraphs
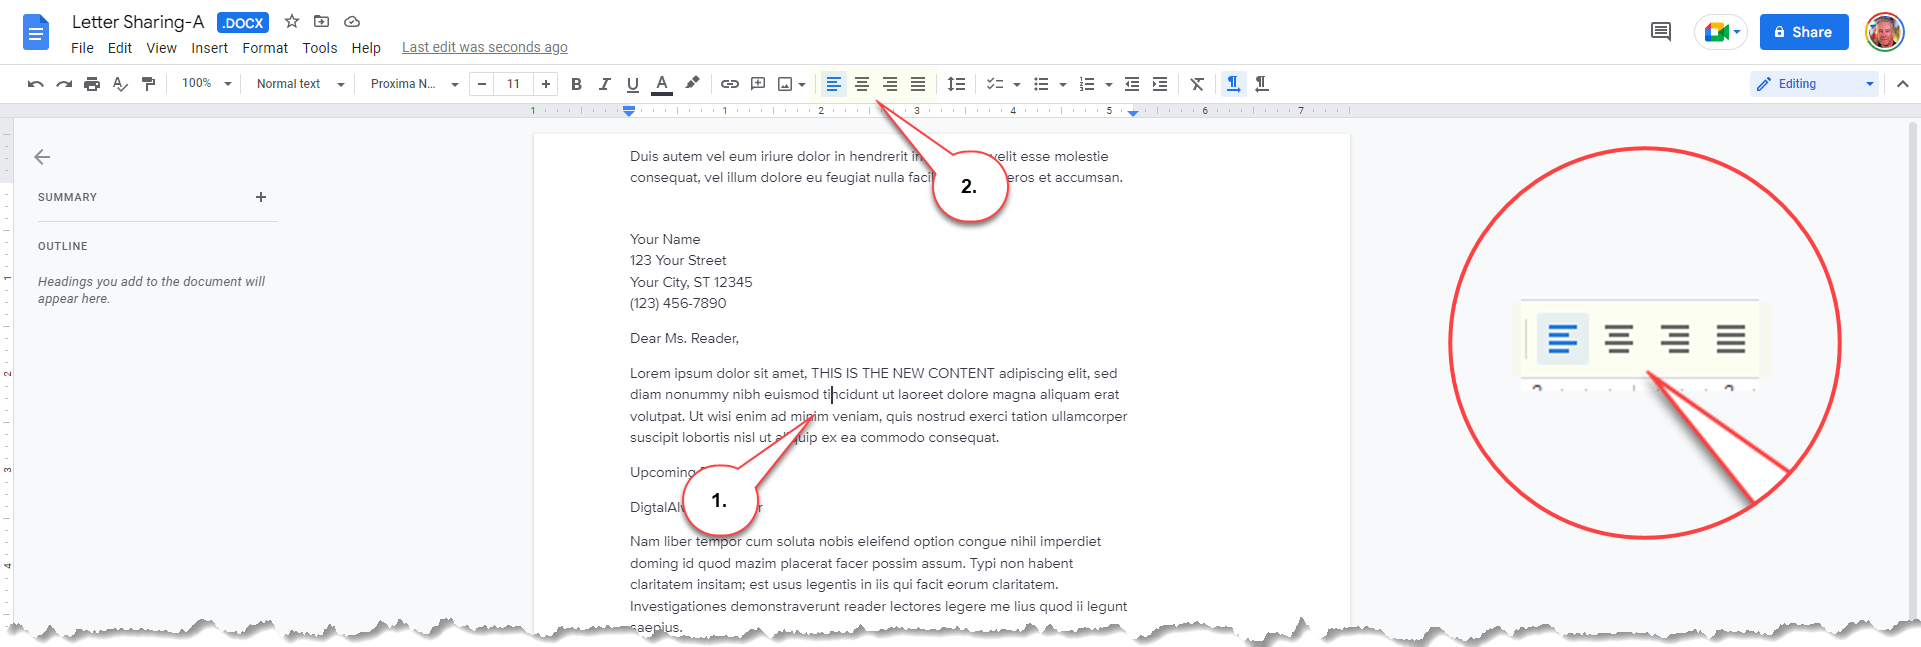
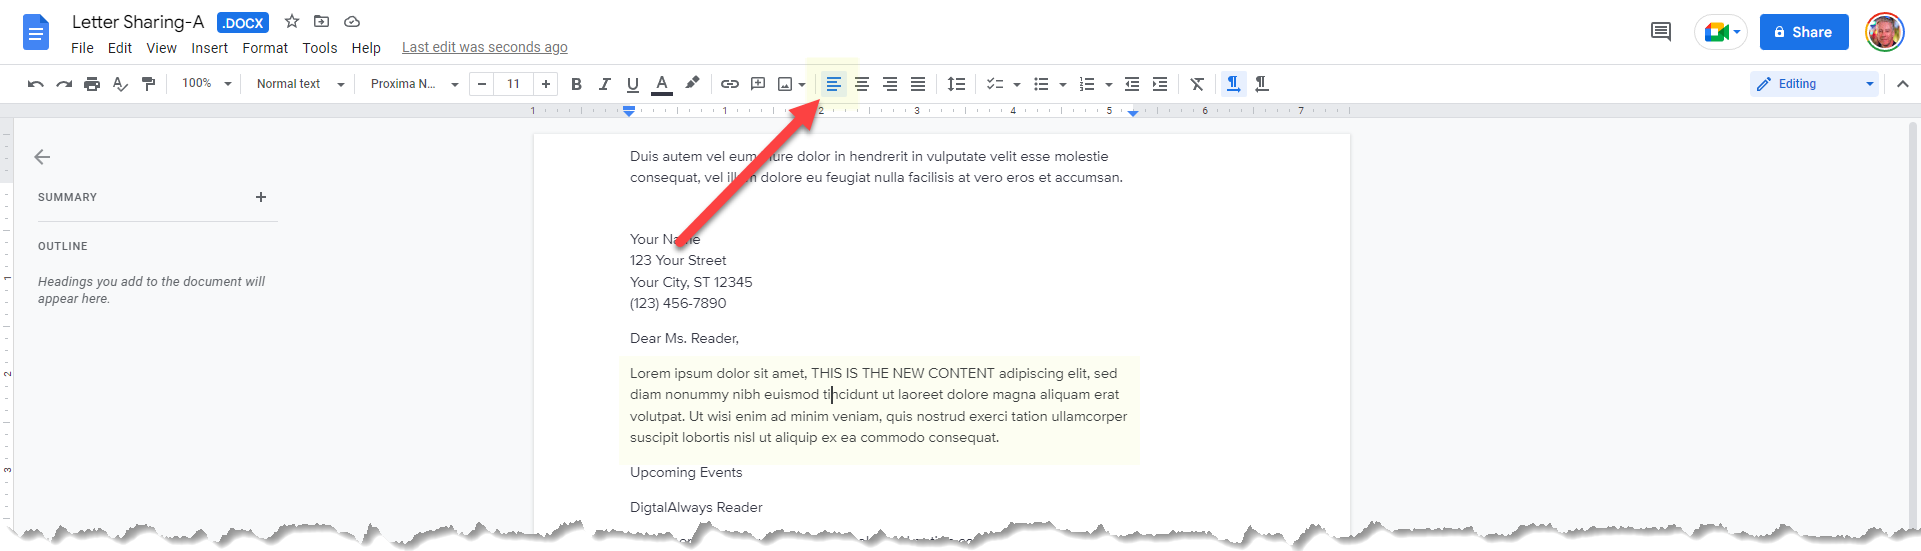
By default, text is aligned to the left margin. This can easily changed using the alignment options.
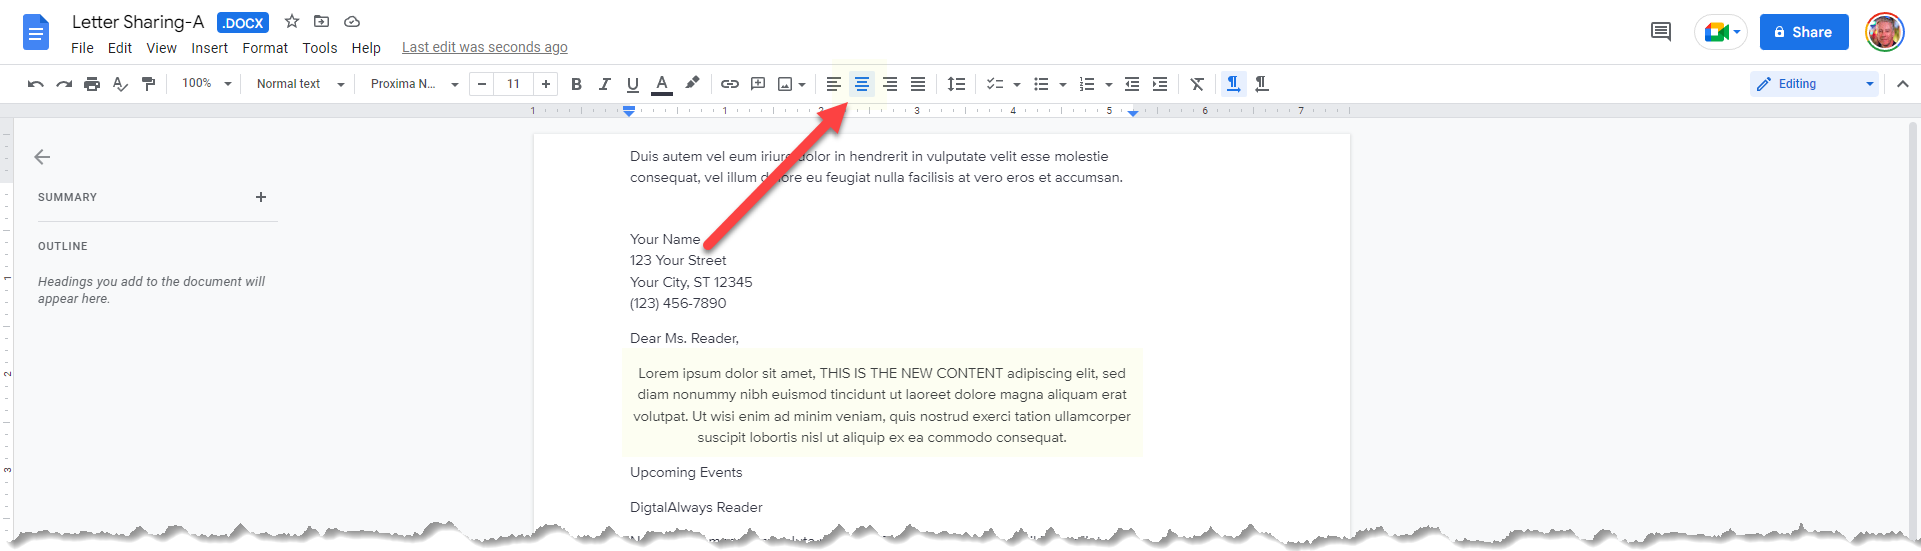
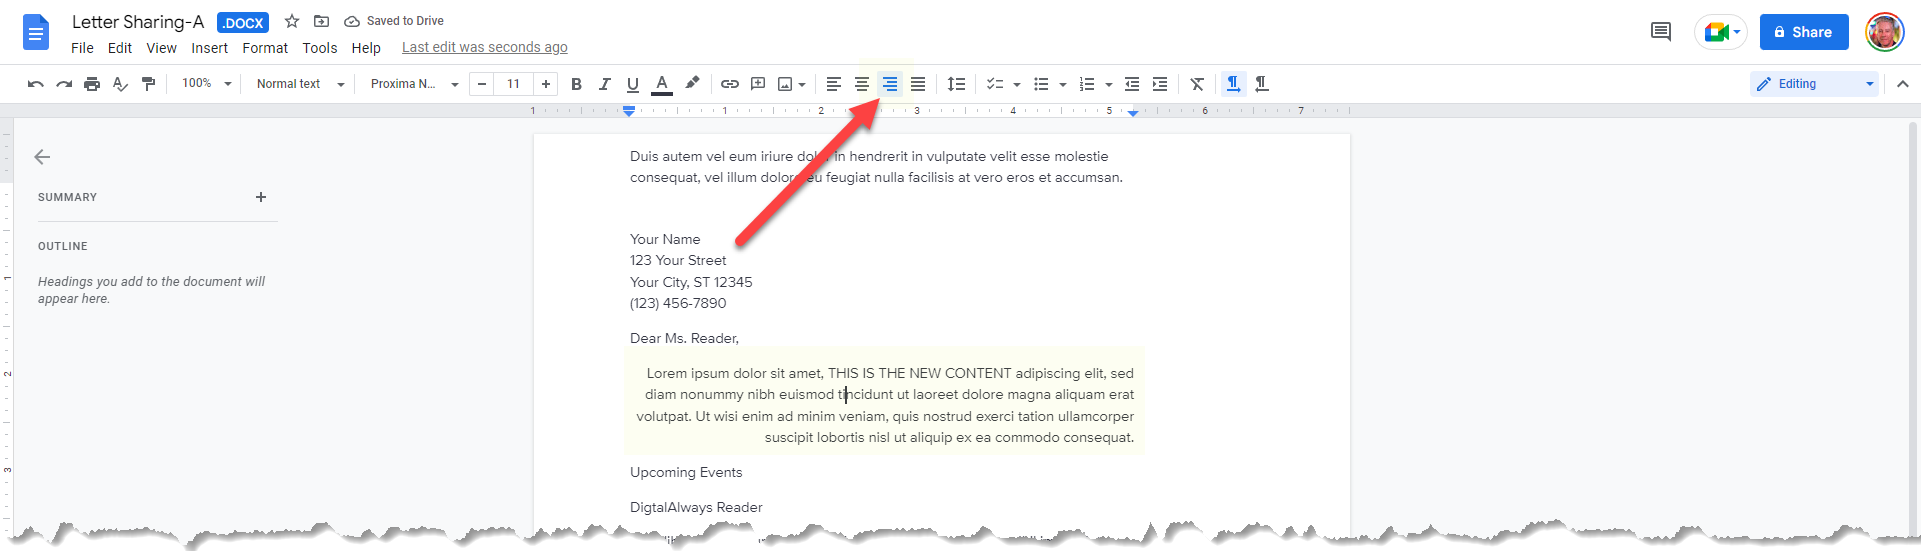
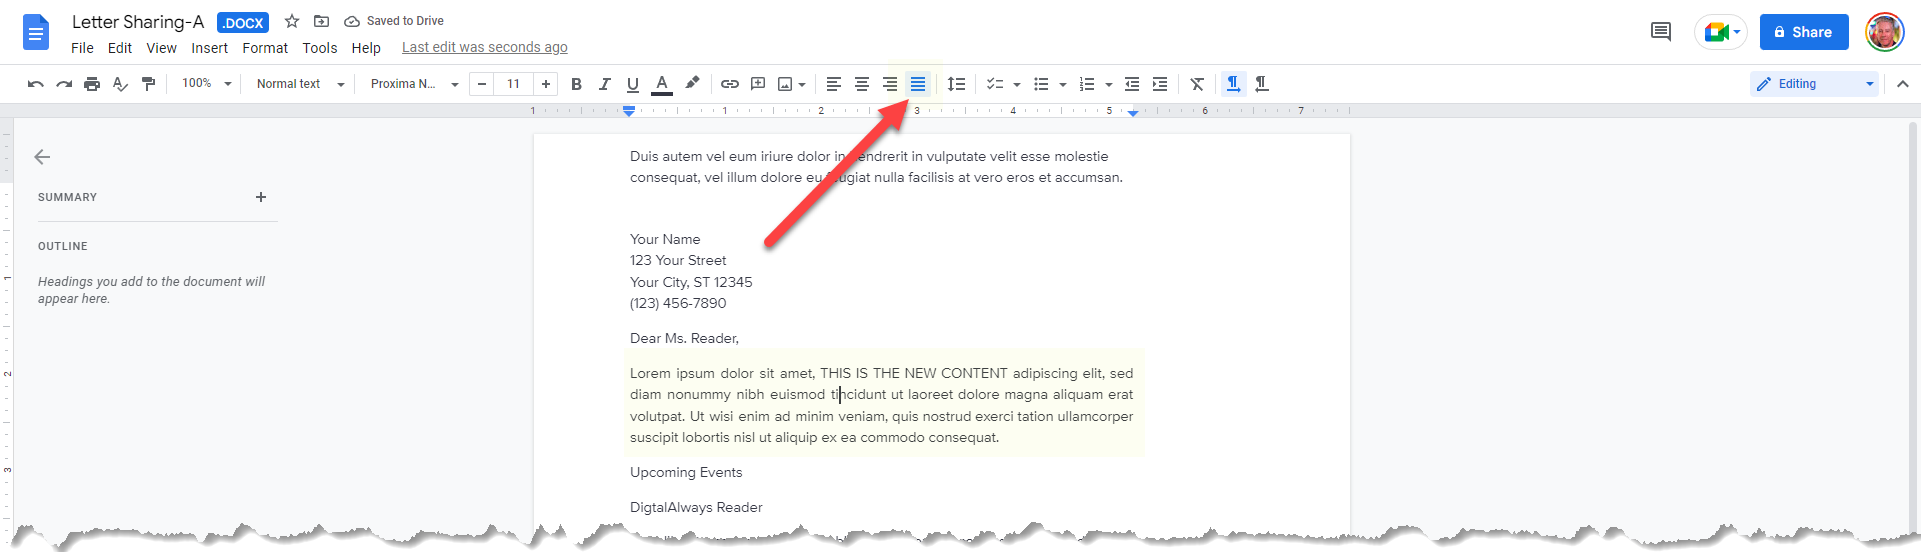
Align a Paragraph
Click anywhere in the paragraph you want to align.- Select an alignment option.
Shortcuts:
- Align left: press Ctrl + Shift + L
- Align right: press Ctrl + Shift + R
- Center: press Ctrl + Shift + E
- Justify: press Ctrl + Shift + J
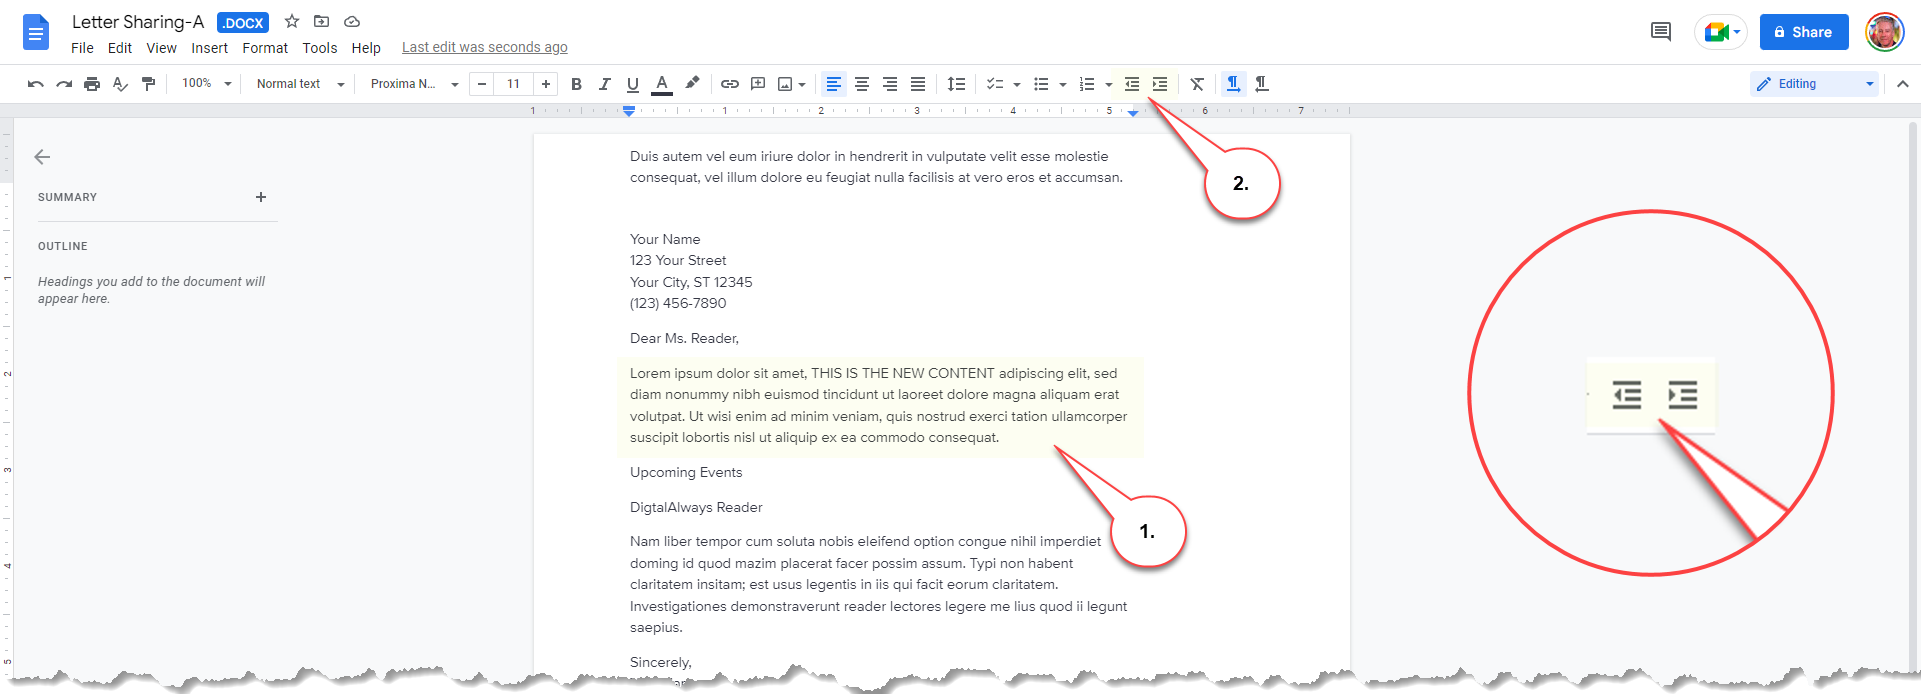
Indent Text
Indenting text is a way to organize and structure a document, creating visual hierarchy and setting certain text apart. Indenting text is commonly used for lists, quotes, and paragraphs that are part of a larger section, helping to visually separate different types of information and make the document easier to understand and navigate.
Method 1
Click anywhere in the paragraph you want to indent.- Select either the Increase indent or Decrease indent button.The paragraph will move over by half an inch each time you click Increase (or Decrease).
Method 2 – Manual Adjustment
Click anywhere in the paragraph you want to indent.- Click on the Left Indent Arrow, hold mouse button, and drag the arrow to adjust the indent. The paragraph is indented to the spot you choose.

How to Change Line and Paragraph Spacing
Adjusting the space between lines and paragraphs can help to make your document more visually appealing and easier to read. It can also help to give your document a sense of structure and organization.
Change Line Spacing
Click anywhere in the paragraph you want to adjust.- Click the Line spacing button, and select a spacing option. Additional space is added between the lines in the paragraph.
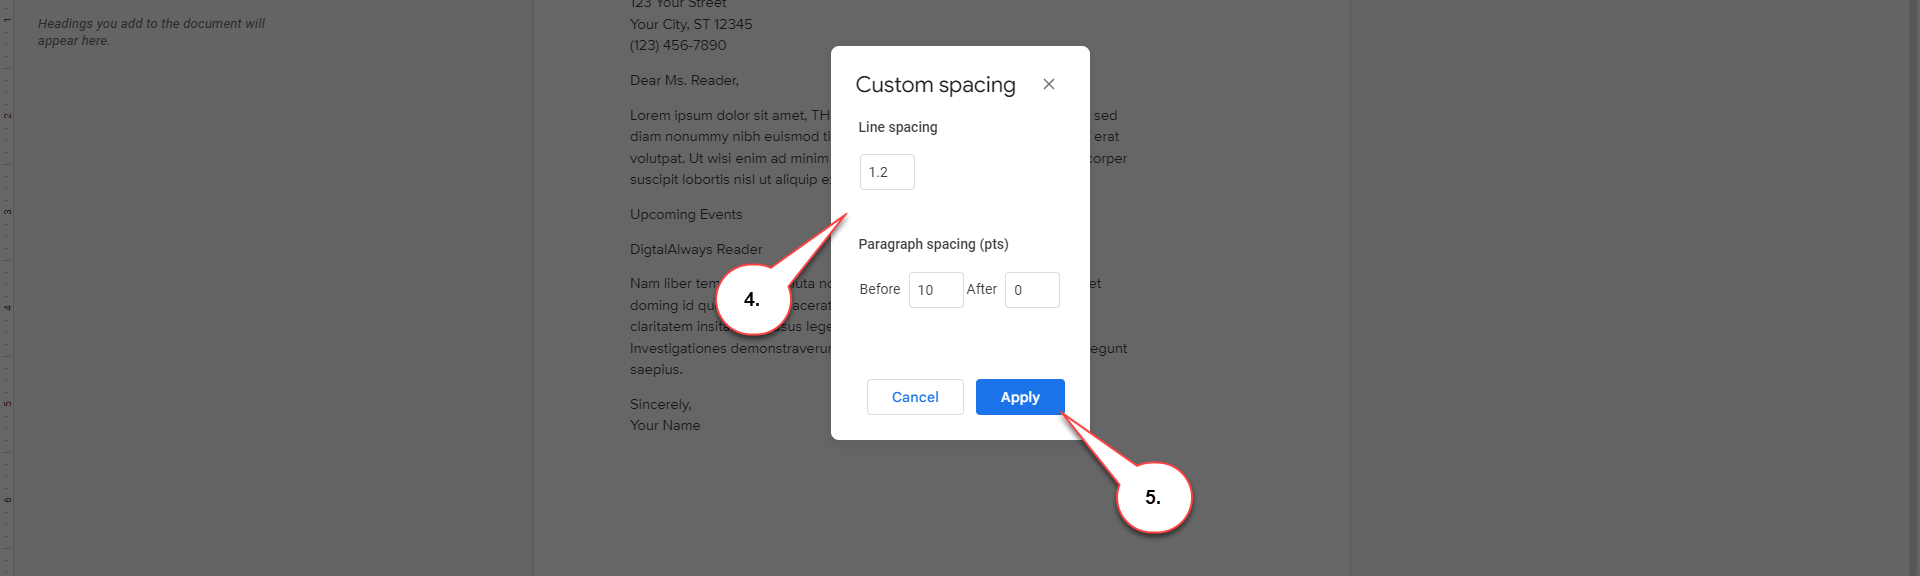
- For more spacing options, select Custom spacing to open the Spacing dialog box.
Enter line spacing and/or paragraph spacing adjustments in the dialog box.- Click Apply to finish.

Change Paragraph Spacing
To add space above and below a paragraph, use the paragraph spacing options instead of the line spacing options.
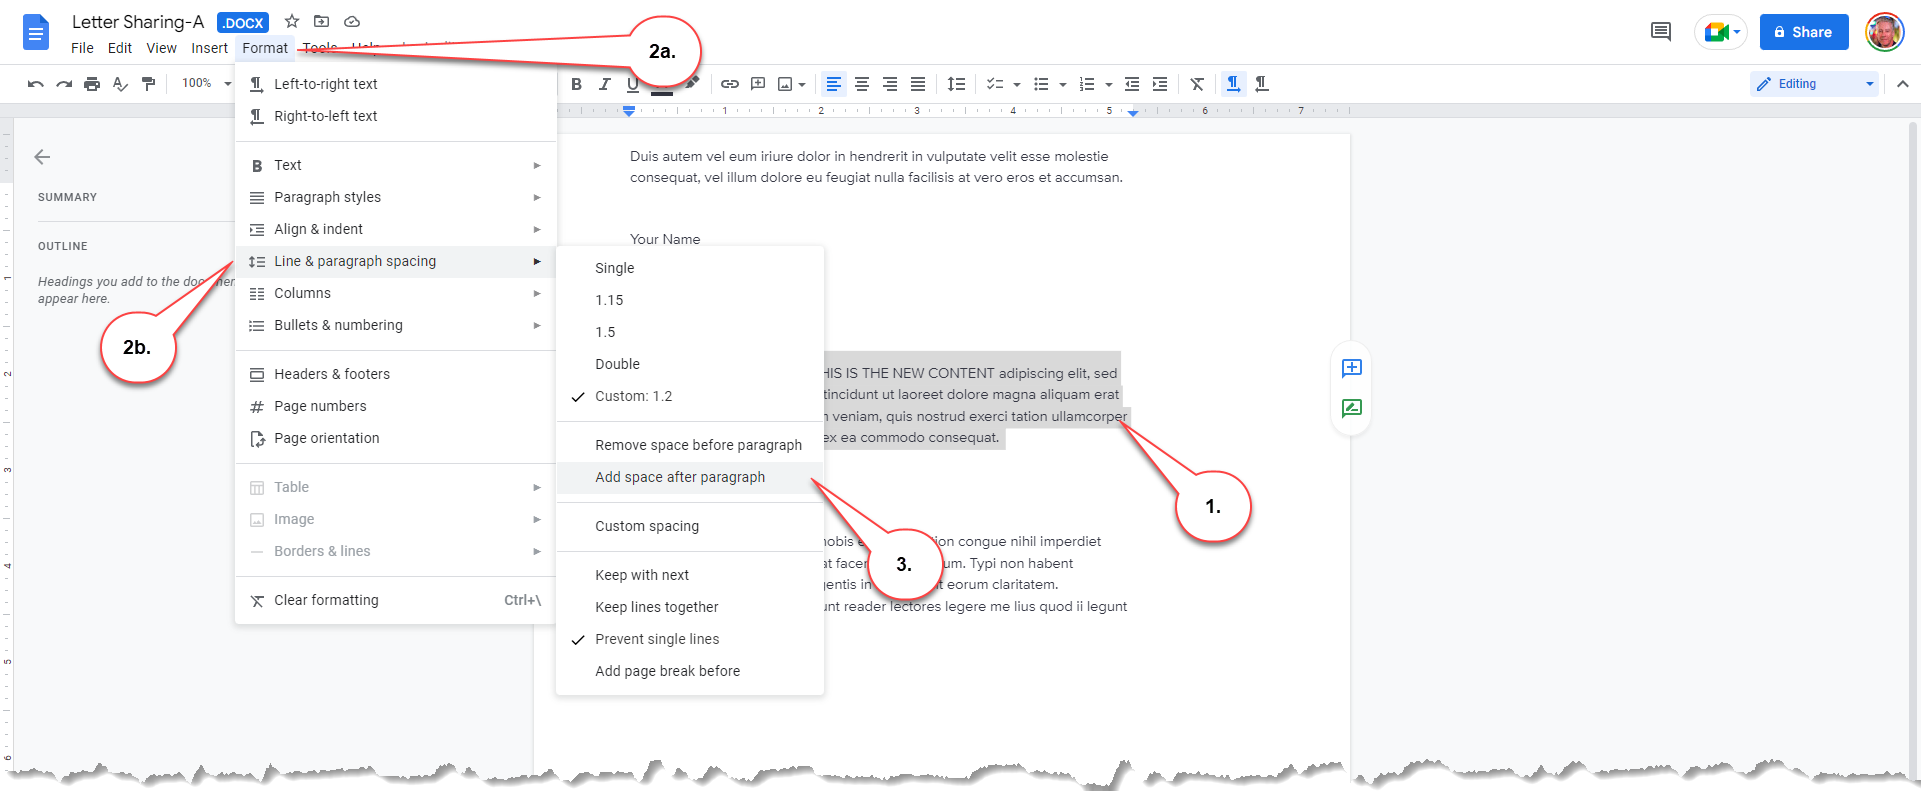
Select the paragraph you want to adjust.- Click Format on the menu bar, then select Line & paragraph spacing.
- Choose Add space after paragraph (Remove space before paragraph and Remove space after paragraph will appear in the drop down after space has been added).
How to Apply Paragraph Styles
Using paragraph styles can save you time and help you to maintain consistency in your document. Instead of manually formatting each paragraph, you can apply a style to a group of paragraphs and the formatting will be applied automatically. Styles can overwrite font options, such as font type, size, and color, as well as paragraph options, such as alignment, indentation, and spacing.
Use Paragraph Styles
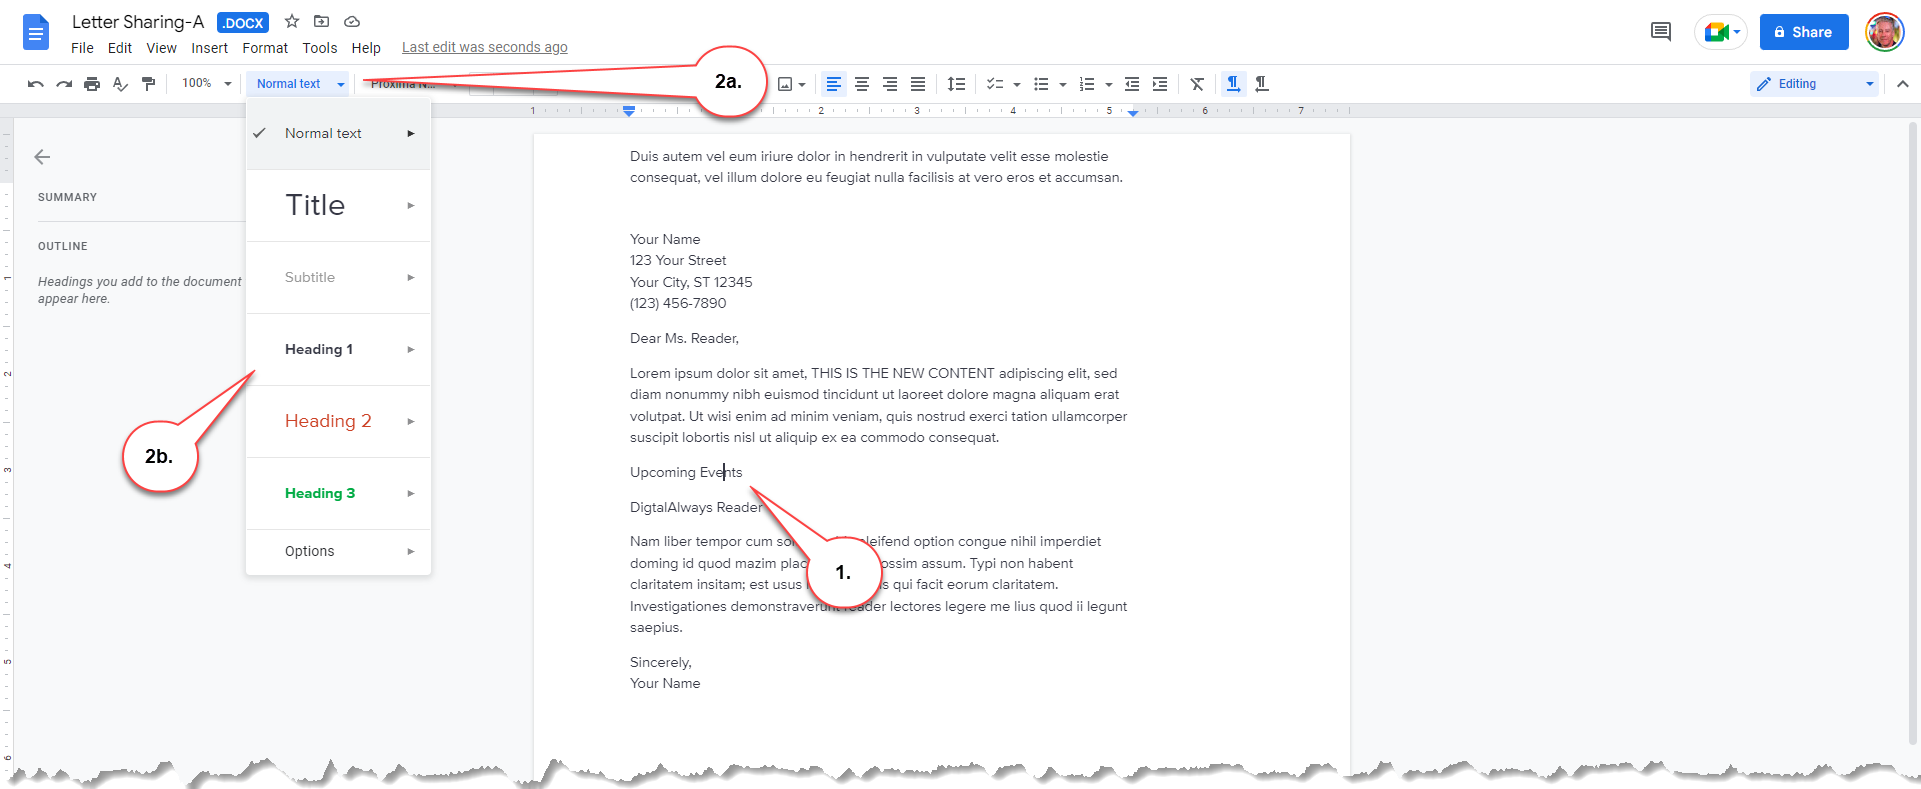
Google Docs comes with a set of predefined paragraph styles, such as “Heading 1”, “Heading 2”, “Normal text”, etc. These styles can be used to create a structured document, with headings and subheadings, making it easy to understand the organization of the document. These styles also trigger the documents “outline” features.
Select the text you want to style.- Click the Styles list arrow and select a Style.
Update Paragraph Styles
You can also create your own custom paragraph styles, which can be saved and reused throughout the document. This can be useful when you want to apply a specific formatting to a certain type of text, like quotes or captions
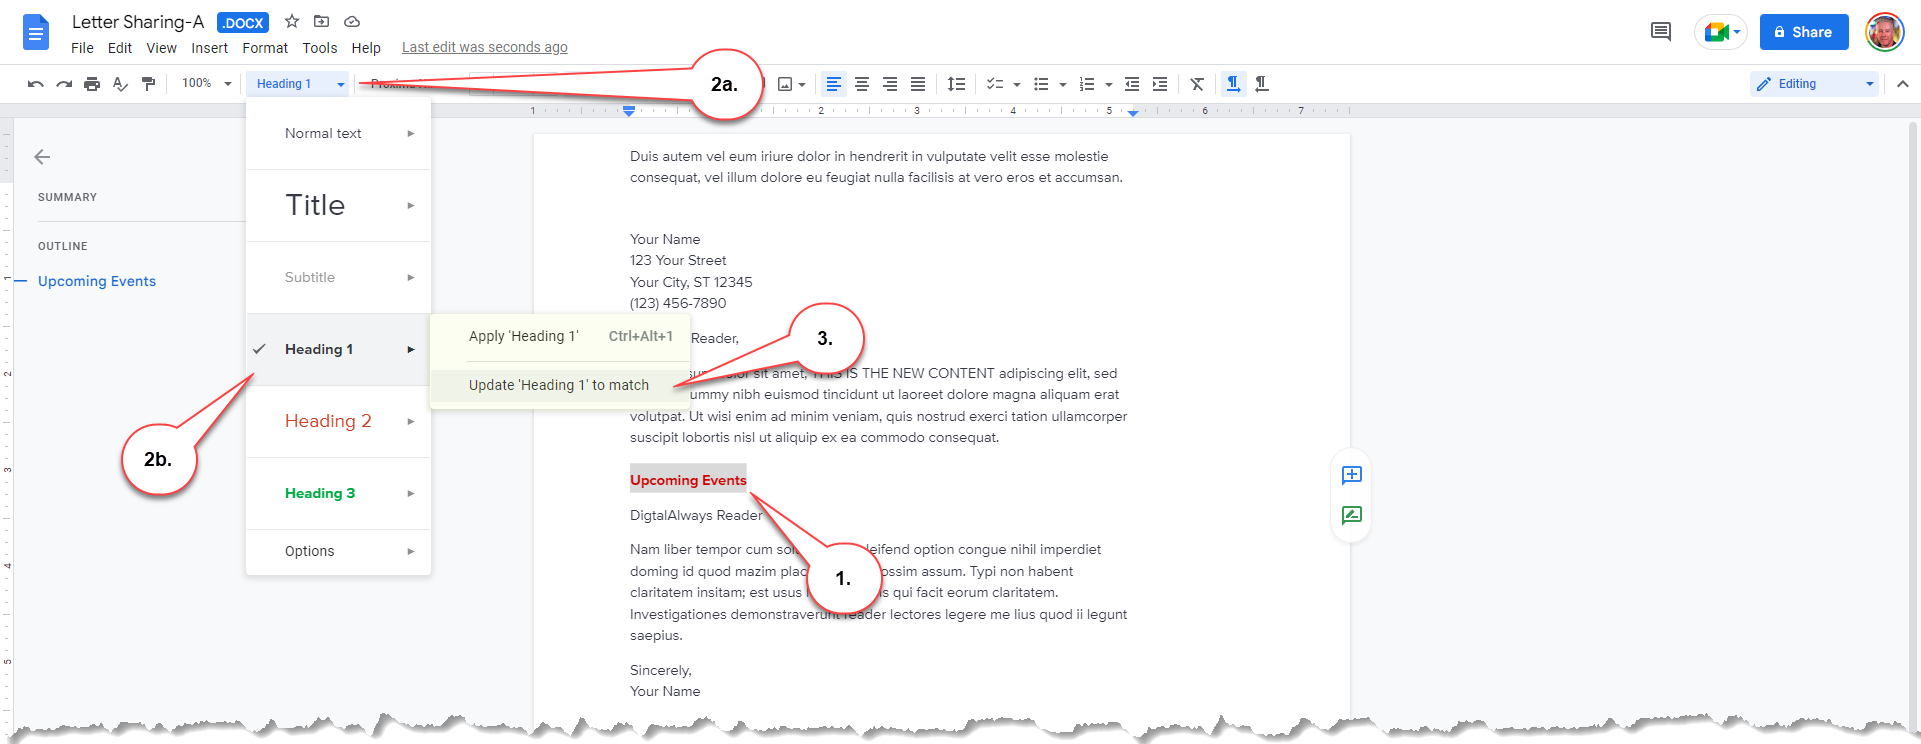
Apply formatting to text that you want to use for the style.- Click the Styles list arrow, the select the menu arrow for the style you want to update.
- Select Update [style element] to match. All of the text elements that match that style are updated with the new formatting.
Reset Paragraph Styles
If you decide that you don’t like custom styles, you can reset the document back to the default settings.
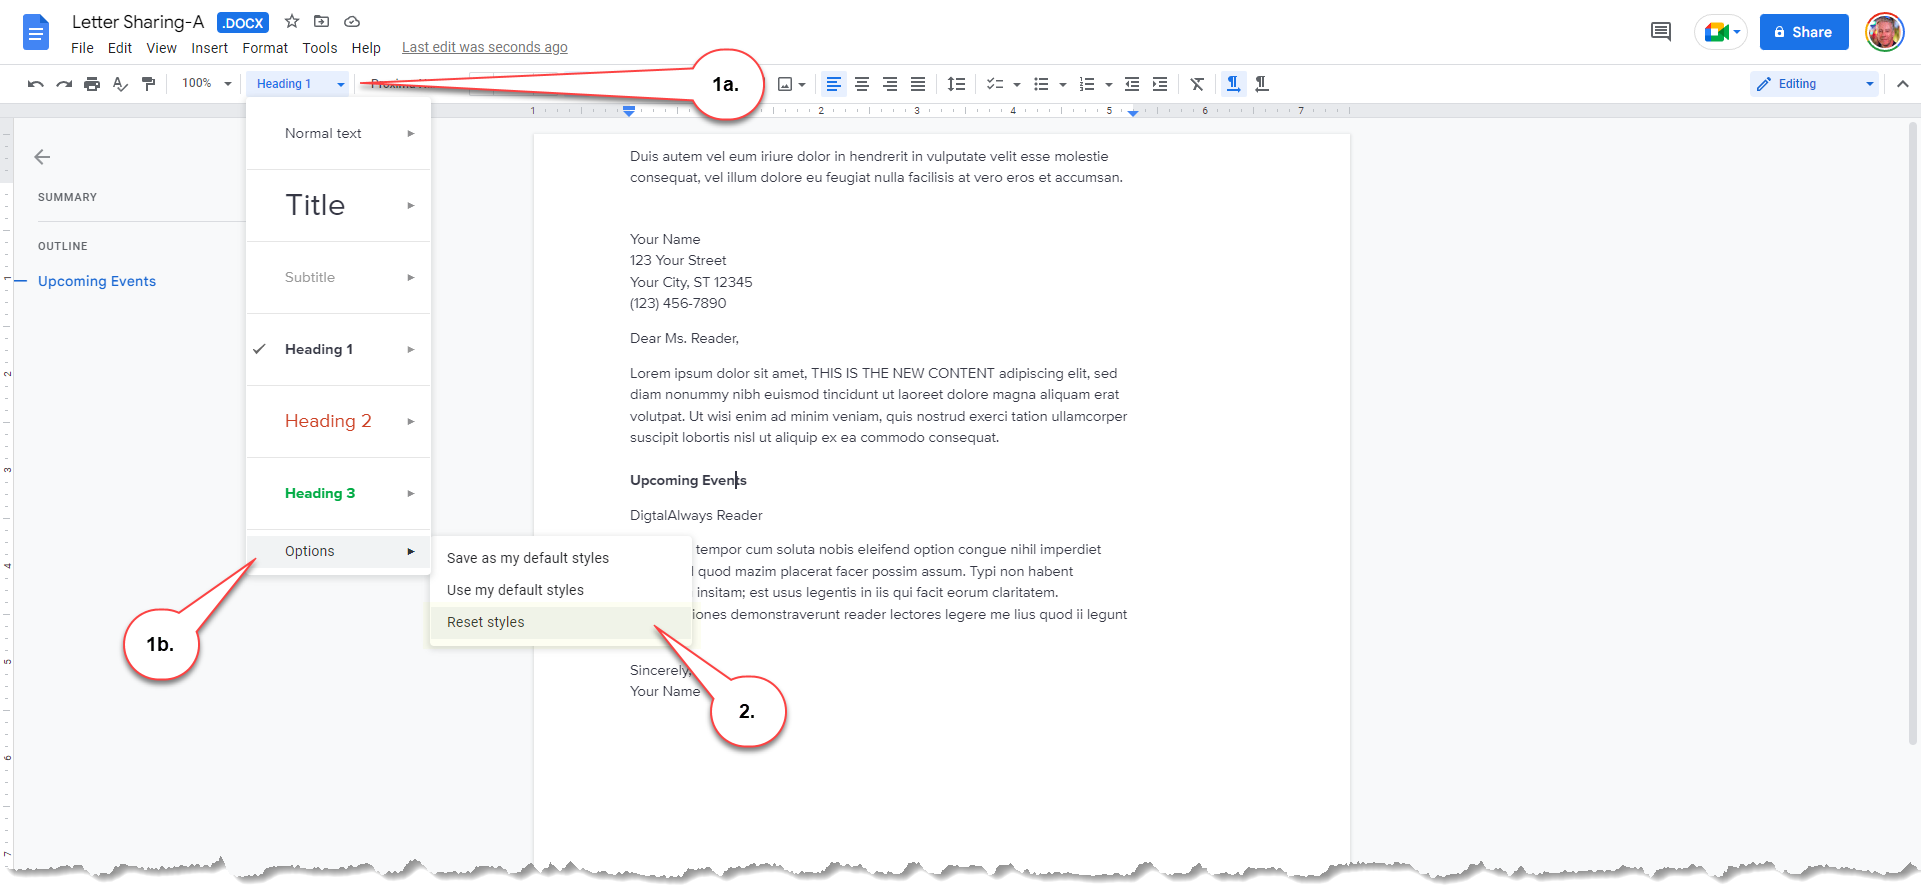
Click the Styles list arrow, then select Options.
3. Select Reset styles. All of the styles in the document are reset to the default formatting.
How to Copy and Clear Formatting
To save time formatting your document, you can use the Format Painter to copy the character and paragraph formatting of selected text and apply it to other parts of the document. This way, you can quickly apply the same formatting to other text elements throughout the document.
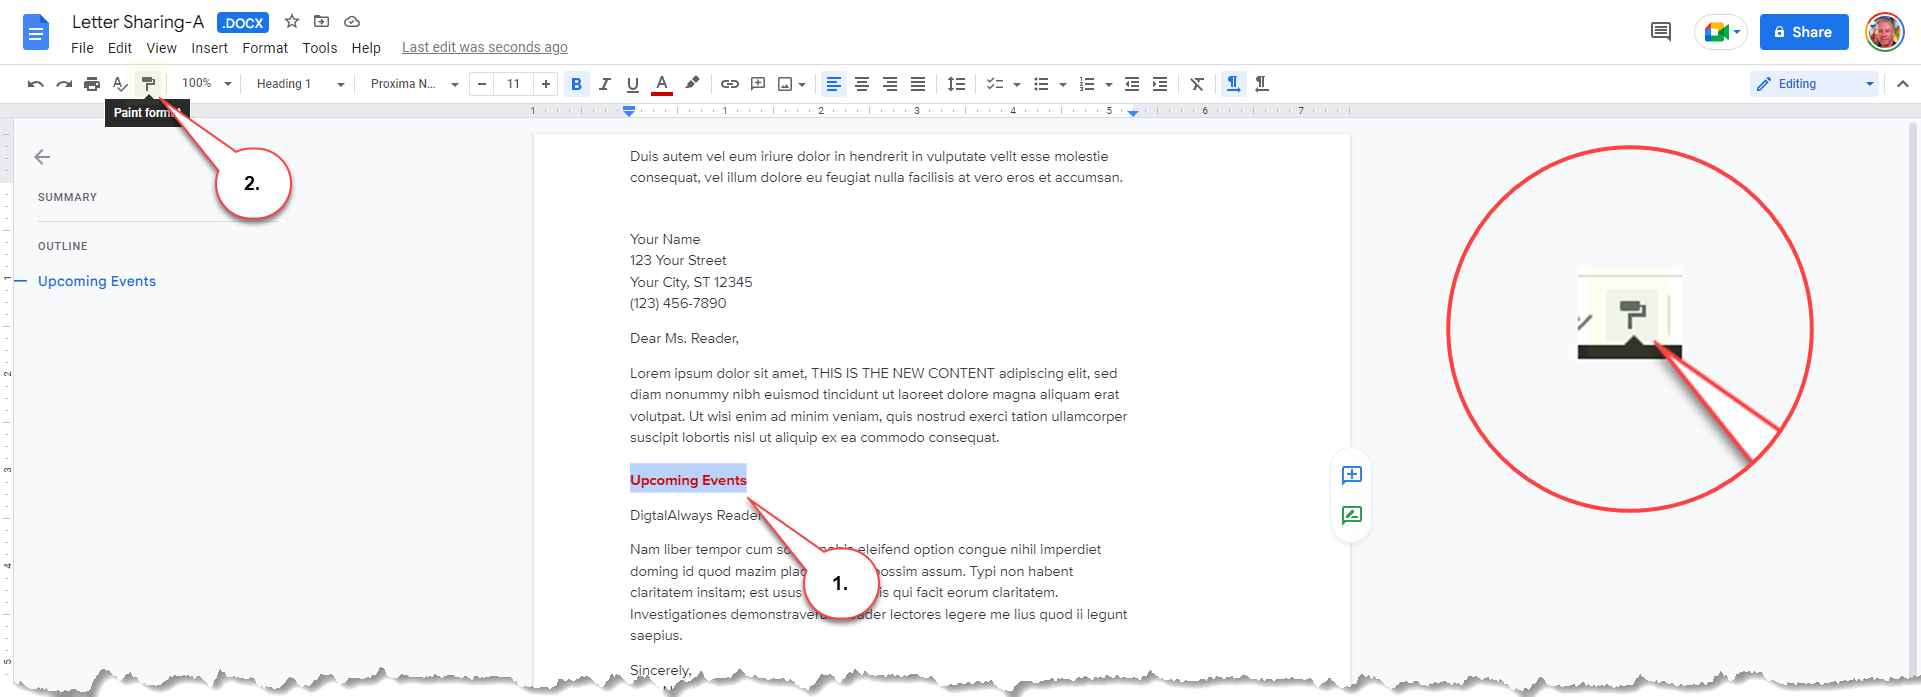
Copy Text Formatting
Select the formatted text you want to copy.- Click the Paint format button. The cursor changes to a paintbrush, indicating that the format painter is ready.
Click on the text you want to apply formatting to.

Note: The Paint format buttons works two ways:
- If you click the Format painter icon 1X, the format brush is only available for one click, then the painter turns off automatically. You will have to repeat the process again if you want to apply the same format to more text.
- If you click the Format painter icon 2X, the format brush will continually apply the copied format until you turn it off (by clicking on the Format painter icon).
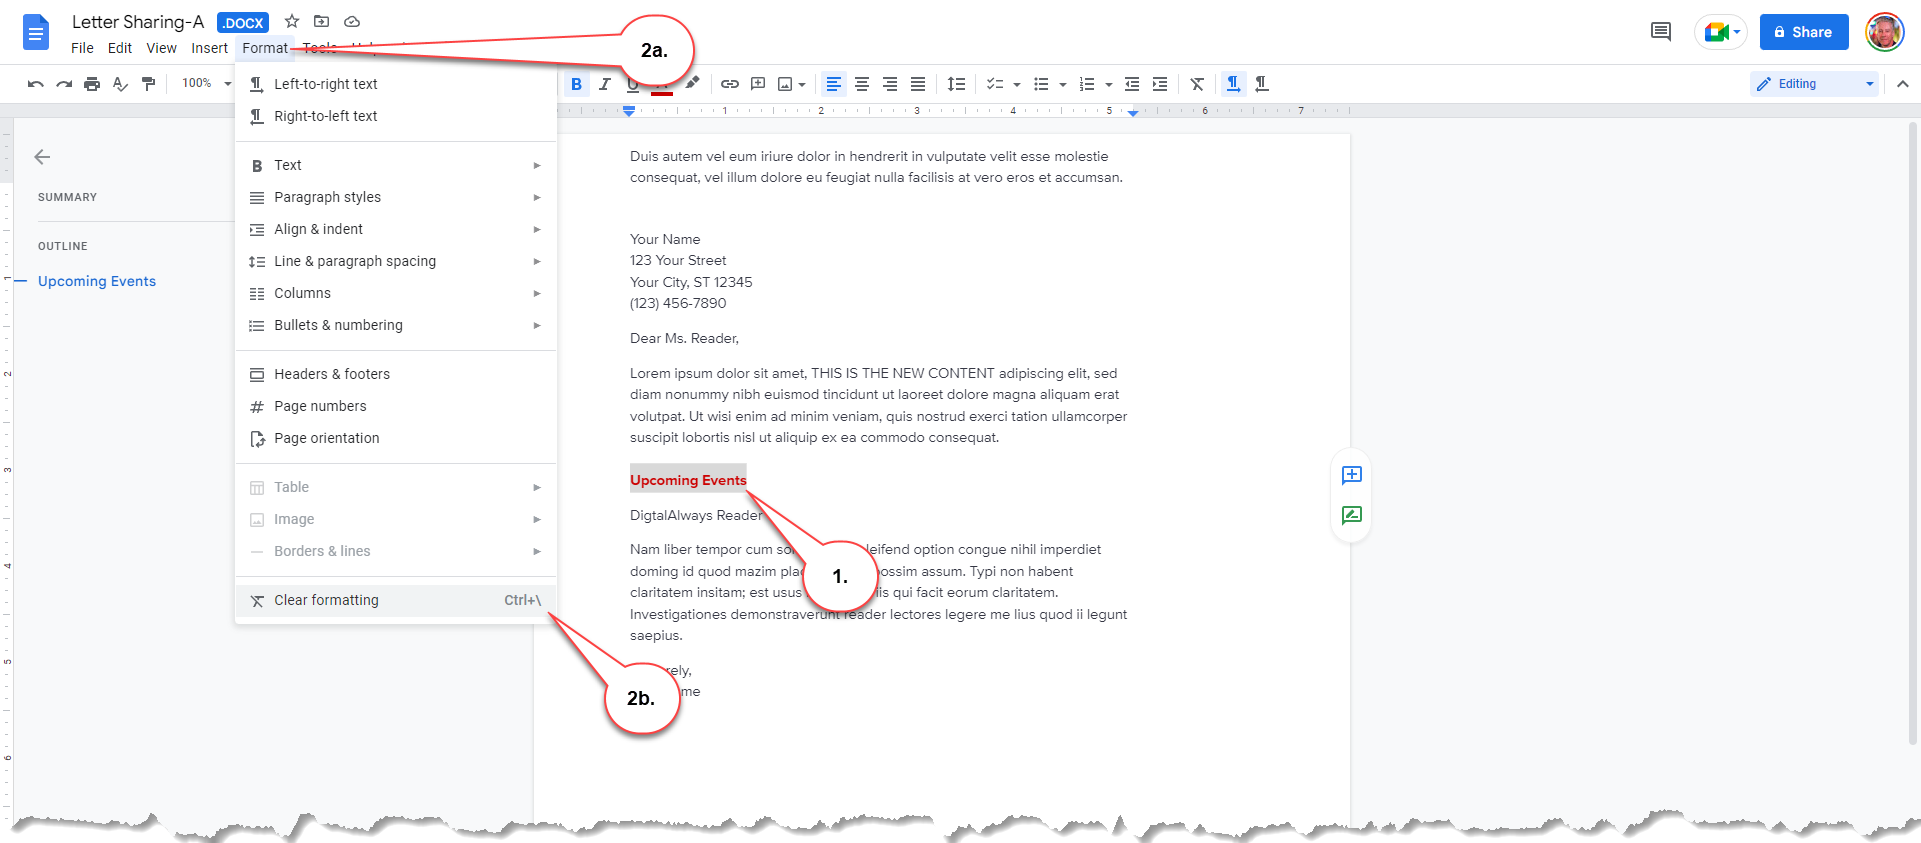
Clear Formatting
If you change your mind about the formatted items, you can easily clear the formatting using the menu.
Select the text with formatting you want to clear.- Click Format on the menu bar, then select Clear formatting. The formatted text will be restored to the default setting.
How to Use Tab-Stops
A tab stop is a designated position in the document ruler used to align text or other content. There are three types of tab stops: left-aligned, right-aligned, and center-aligned, and you can also create custom tab-stop by specifying a position in the ruler. Tab stops help to create uniformly spaced text and ensure proper alignment in the document.
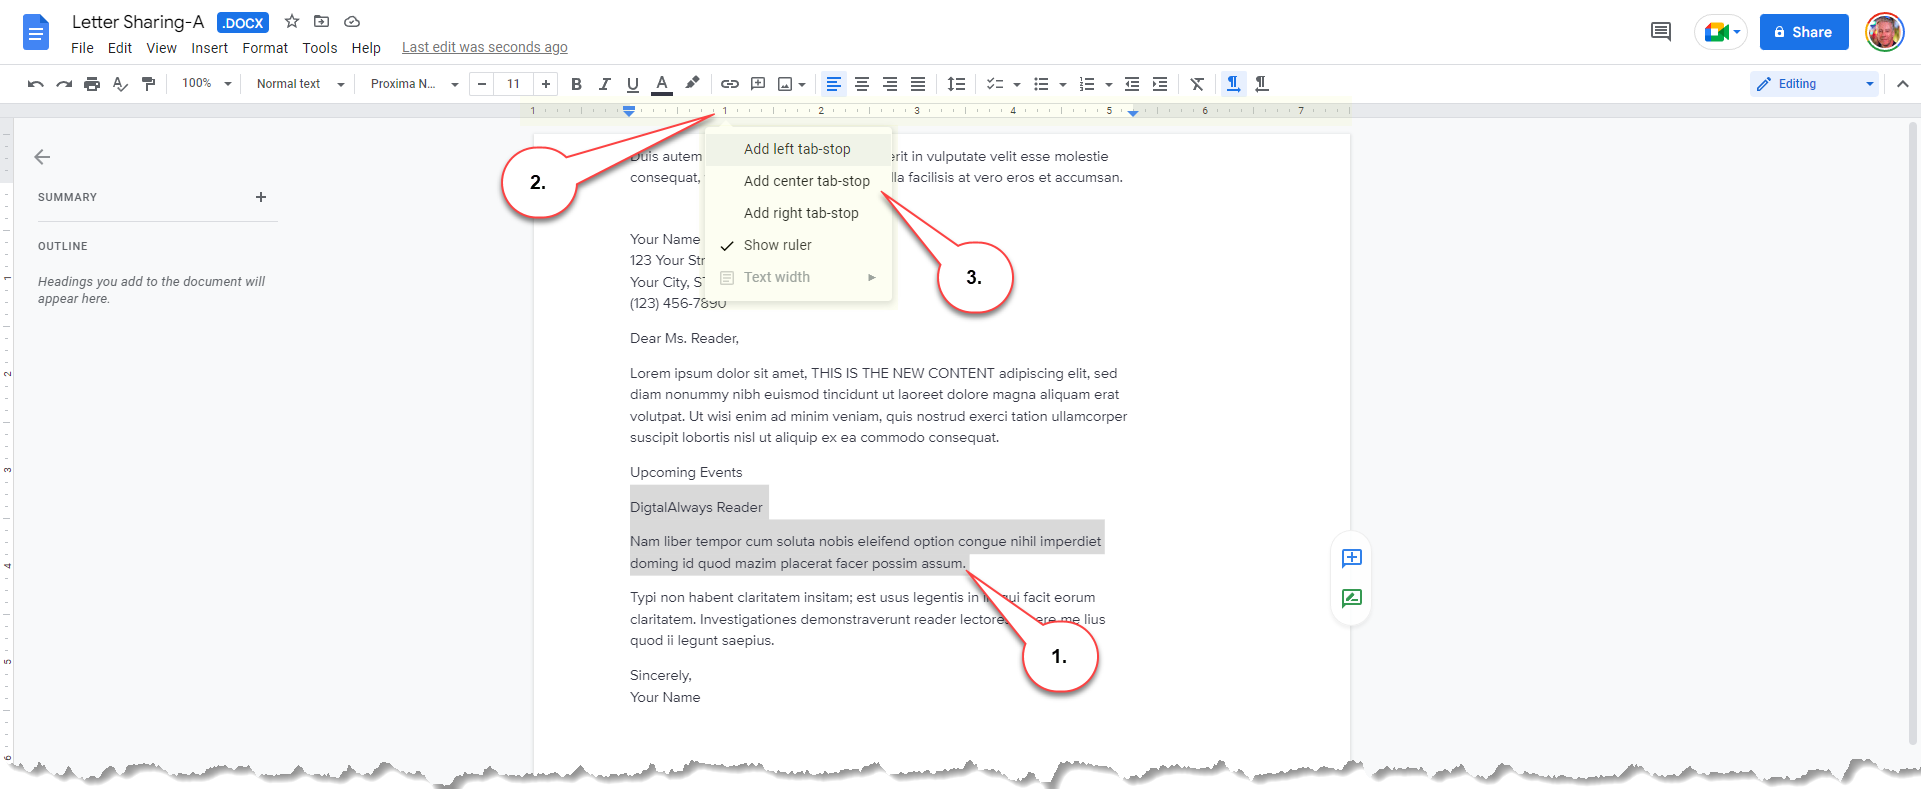
Set a Tab-Stop
Select the text you want to align with a tab-stop.- Click in the ruler field where you want to place the tab-stop, and a dialog menu will popup giving you three choices: left, center, or right. (which also sets text alignment).
- Select a type of tab-stop.
The tab-stop is added for the selected text. An arrow or diamond will appear on the ruler as an indication of the tab-stop location.

Types of Tab Stops:
- Left: Aligns the left side of text with the tab-stop.
- Center: Aligns the text so that it’s centered under the tab-stop.
- Right: Aligns the right side of text with the tab-stop.
Align Text to a Tab-Stop
Place the cursor where you want to separate text with a tab and press the tab key. The text moves directly to the location of the tab-stop.
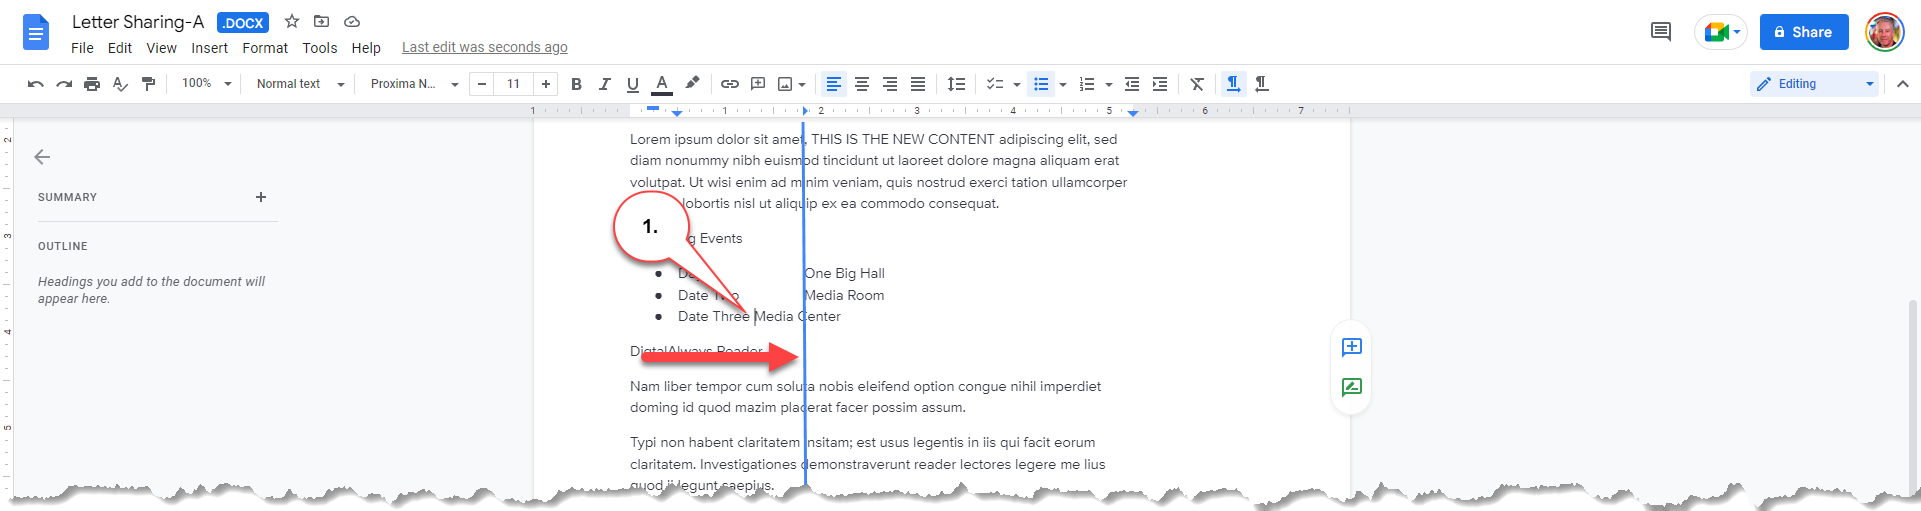
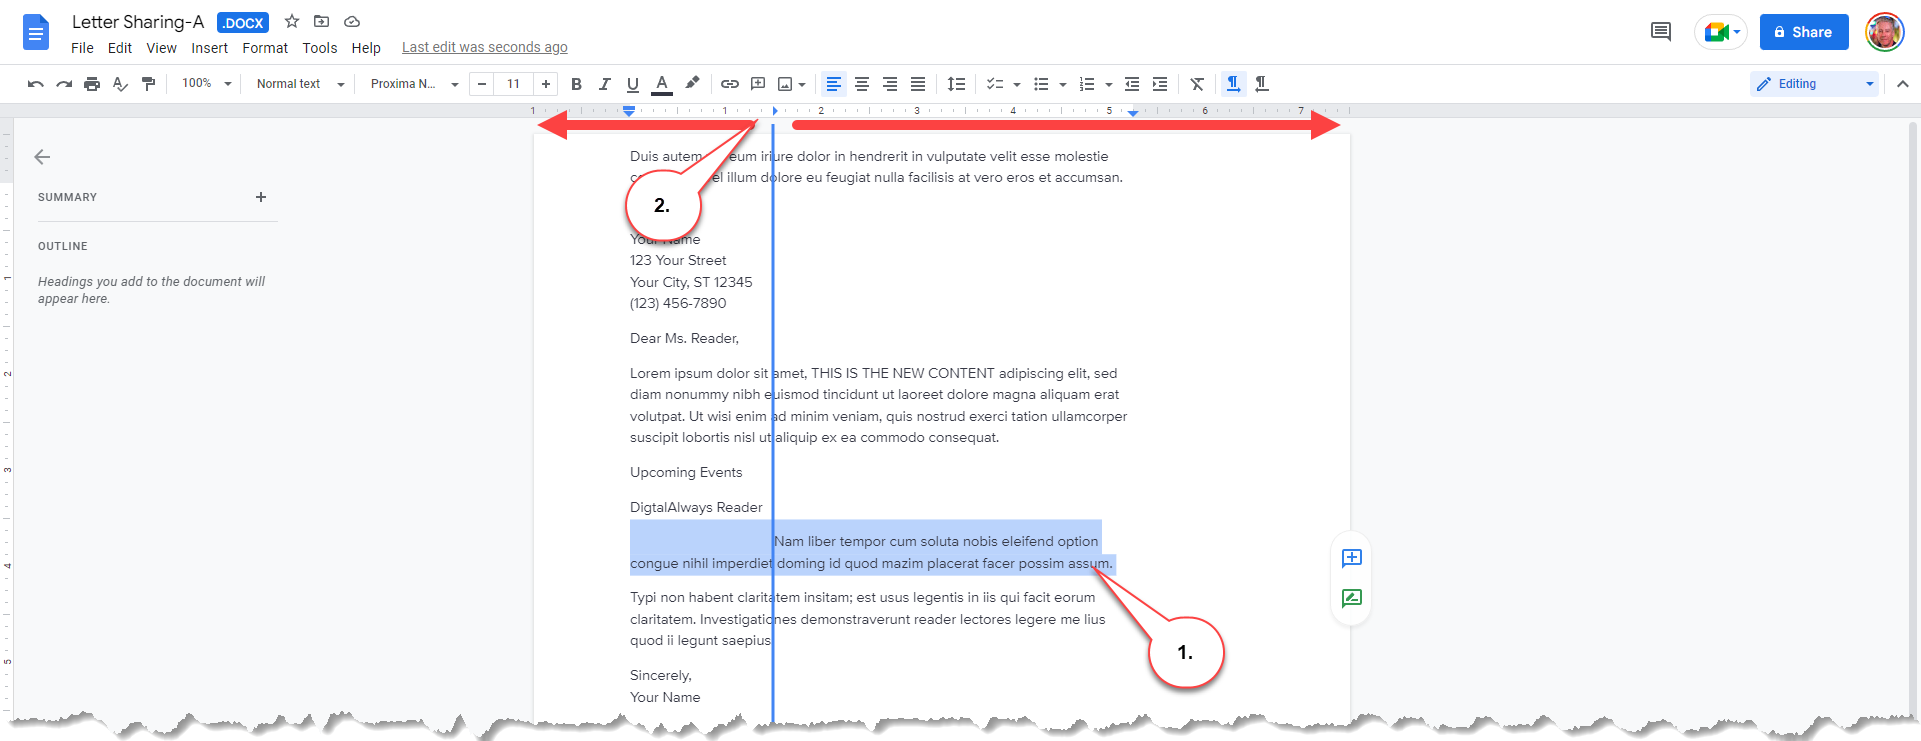
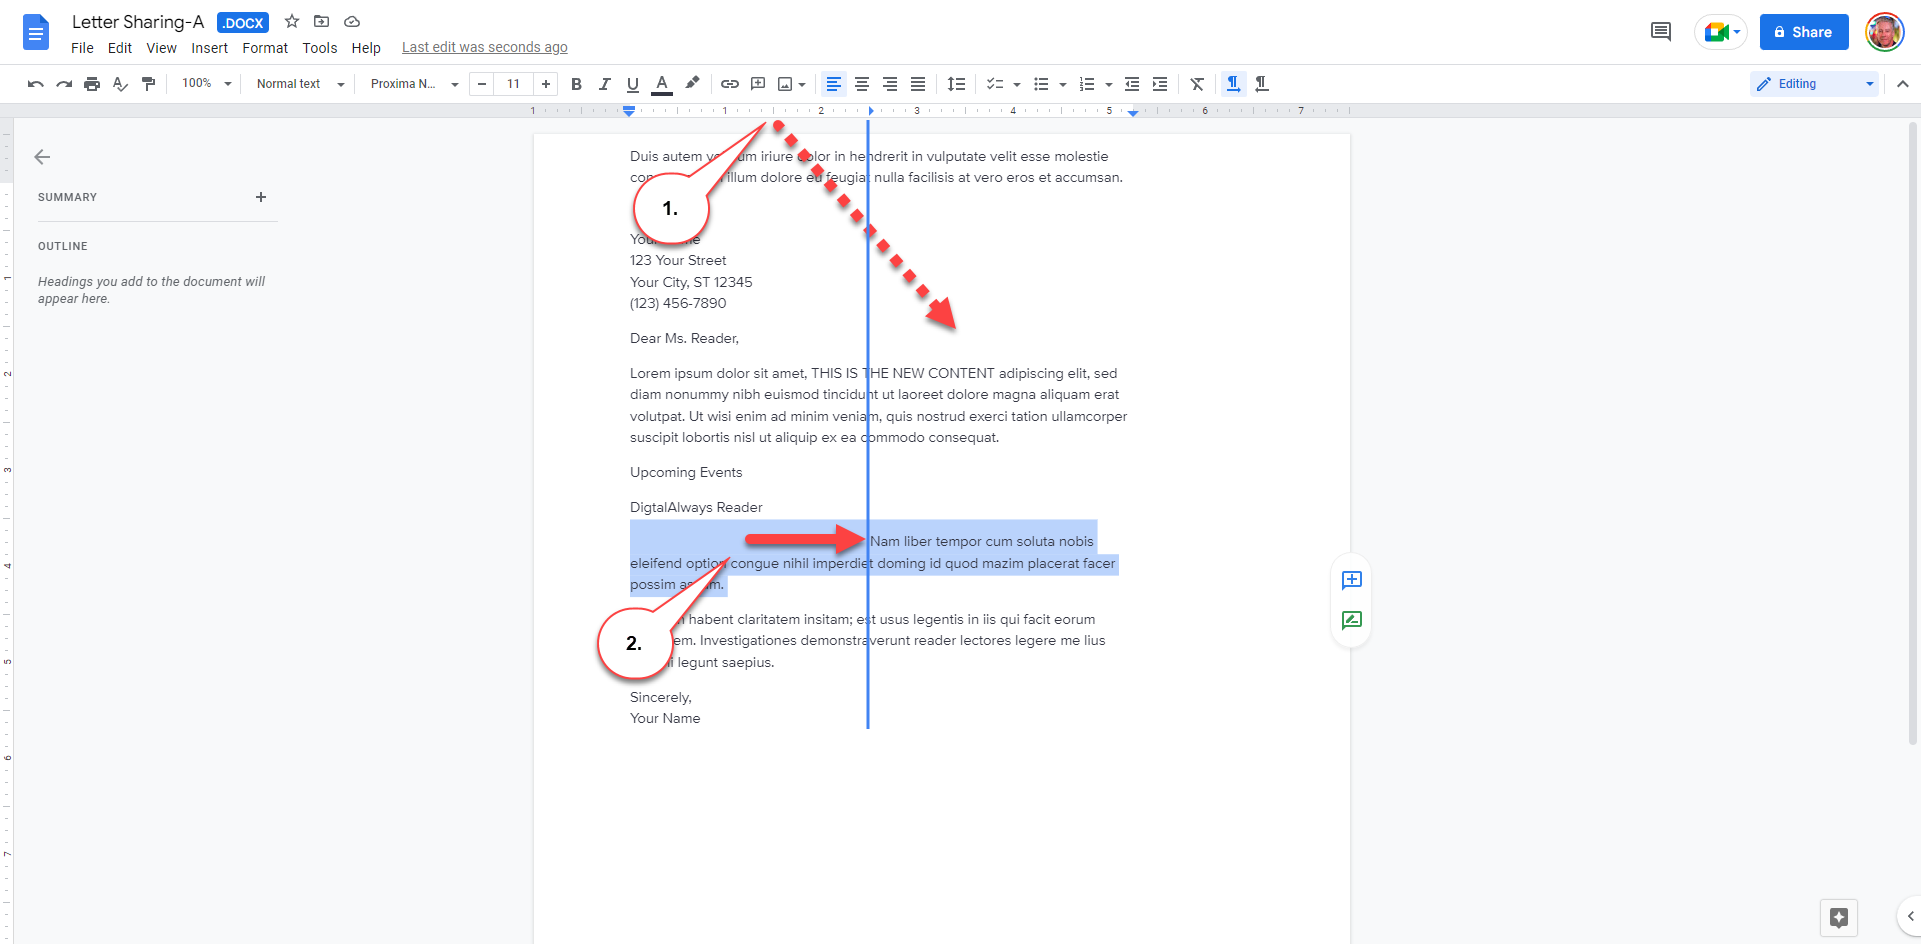
Move a Tab-Stop
You can fine-tune the position of a tab stop by dragging its icon on the ruler to a new location.
Select the text you want to reposition with the tab stop.- Click and drag a tab-stop on the ruler to reposition it. As you drag a tab-stop to a new position on the ruler, the text affected by that tab-stop will move with it.
Remove a Tab-Stop
Click and drag a tab-stop off the ruler (down and out) to remove it.- Removing a tab-stop will shift the text over to the next tab-stop. If another tab-stop isn’t set, the text will instead use the default half-inch tab spacing.
How to Modify Columns
Organizing content into columns can enhance the visual appeal and readability of your document. Columns divide the page into vertical columns, allowing you to place text and other elements in multiple parallel sections.
Apply a Column Layout
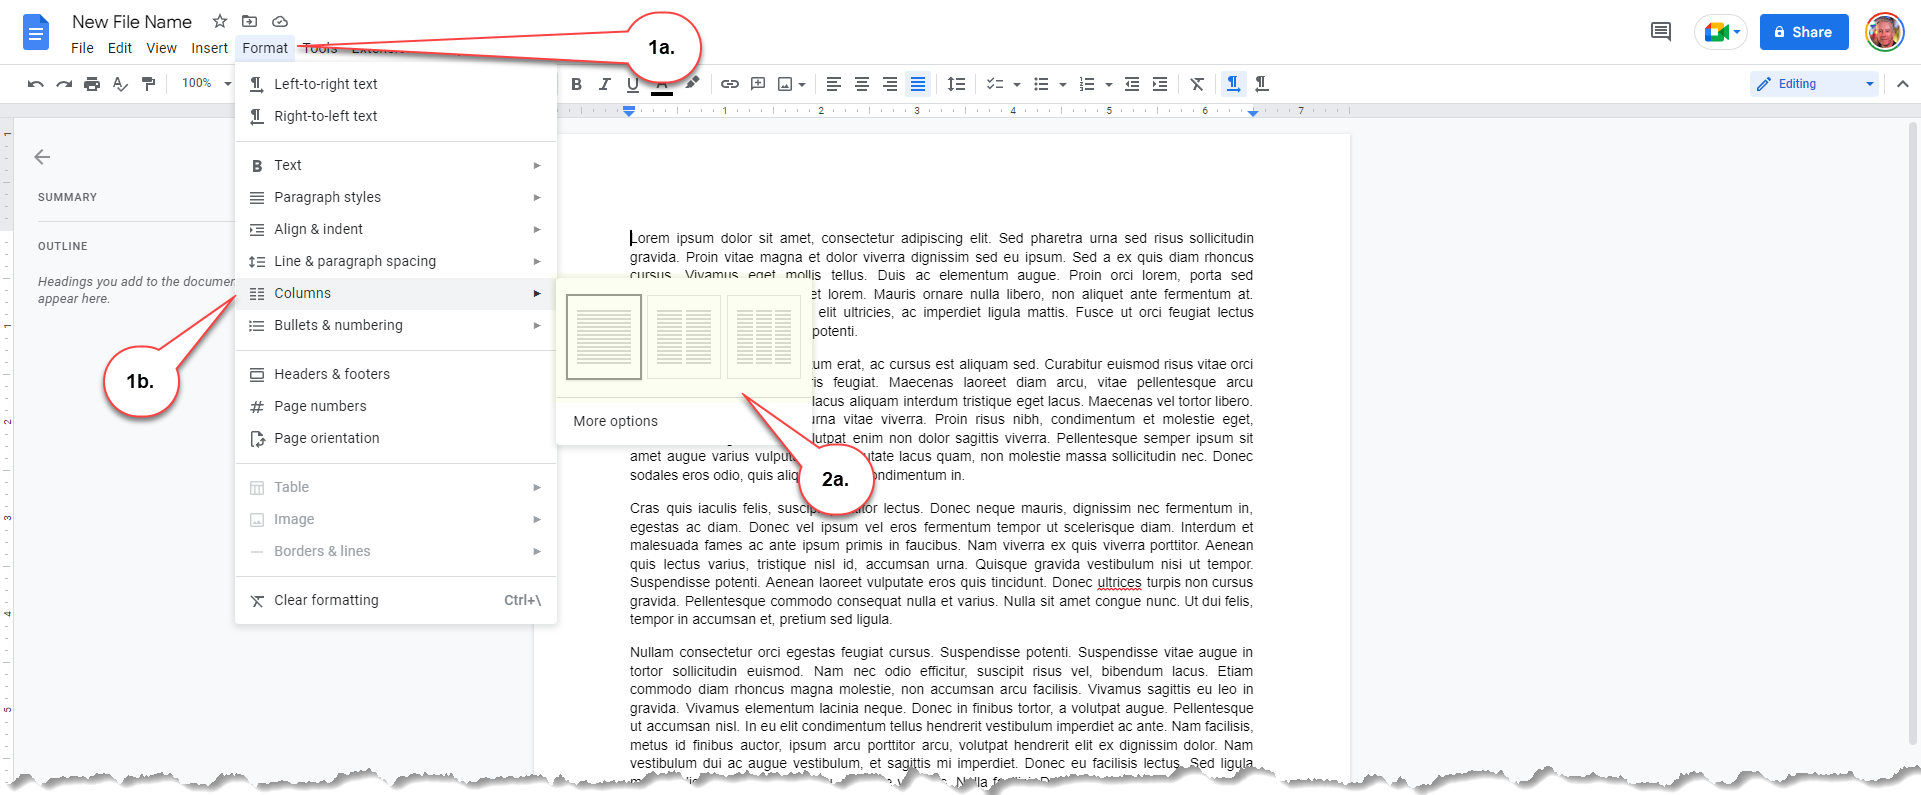
Google Docs includes predefined column layouts.
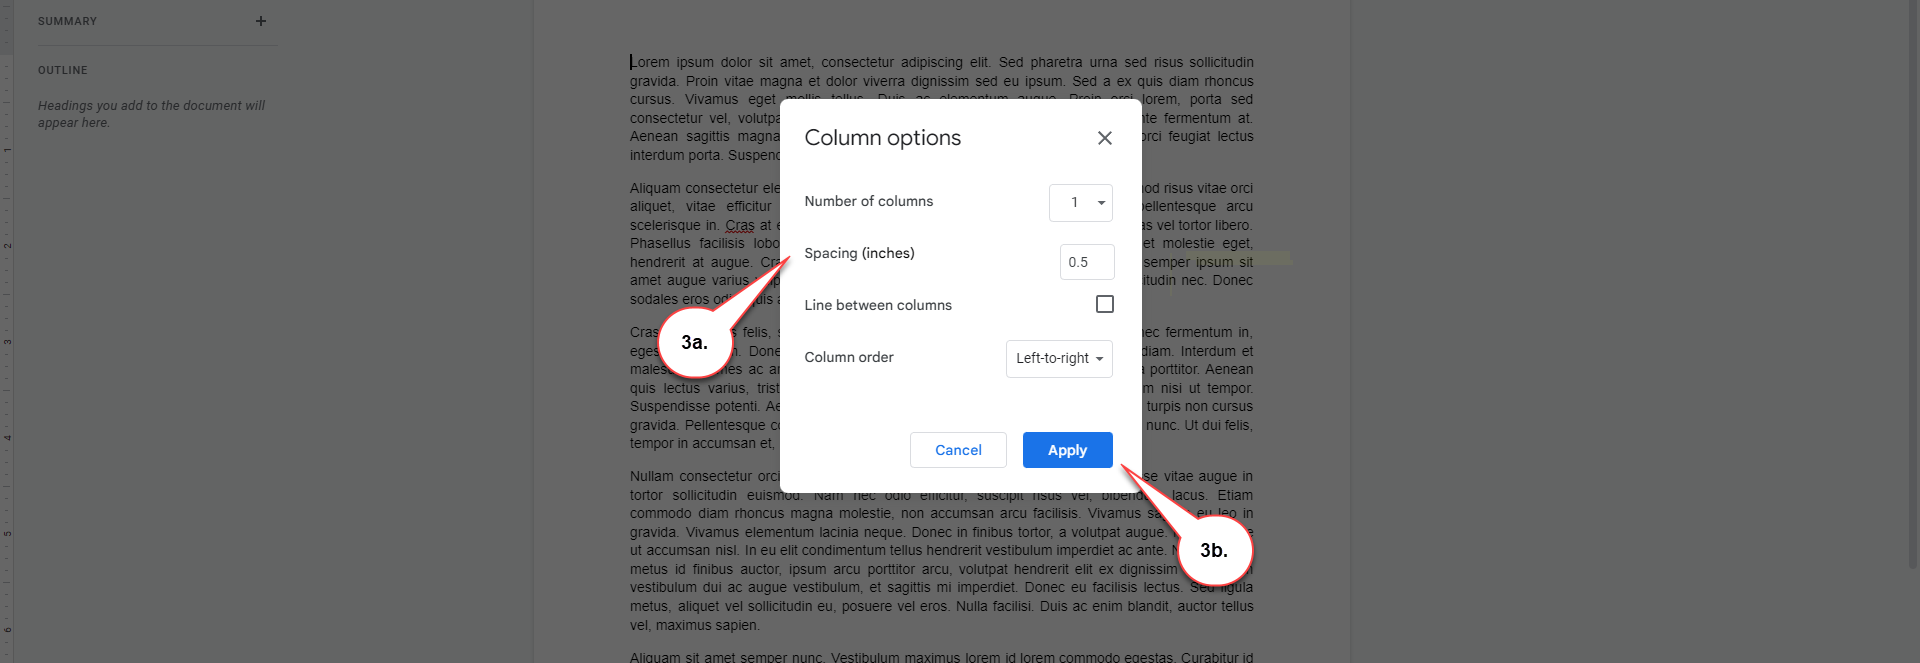
Click Format on the menu bar and select Columns.- Select a column layout OR select More options (to manually configure your column layout in the Columns dialog window).
(Optional) More options: enter your column settings (number of columns, spacing, line between columns, and column order), and click Apply.
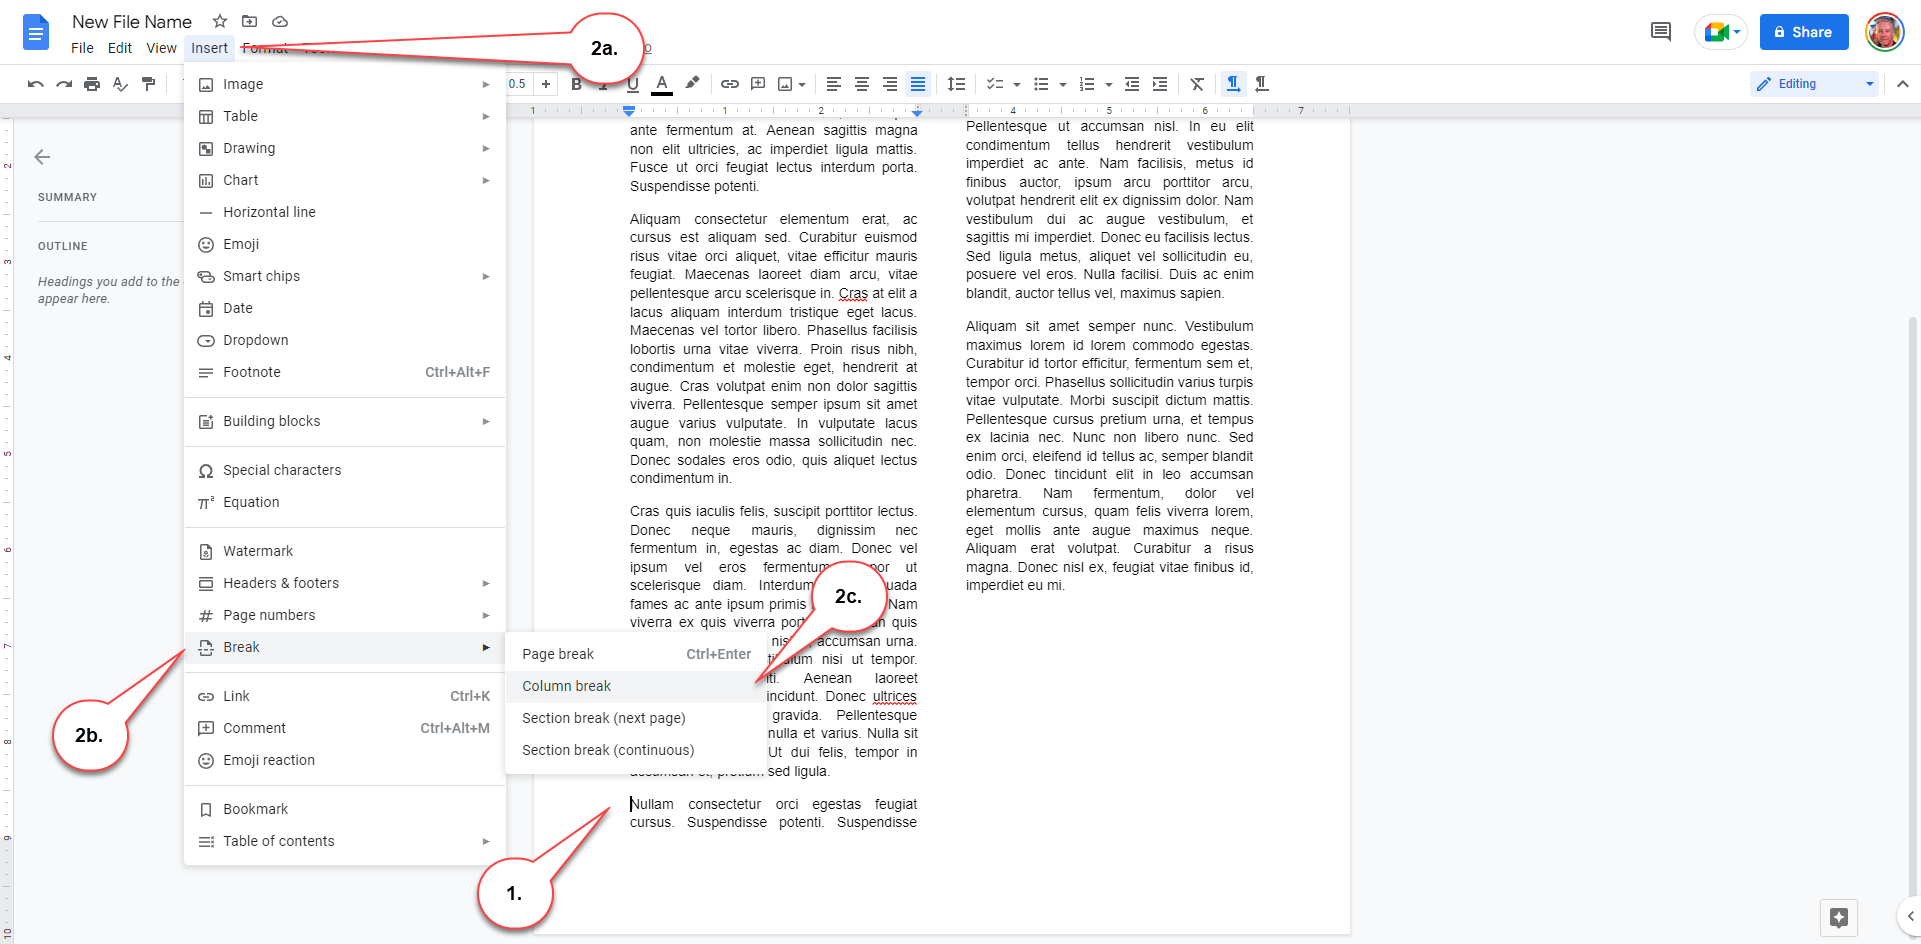
Insert a Column Break
Inserting a column break will move the text cursor and any text after it to the top of the next column, ending the current column.
Place the cursor where you want to insert a column break.
2 Click Insert on the menu bar, select Break, the Column break. The column break is inserted, and the cursor (and text) moves to the beginning of the next column.