The Google Slides Screen
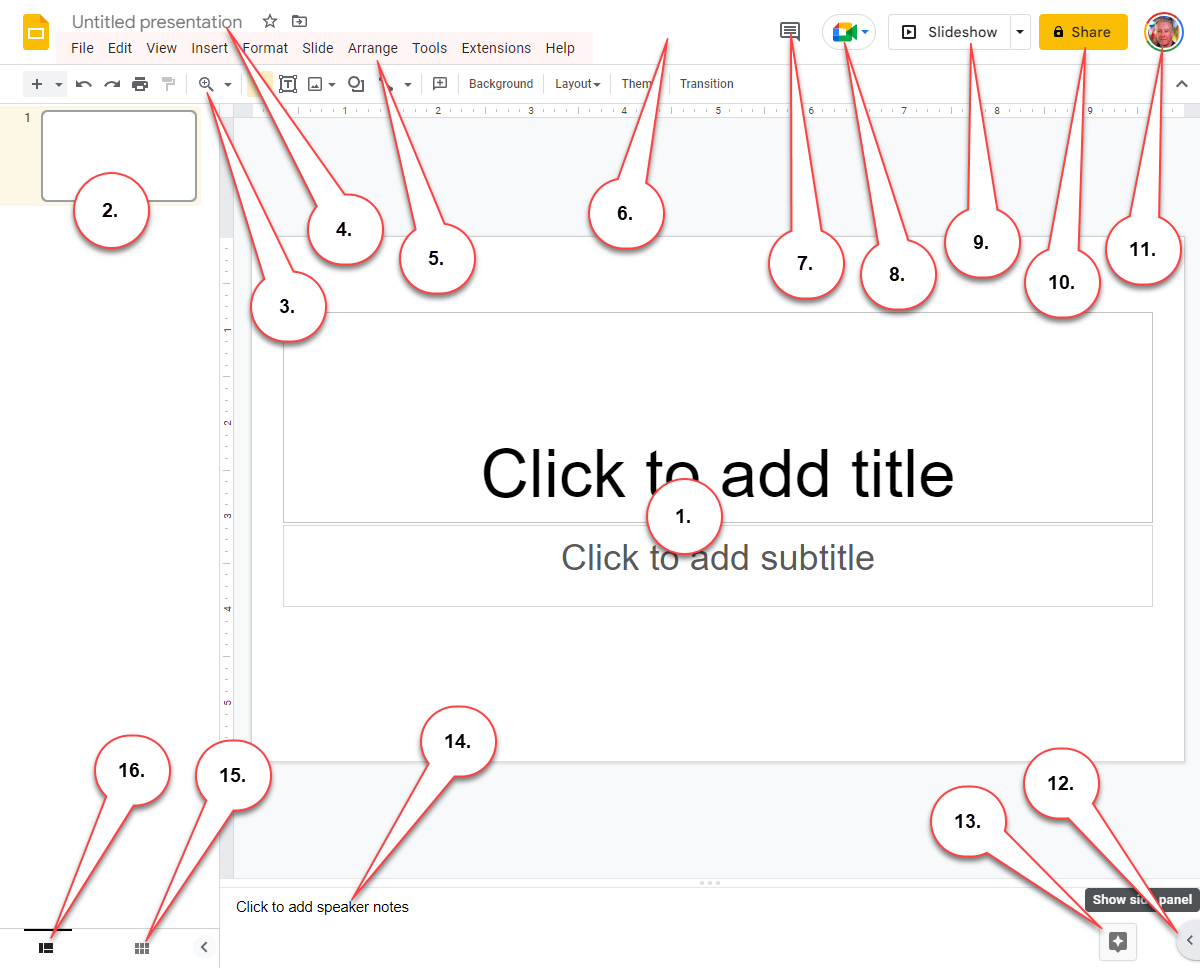
- Active Slide
An “Active Slide” is the slide that is currently being viewed or edited. Once a slide is activated, users can add or edit text, images, and other elements, and it can be identified by a highlighting or different background color. The active slide can be changed by clicking on slide s in the navigation pane or using keyboard shortcuts. - Slide Navigation Pane
The “Slide Navigation Pane” appears as a column on the left-hand side of the screen and shows thumbnails of all the slides in the presentation. Users can click on the thumbnails to navigate through the slides, and they can also organize, copy, delete and create new slide from this pane. - Formatting Toolbar
The formatting toolbar in a presentation software like Google Slides is a set of tools that allows users to customize the formatting of text and other elements within a slide. The toolbar appears at the top of the screen and contains options for formatting text, such as font size, bold, italics, and underline. It also provides options for editing the layout of the slide, such as adjusting the size and position of objects, adding shapes and images, and changing the color scheme. Some of the key functions of the formatting toolbar include:
New Slide.
Undo and Redo, Printer, and Format Painter.
Zoom (view level).
Select Tool, and Insert Tool: text Box, image, shape, and line.
Add Comment.
Background (change background), Layout (slide layout), and Theme (change theme).
Tansition: slide transition and object animation.
- Presentation Name
The “Presentation Name” field allows the user to give a specific name to their presentation, which will be displayed on the tab of the browser window, and also will be the default name when the presentation is saved. It’s set to “Untitled presentation” by default, but can be changed to any desired name, which can be useful to keep track of multiple documents and identify it, especially when sharing with others. - Menu Bar
The “Menu Bar” is a set of tools located at the top of the window that provides access to various features and options in the program, such as creating and saving presentations, formatting text and slides, adding multimedia elements and more. This is an important feature of the software, providing users quick and easy access to the tools to create, edit and manage their presentations. - Activity Dashboard
The “Activity Dashboard” provides a view of the changes made to a shared presentation. It displays information such as who made the changes, when they were made, and a summary of what the changes were. It also allows users to see who’s currently viewing the presentation and revert to earlier versions of the presentation. - Comment History
The “Comment history” allows the user to view and manage comments that have been added to a presentation. When the button is clicked, it opens a sidebar on the right-hand side of the screen displaying a list of comments, with information about who added it and when. The user can view, reply, resolve or mark as done comments, also the user can filter them by author, by type, and by status. - Google Meet
The “Google Meet” button is a feature that allows you to start a video meeting directly from within a presentation using the Google Meet video conferencing tool. When clicked, a new window opens, and the user can start a video meeting with the other collaborators working on the presentation. - Start Presentation
The “Start presentation” button allows users to begin a live presentation of their slides in full-screen mode. Users can control the flow of the presentation and engage with the audience while they navigate through the slides. - Share Settings
The “Share settings” feature allows users to control who can access and collaborate on a presentation, and what level of access they have. Clicking the button opens a window to invite others, set sharing options and share the presentation with specific people by adding their email addresses or creating a shareable link that anyone with the link can access. Users can set different levels of access for different people, such as “can edit” or “can view,” and it also allows users to see the revisions and feedback on the Activity Dashboard, which can help keep track of changes and feedback on the presentation. - Google Account
The “Google Account” button allows the user to access and manage your Google account settings. When clicked, it opens a drop-down menu, providing access to different settings and options such as personal information, security settings, personalization options, and sign-out. This button makes it easy to manage account settings and personalize the Google Slides experience. - Show Side Panel
The “Show side panel” button allows users to open and close a sidebar panel on the right side of the screen. When clicked on, the side panel appears on the right side of the screen, giving access to additional tools and options related to the current slide, such as text formatting, slide transition, and notes. When done, the side panel can be closed by clicking the “Show side panel” button again. - Explore
The “Explore” feature that allows users to access various research and information resources directly from within a presentation. When clicked, it opens a sidebar on the right-hand side of the screen displaying options such as “Research”, “Define”, “Translate”, “Images”, and more. These options allow users to search the web for information, lookup the definition of a selected word or phrase, translate a selected word or phrase, search for and insert images, access information from third-party services like Google Maps, YouTube and more. - Slide Notes
The “Slide Notes” area is a section of the interface located below the slide, where users can add notes or comments related to the current slide. It can be used to provide additional information or context about the slide, or to include instructions for the presenter. The notes can be formatted with text formatting options, and it is visible only to the presenter, not to the audience. It can be used by presenters to remind themselves of key points during the presentation, by the creator to provide additional context or information related to the slide and for team collaborations. - Grid View
The “Grid View” button allows users to see all slides of a presentation in a grid of thumbnails, making it easier to navigate, browse, rearrange, duplicate, or delete slides by clicking on their thumbnails. It can be especially useful for presentations with many slides or when working in collaboration with others. - Filmstrip View
The “Filmstrip View” button returns the workspace back to the default view (aka “Edit Veiw” or “Slide View”) from the “Grid View.” The default view is the main workspace where most of the work is done on creating the presentation, editing and finalizing it.