Welcome to Share, Collaborate, and Converting Google Docs. In this section we will cover the following topics:
Upload and convert documents
Download and email documents
Share documents
Collaborate with others
Suggest edits
Work with versions
Google Docs add-ons
How to Upload and Convert Documents
Converting a document means changing its file format to another file format. Google Docs allows you to convert documents to different file formats, such as PDF, Word, or text. This can be useful if you need to share a document with someone who doesn’t have access to Google Docs, or if you need to use the document with a different program that doesn’t support the original file format.
Upload a Document
You can upload documents (even non-Google Docs documents) in Google Docs.
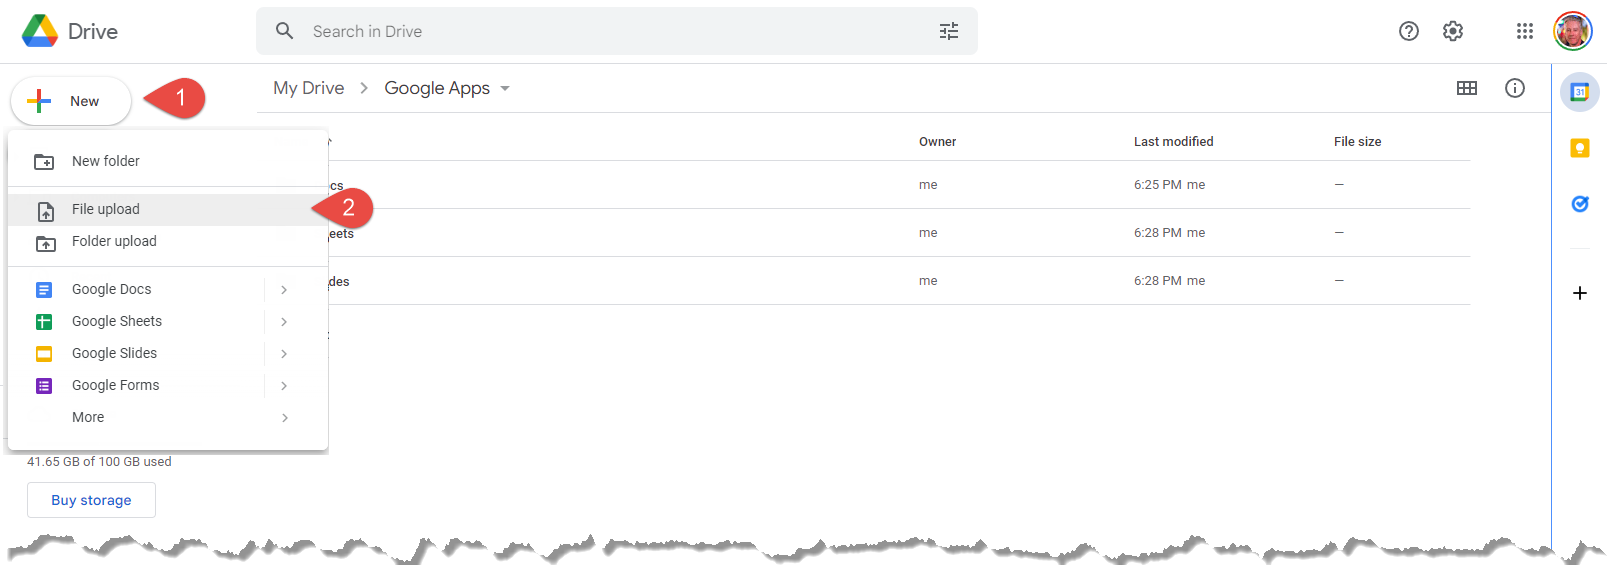
1. Click New.
2. Select File upload.
Google Docs will be able to convert most types of documents, including: Microsoft Word (.docx), OpenDocument (.odt), Rich Text Format (.rtf), PDF format (.pdf), Plain Text (.txt), Zipped Web Page (.html), and EPUB documents (.epub).
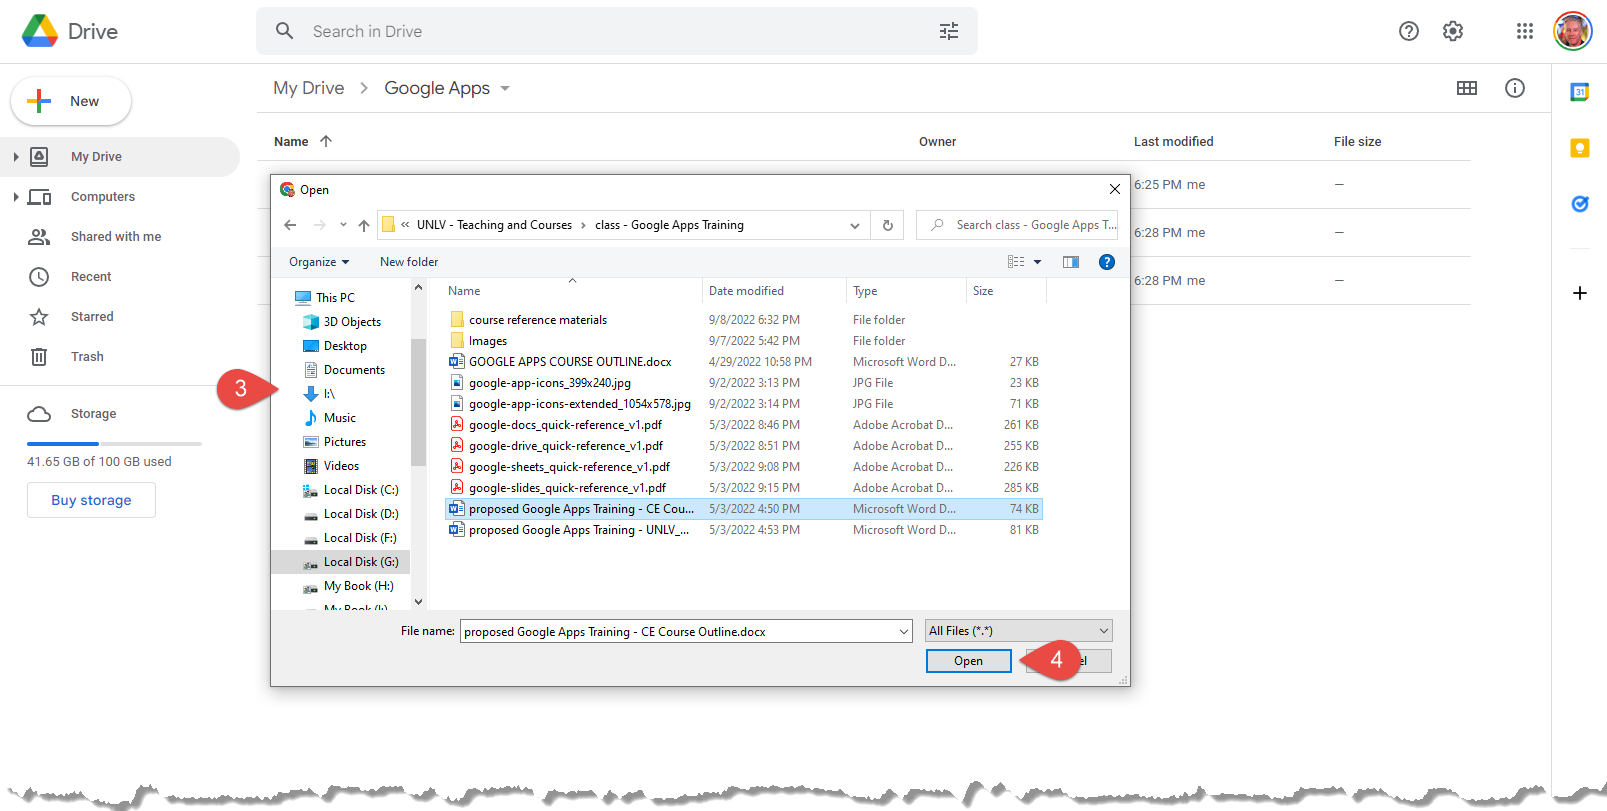
3. Select a document to upload.
4. Click Open.
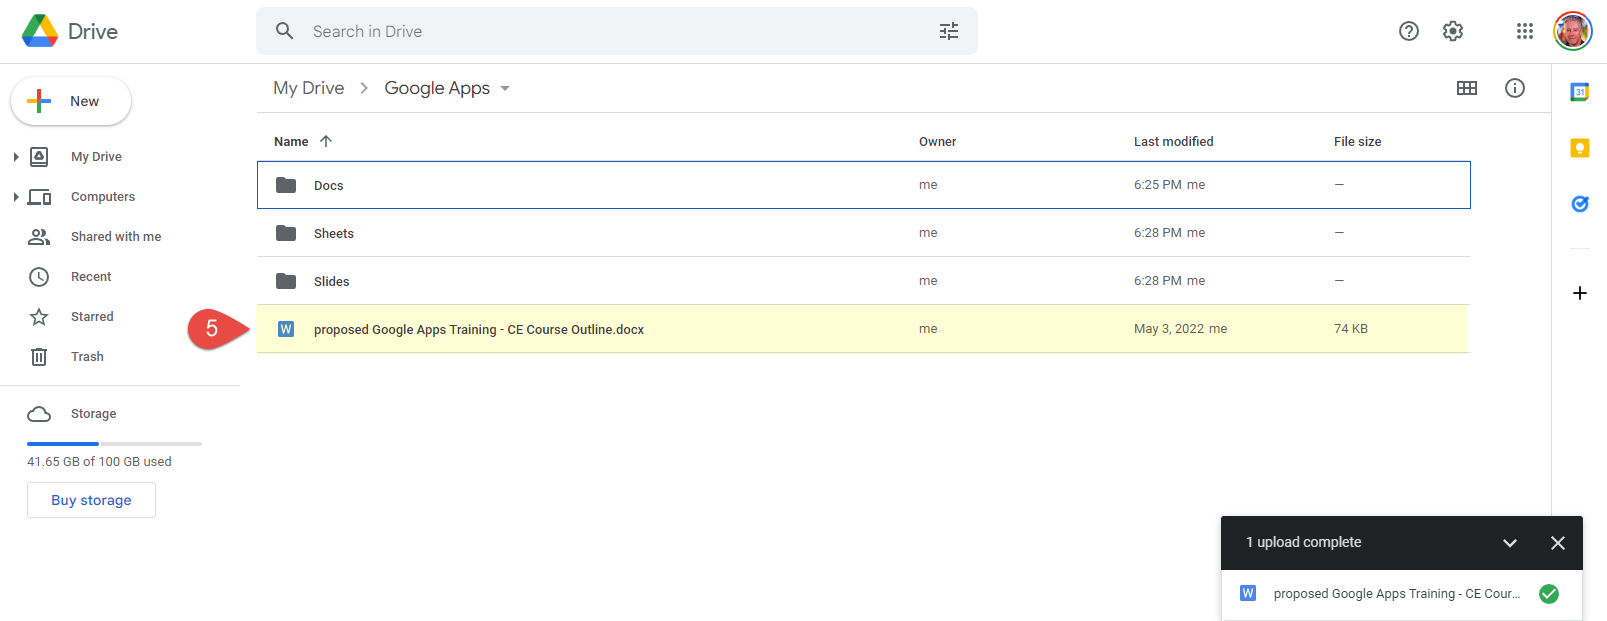
5. The file is uploaded and will appear in your Google Drive.
Convert a Document
Google offers several options for file conversion. You can upload the document to Google Drive or you can open the file from the Google Docs menu. Once the file is opened, you will have the option of converting the file to Google Docs. This will create a copy of the file in Google Docs format, leaving the original file unchanged.
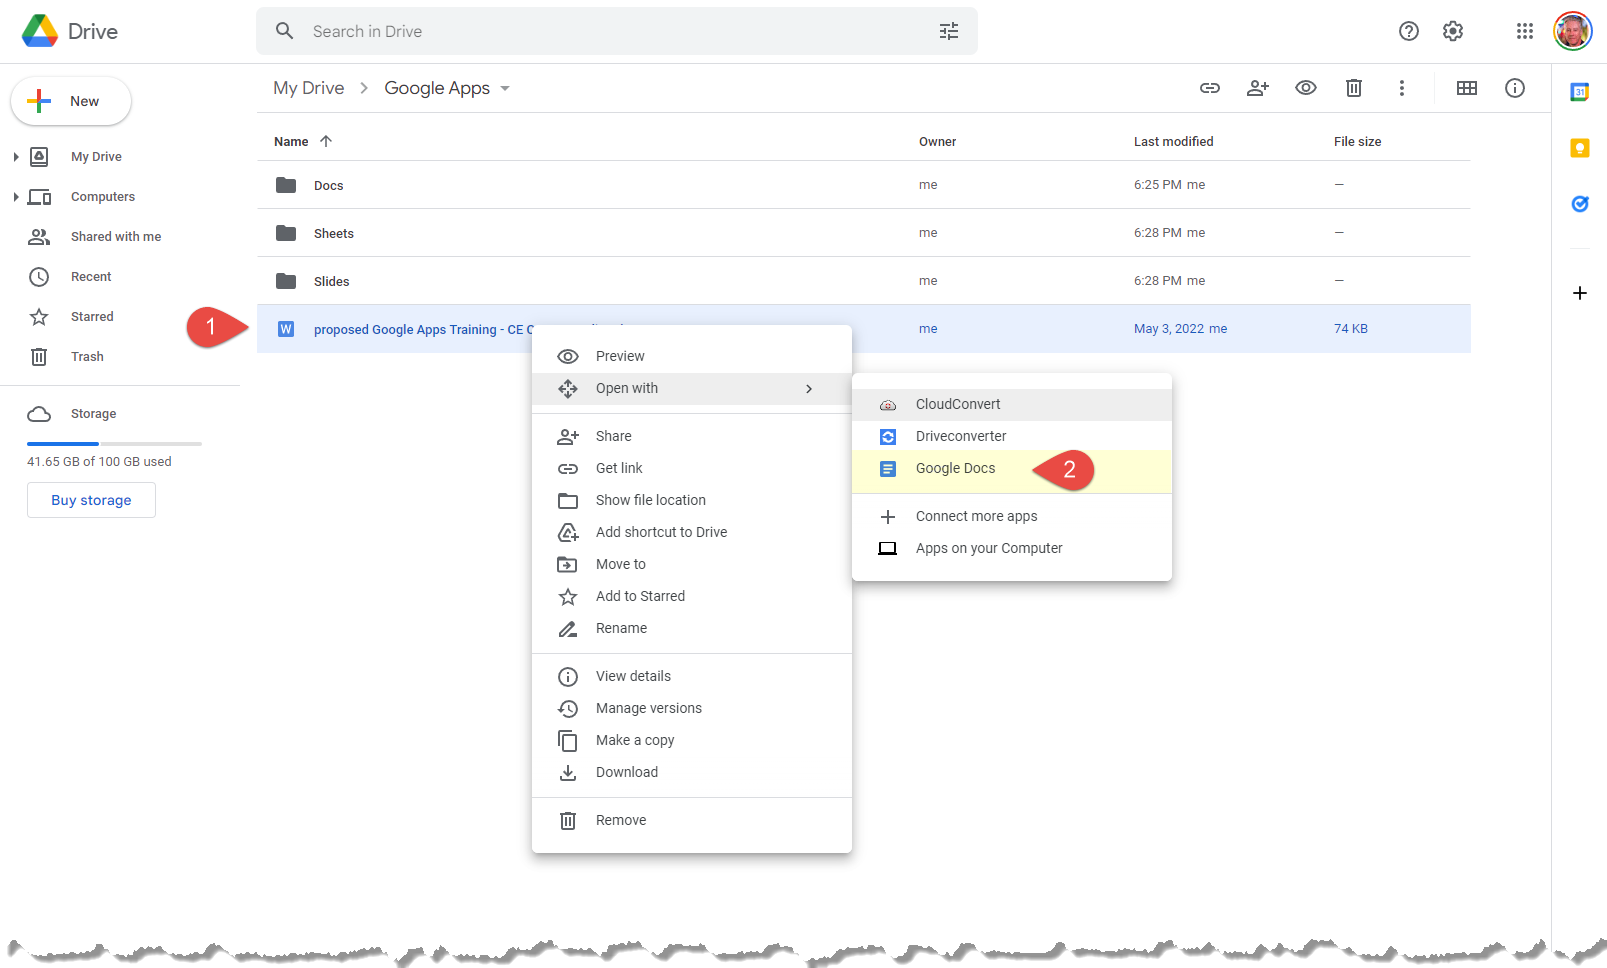
1. Double-click an uploaded document to open into Google Docs OR Right-click an uploaded document to see other options for using the file.
2. Click Open with Google Docs.
The document will open in Google Docs.
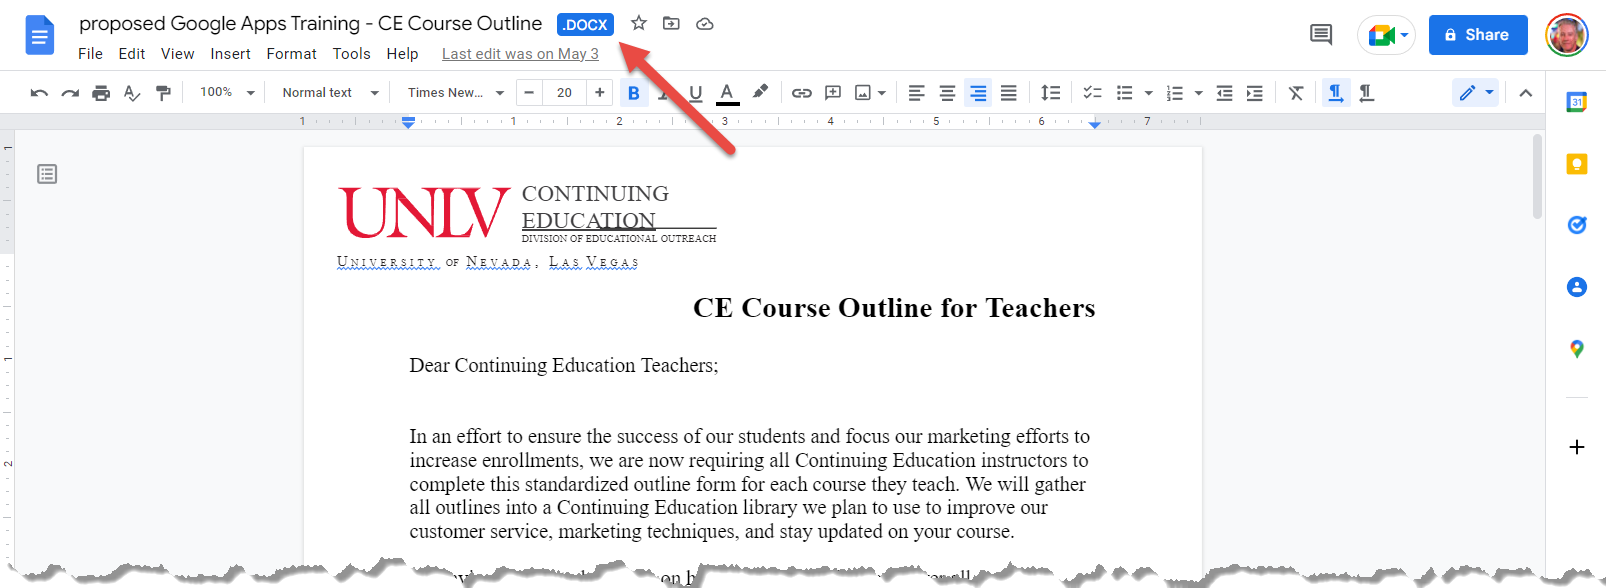
NOTE: Though you’re viewing the document in Docs, you can see by the .DOCX file extension that it’s still in the Word format.
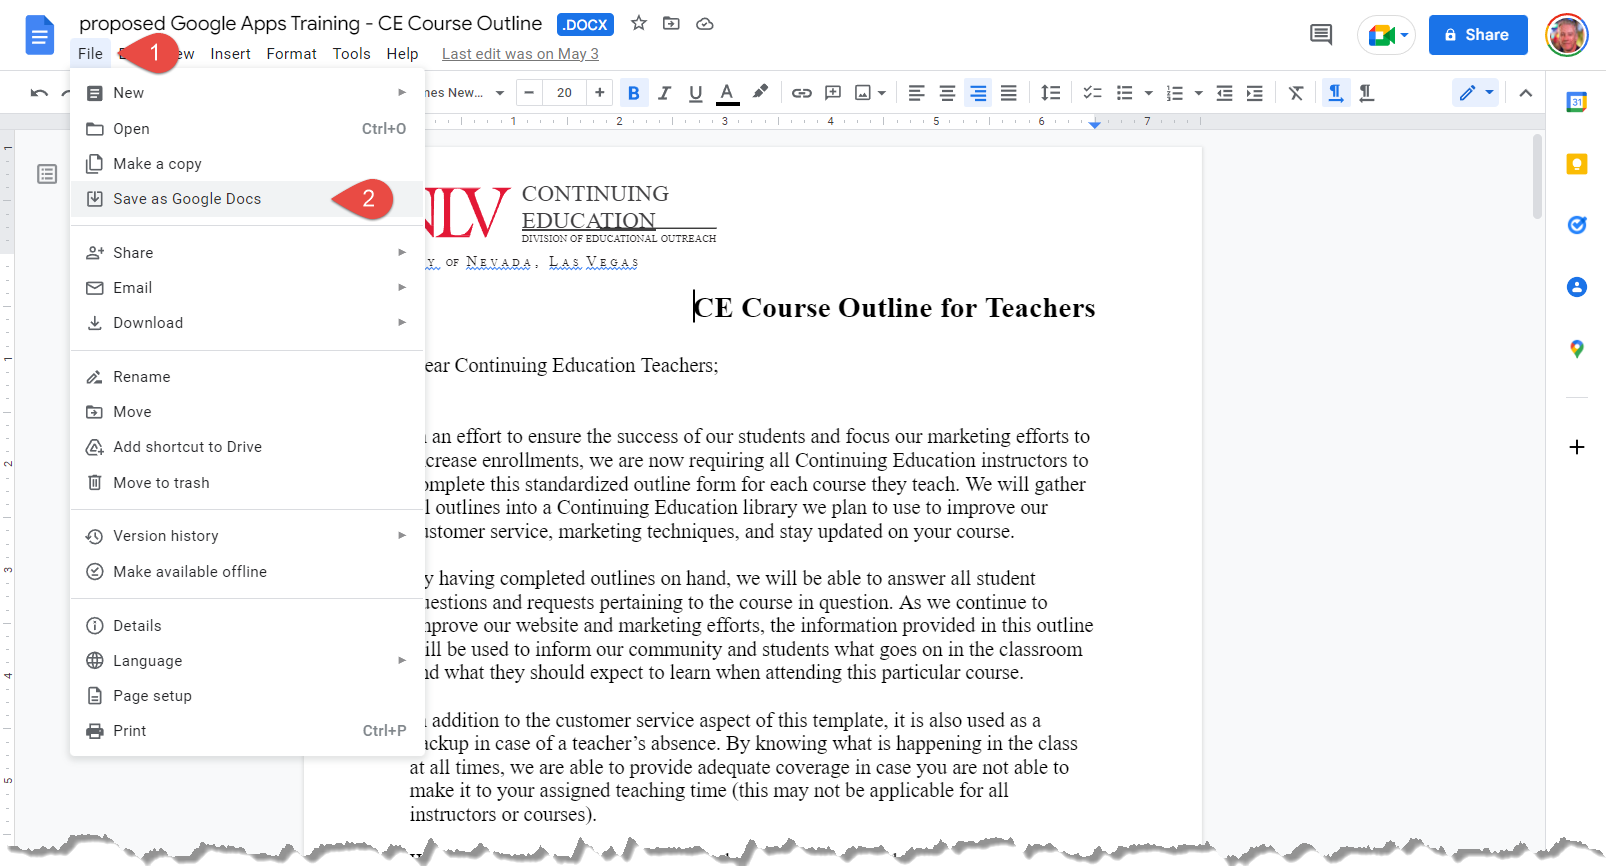
1. Click File on the menu bar.
2. Select Save as Google Docs.
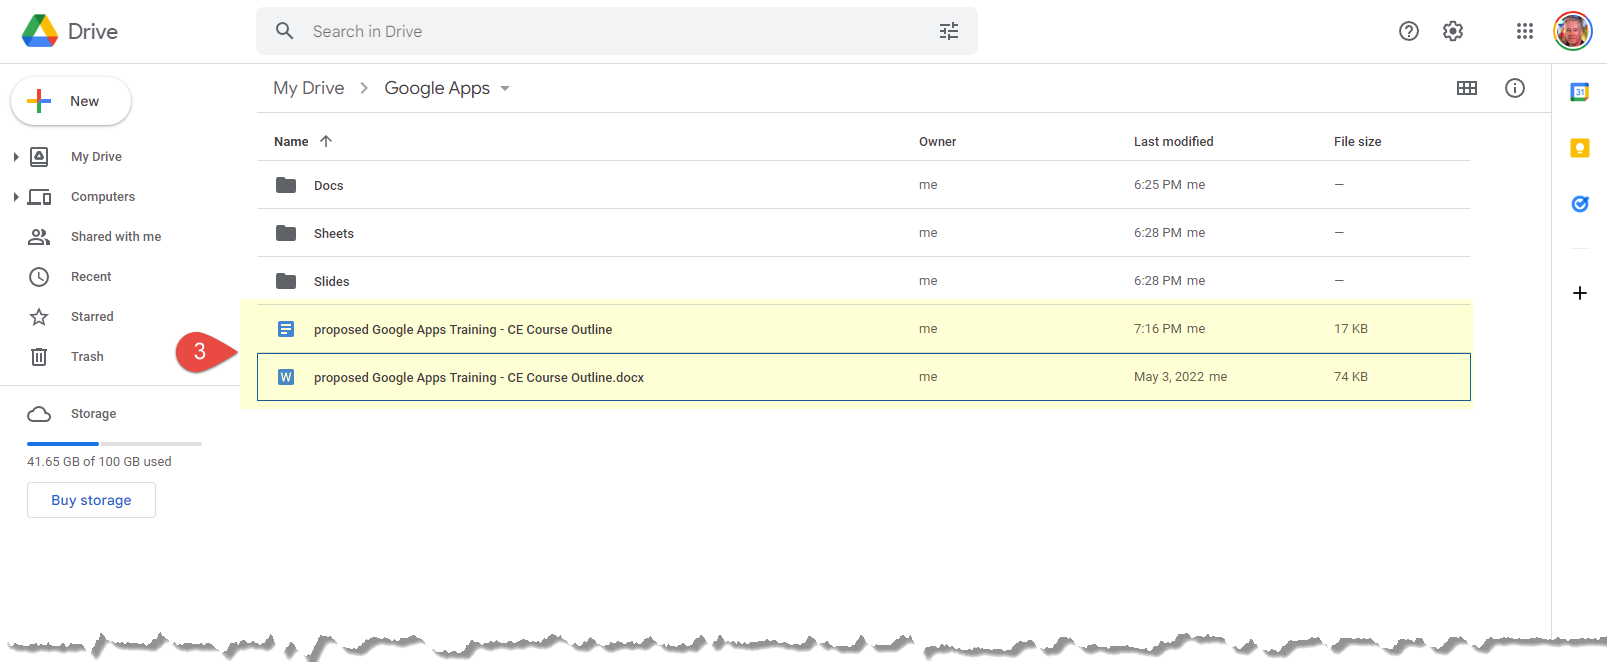
3. The original file will remain unchanged, and a copy of the file in the Google Docs format will be saved in your Google Drive.
How to Download and Email Documents
Downloading your document to your device allows you access to the document even if your offline. Your free to edit the document with other software or give them to someone else.
Download a Document
Downloading a Google Docs document saves a copy of the document to your device in a specific file format. This allows you to access and work on the document offline or to share the document with others who may not have a Google account.
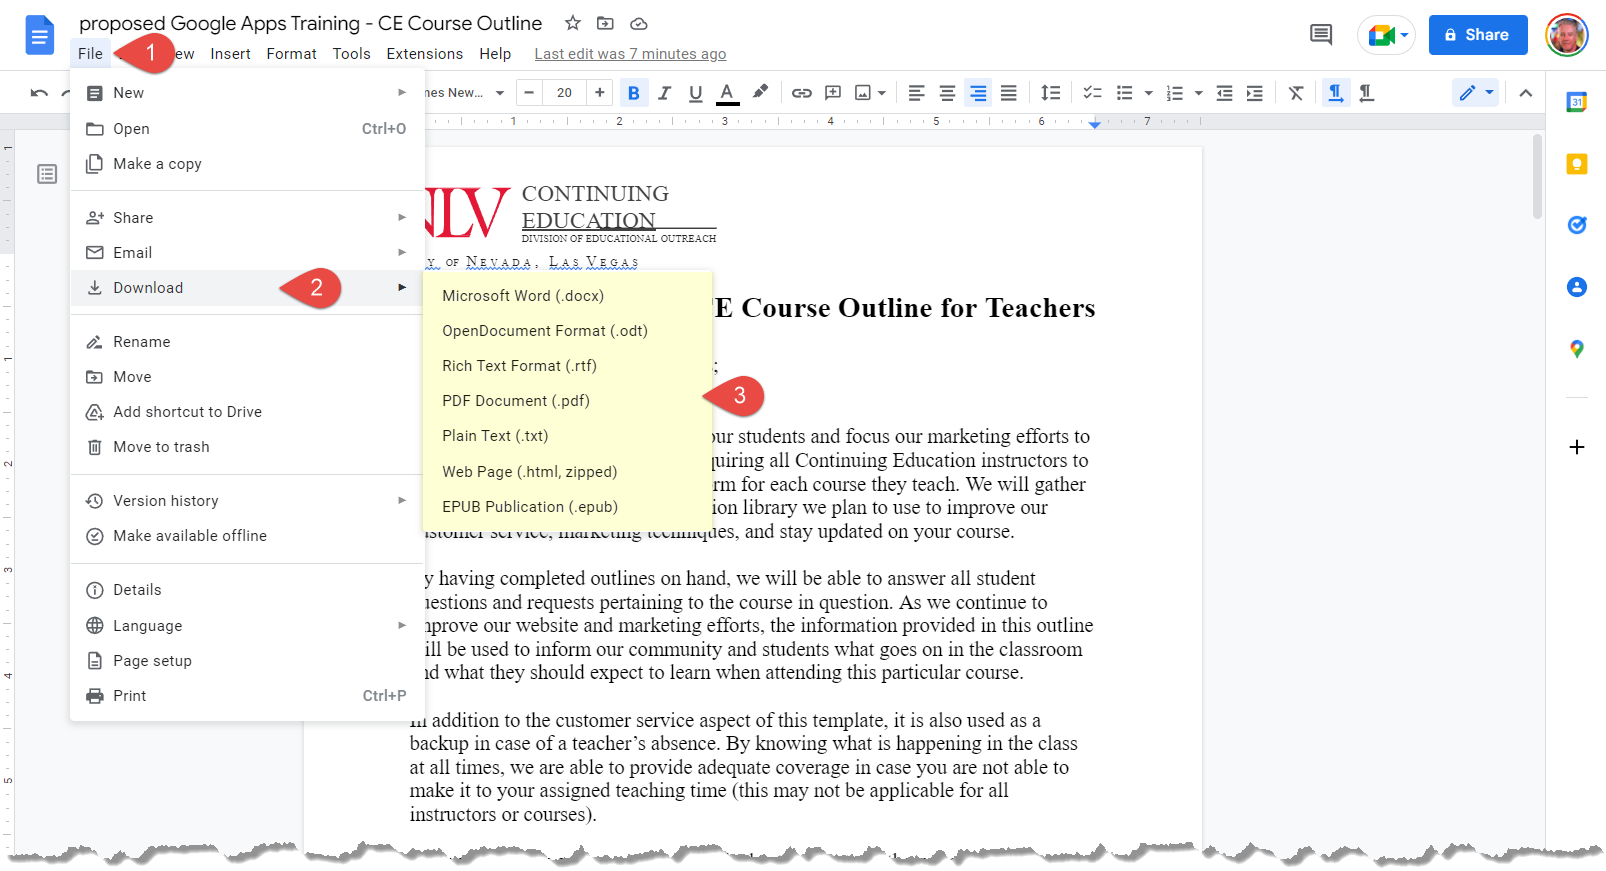
1. Click File on the menu bar.
2. Select Download as.
3. Select a file format.
The document is converted and saved to your Downloads folder.
Email a Document
Emailing a Google Docs document allows you to send a copy of the document to one or more recipients via email. The recipients will receive a link to the document.
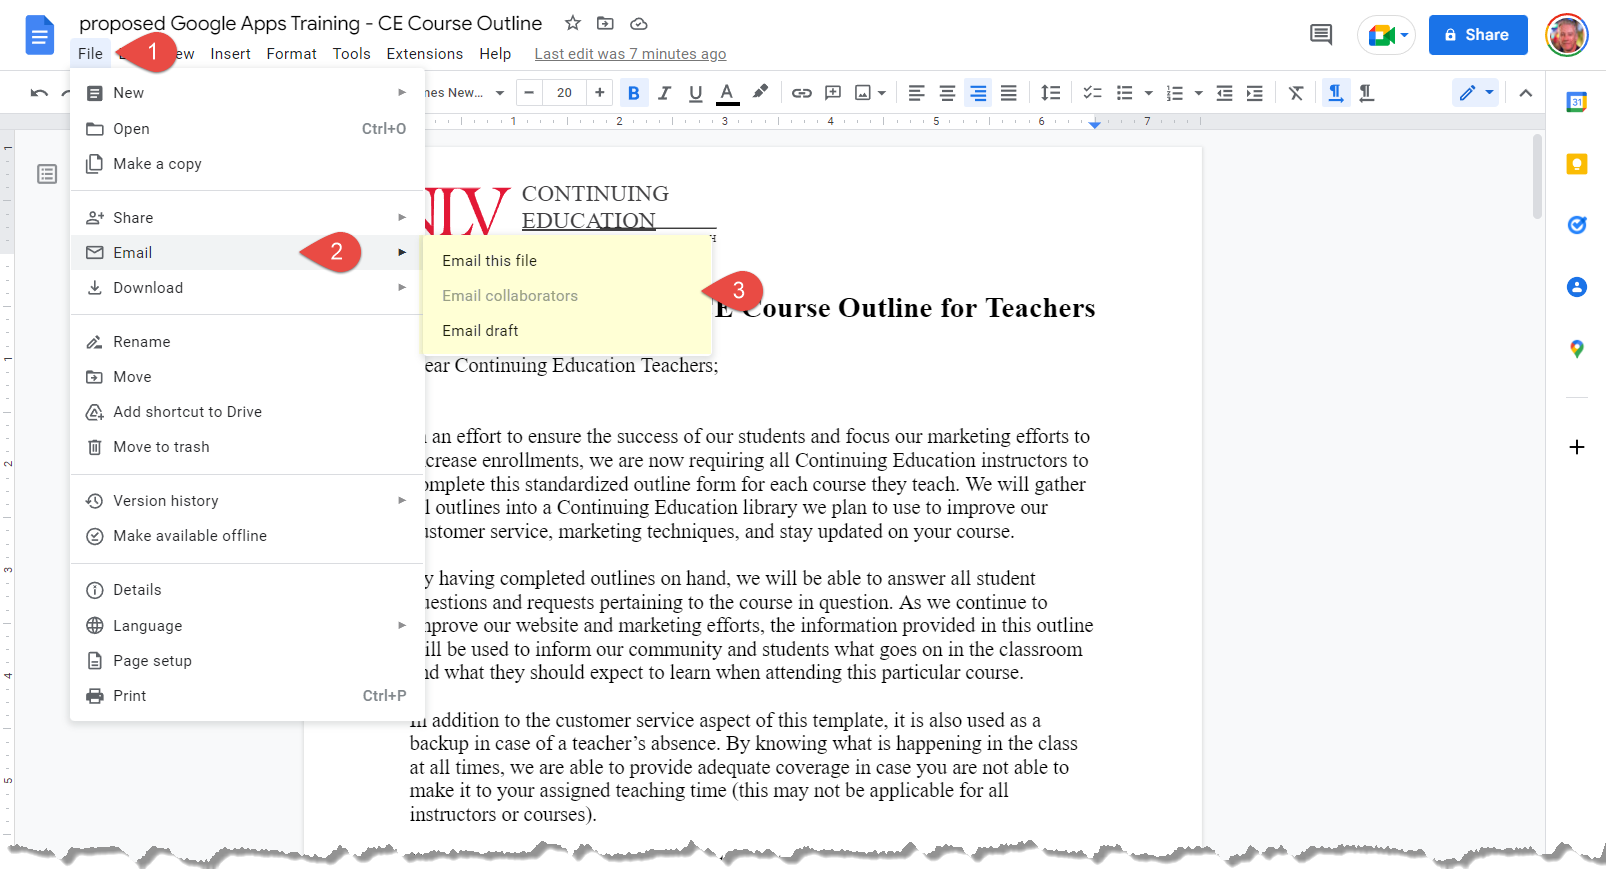
1. Click File on the menu bar.
2. Select Email.
3. Select an attachment type.
Complete email instructions.
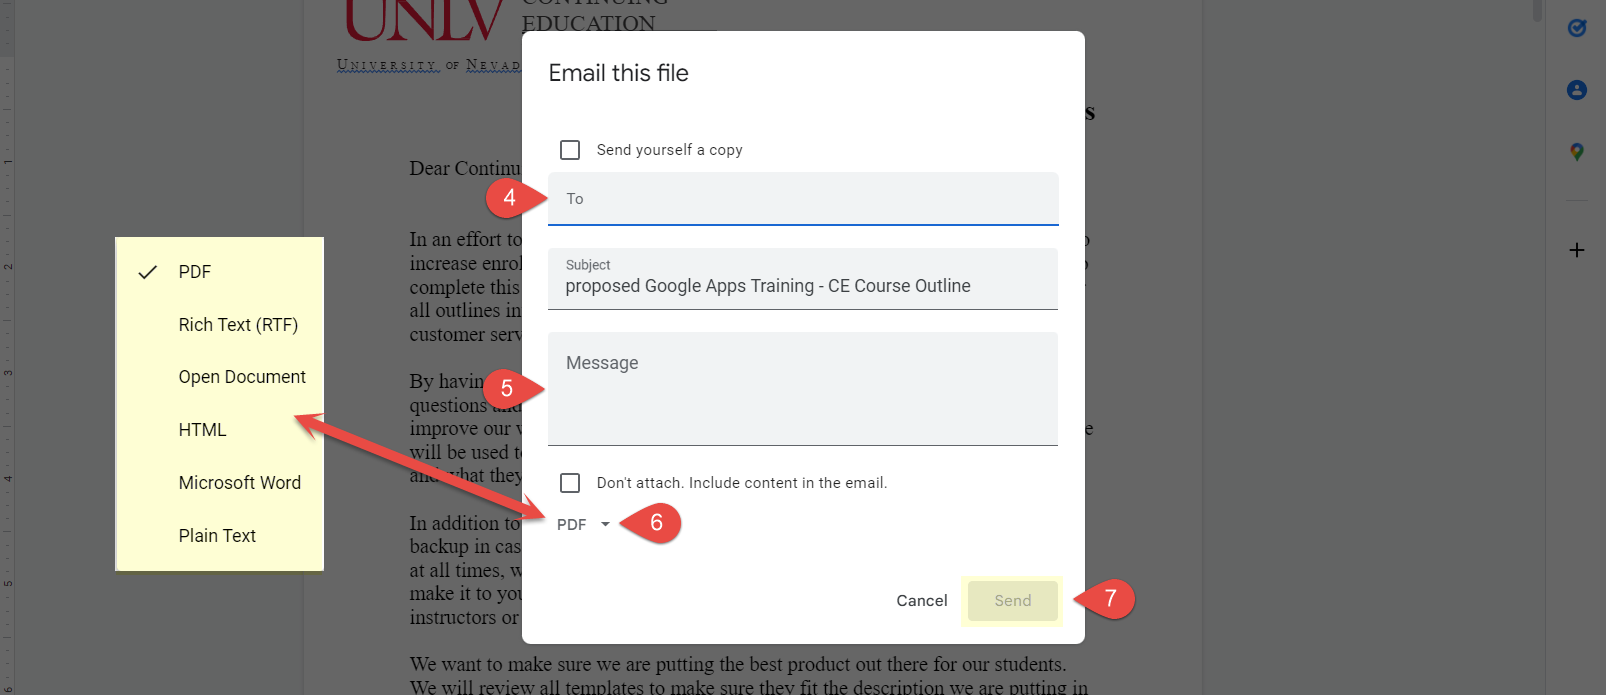
4. Add your email recipient(s).
5. (Optional) Type a personalized message.
6. Select the format you want to send.
7. Click Send.
The document is sent as an email attachment.
How to Share Google Docs Documents
Sharing a document in Google Docs allows you to give other people access to view or edit the document. When you share a document, you can specify the level of access that you want to grant to others.
Share a Document
1. Click the Share button.
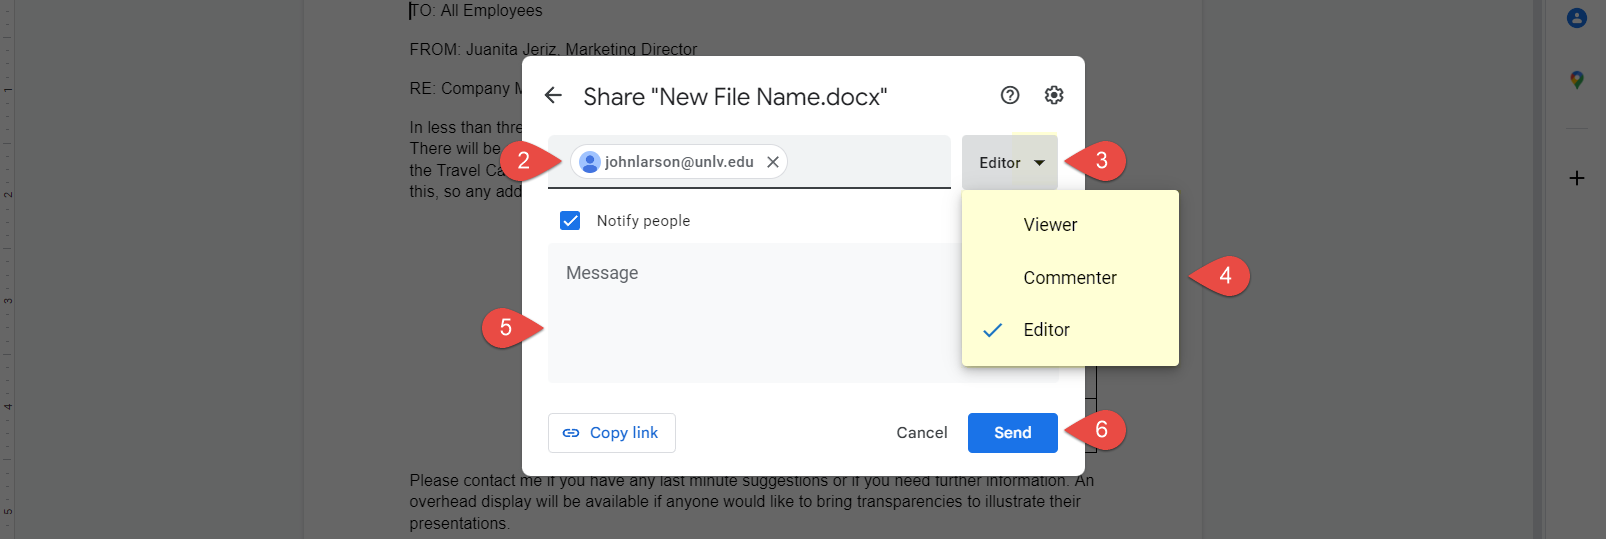
2. Enter the email address(es) for the people you want to share with.
3. Click the Permissions list arrow.
4. Select a permissions level.
- Viewer: Anyone who has been invited is only able to view the document, not make changes or share the file with others.
- Commenter: Anyone who has been invited is able to make comments and suggestions but can’t make changes or share the file with others.
- Editor: Anyone who has been invited to the document can make changes and share the file with others.
5. (Optional) Write a message for the recipient.
6. Click Send.
An email invitation is sent, and the document is now added to the Google Drive of everyone you shared it with.
EXAMPLE
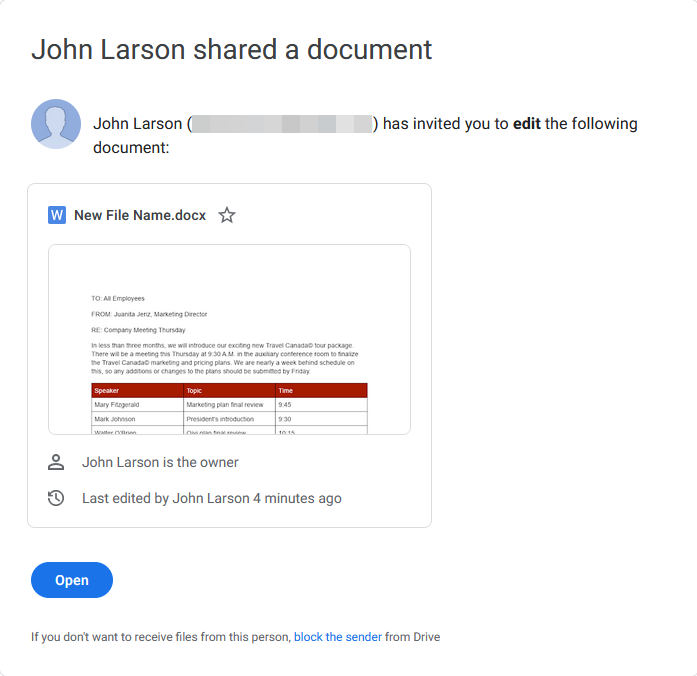
Example: Document Share Invite email
Change Share Settings
1. Click the Share button.
Here you see a list of everyone the document is shared with, as well as their permissions.
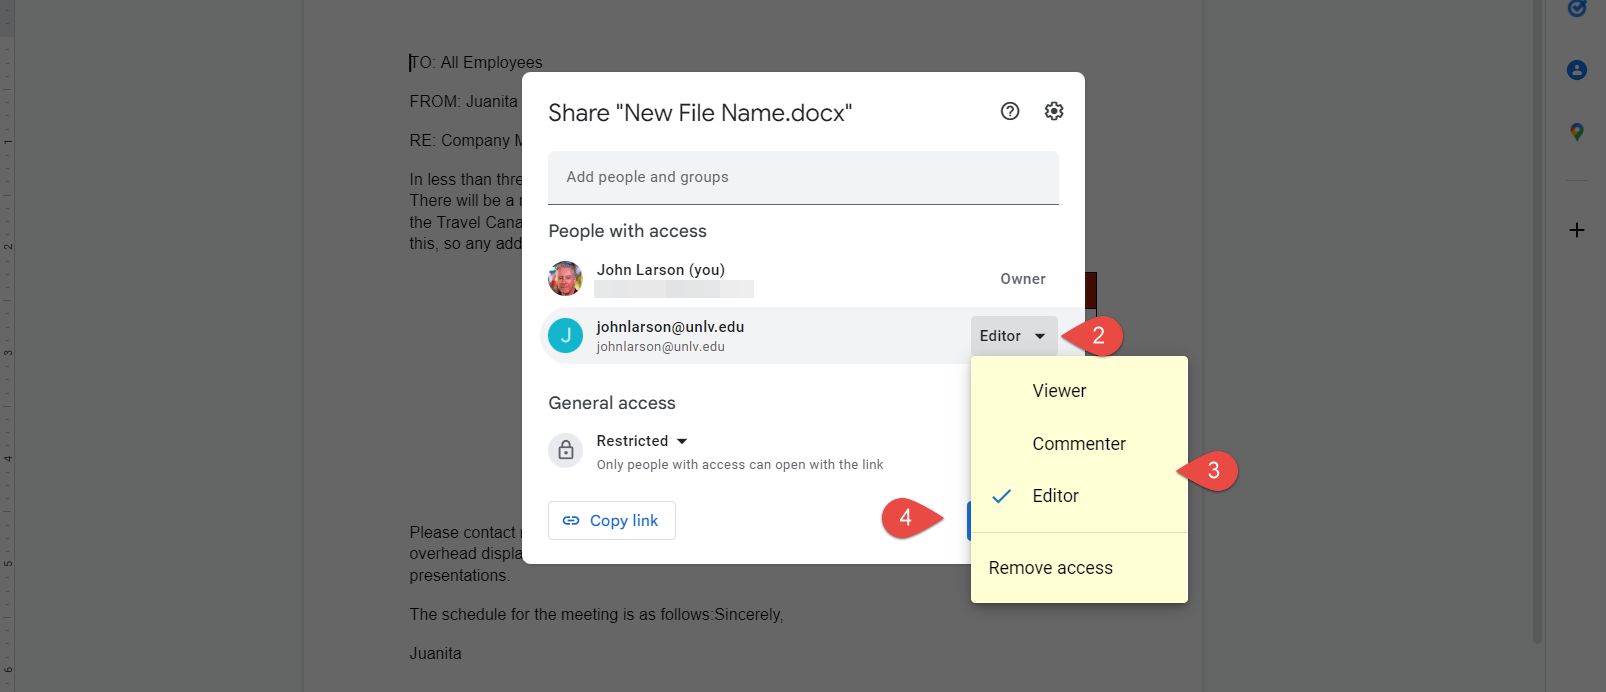
2. Click the Permissions list arrow.
3. Select new permissions level for the person whose permissions you want to change.
4. Click Done.
The Share settings are changed to the permissions level you specified.
Global Shared File Permissions
General Access
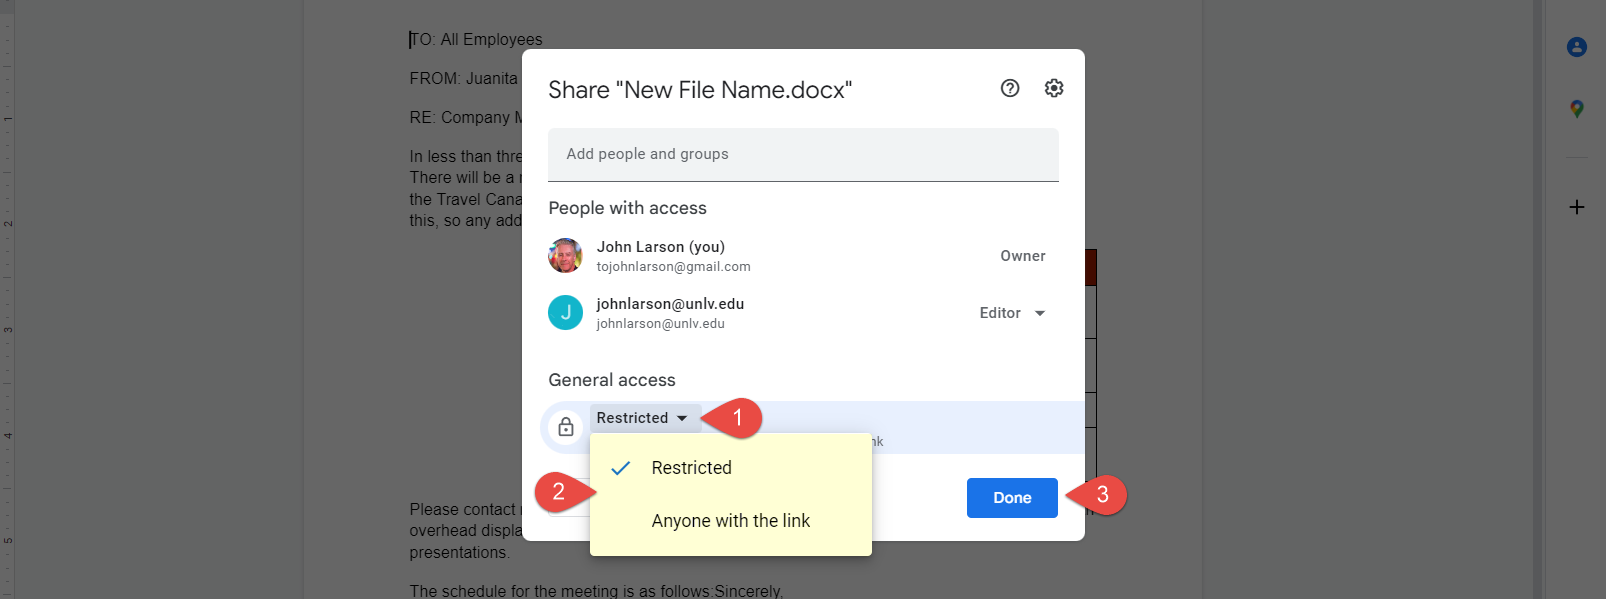
Click the Share button.
1. Click the General Access arrow.
2. Select access restriction levels.
3. Click Done.
Other Shared Filer Permissions
Click the Share button.
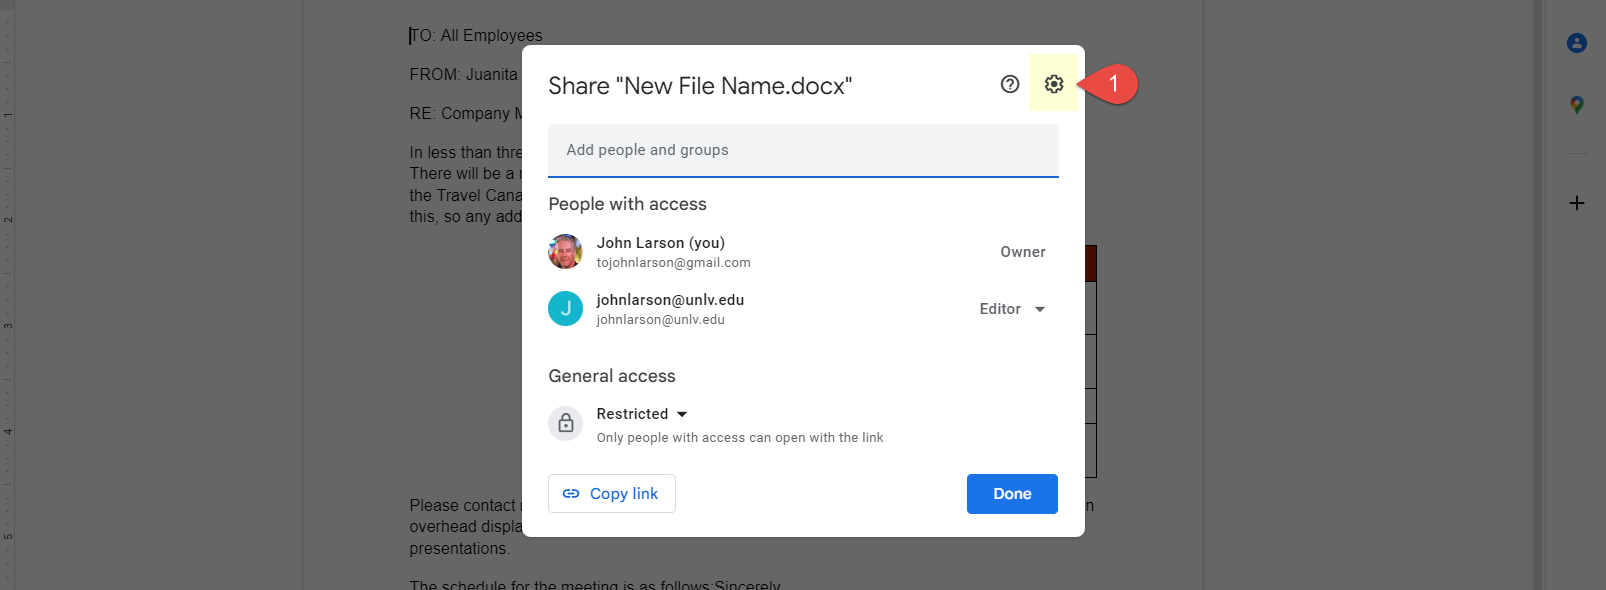
1. Click the Gear button to access permission settings.
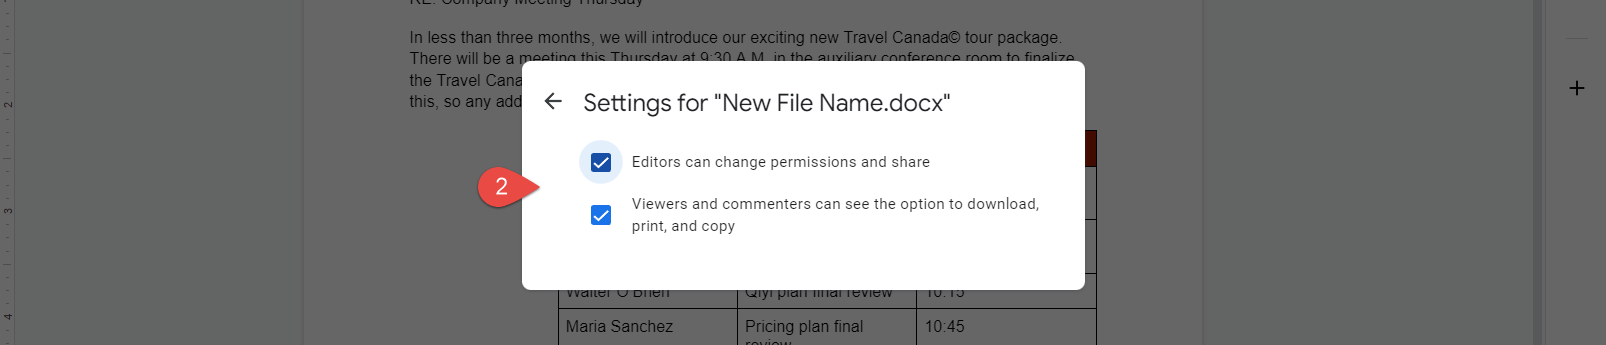
2. Select additional file permissions for Editors and Viewers.
3. Click Done.
New file permission are changed to the permissions level you specified and will affect everyone with shared access.
How to Collaborate in Google Docs
Collaborating on a document means working on the same document with other people at the same time. Google Docs allows multiple people to edit the same document simultaneously and see each other’s changes in real-time.
NOTE: When a collaborator is editing the document at the same time as you, you’ll see their text cursor, and their changes will appear in real-time.
Add Comments
Google Docs commenting feature can be helpful for group projects, brainstorming sessions, and collaborative editing, as it allows all team members to share their thoughts and feedback in real-time. When someone adds a comment to the document, it will appear in a comment box along the side of the page, and all team members will be notified. Each comment can also be replied to, allowing for a conversation to take place within the document.

1. Click into the document where you want to place the comment.
2. Click Insert on the menu bar.
3. Select Comment.

4. A comment balloon is added to the margin.
5. Type your comment into the text field.
6. Click Comment.
Now anyone else viewing the document will see what you had to say about it.
Edit a Comment
“Comments” can be editing if you need to make updates.
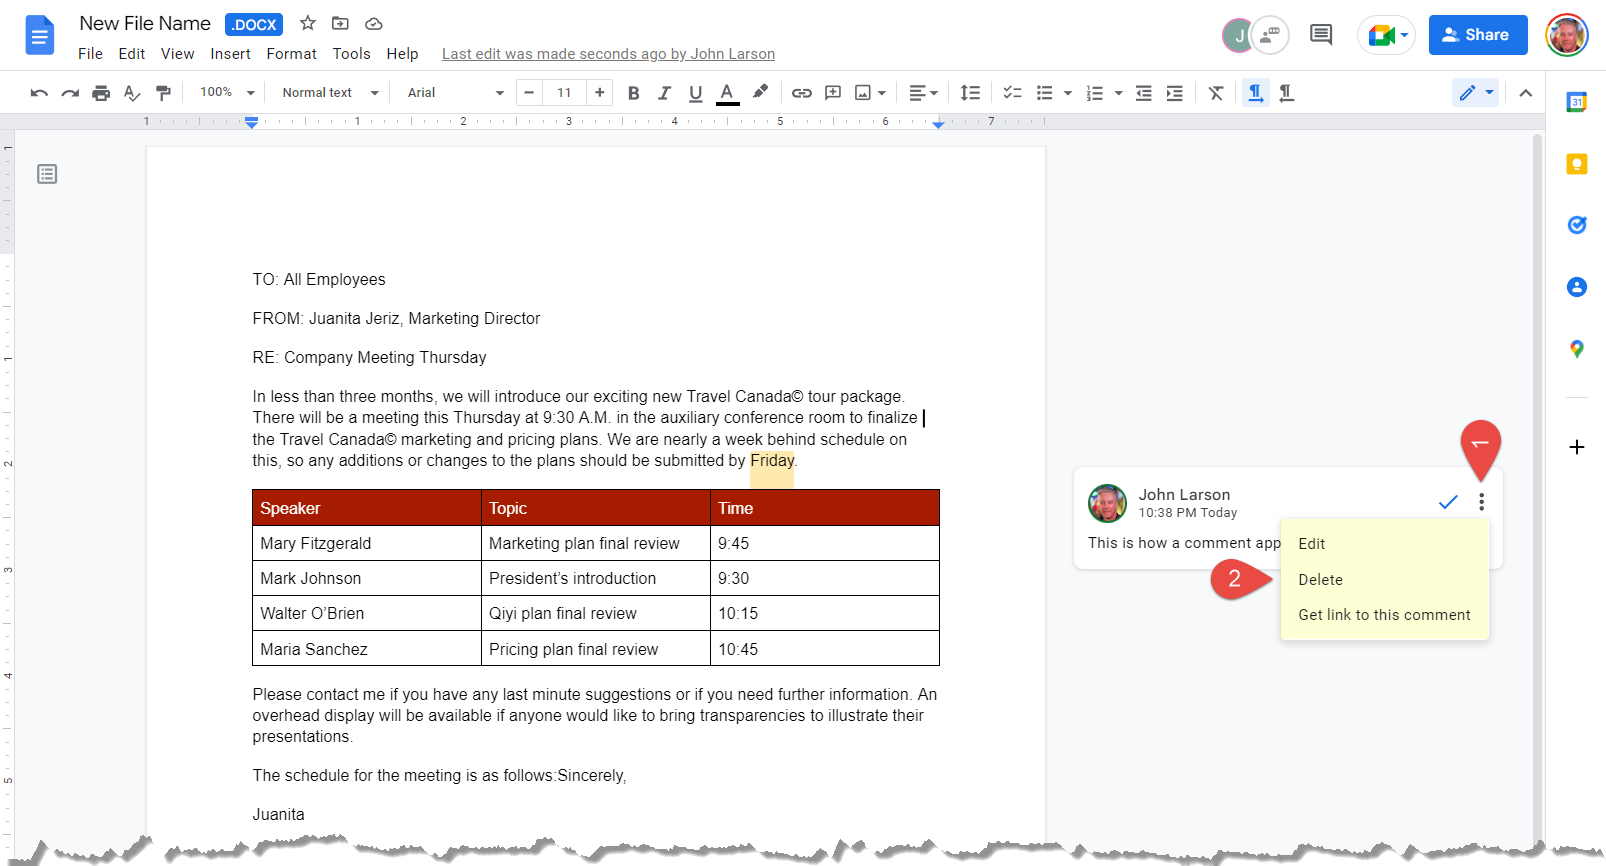
1. Click on the More button in the Comment balloon.
2. Select Edit.
The comment balloon will open where you can make you edits, delete the comment entirely, or grab a link for the comment.
NOTE: Comments can only be deleted by the comment author. However, the original comment has priority over all comment in the comment thread. If the original comment is deleted, all comment replies for that comment will also be deleted.
Reply to a Comment
In addition to making your own new comments, you can also reply to other members comments. This comment conversation will form a thread.
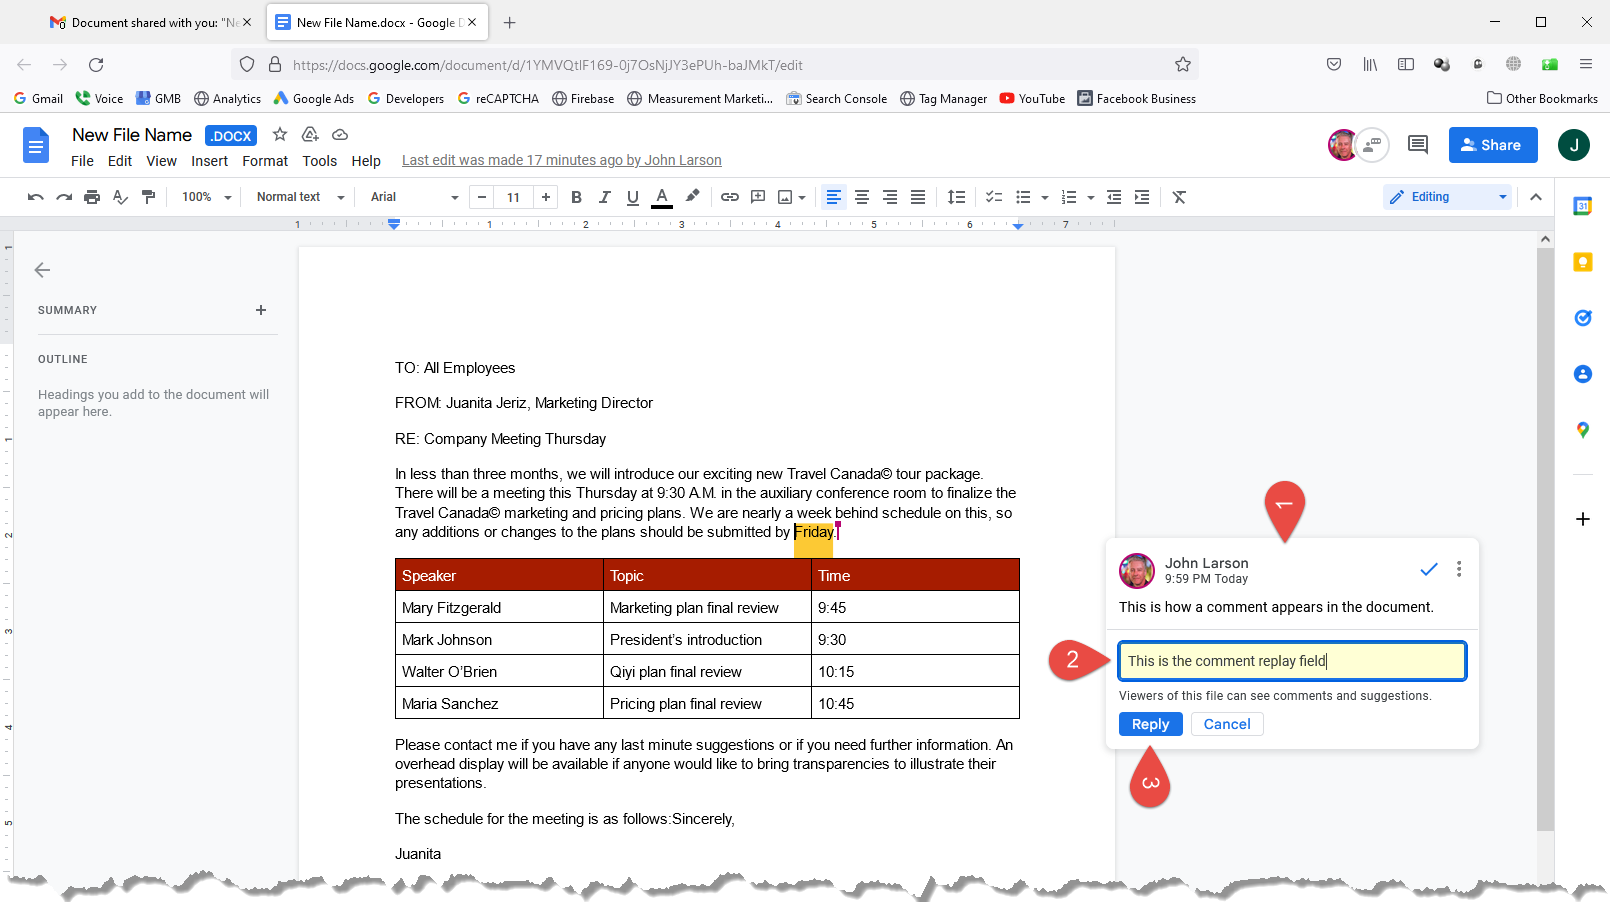
1. Click a comment.
2. Click in the Reply field and type reply.
3. Click Reply.
Resolve a Comment
Resolved comments are comments that have been addressed or resolved, but are still visible in the document. This is in contrast to deleted comments, which are permanently removed from the document. Resolved comments are added to the comment history in Google Docs, and can be brought back to the document if needed. This feature allows users to track the progress and resolution of comments during the collaboration process.
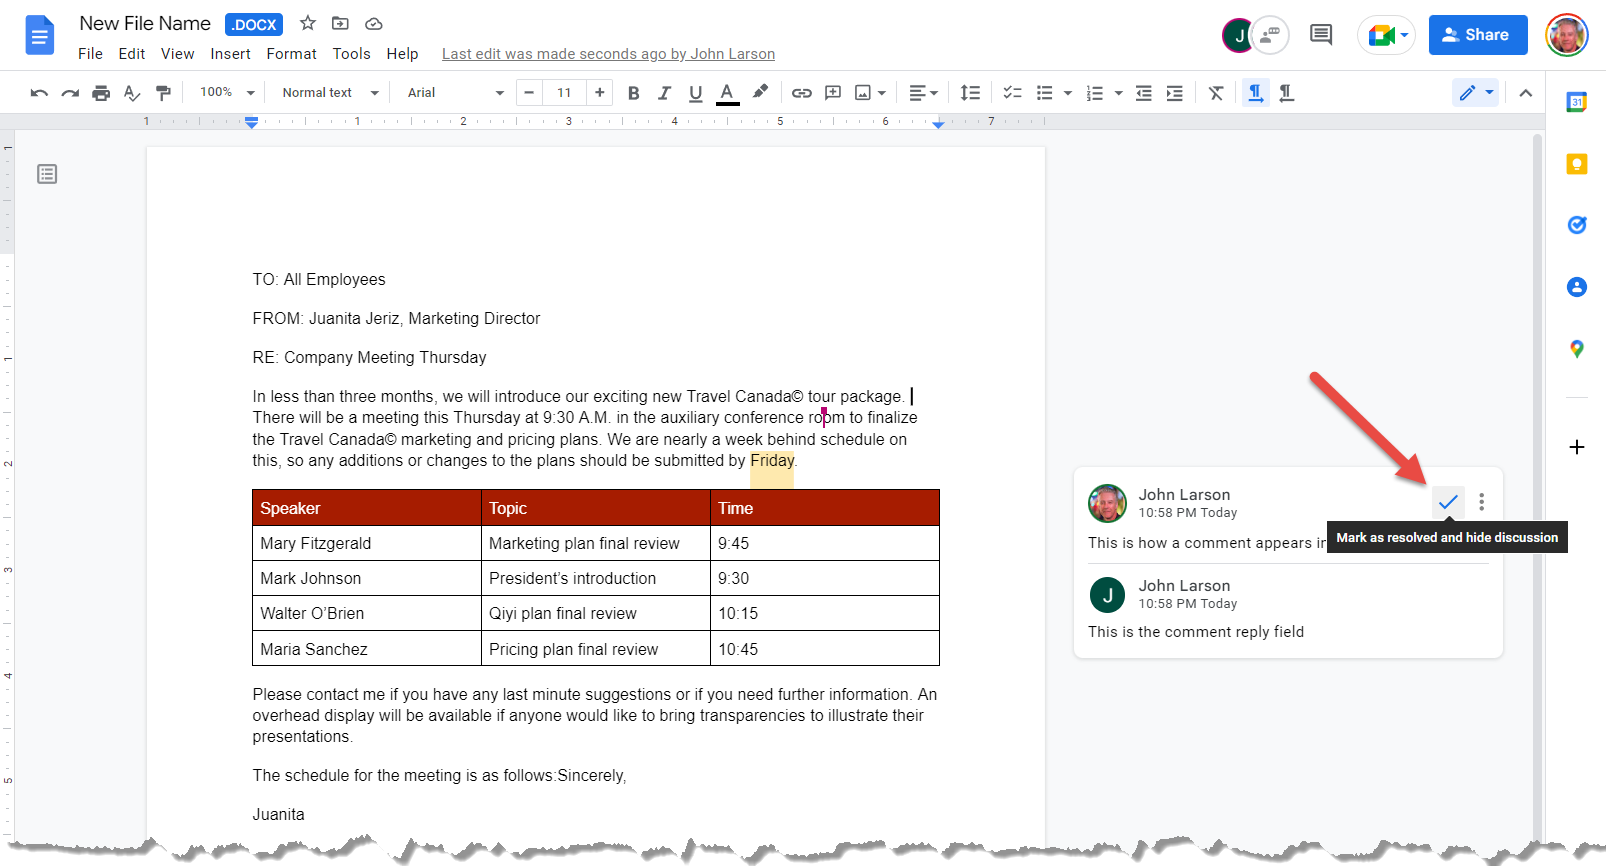
1. Click the Resolve checkmark.
Once a comment is resolved, it will no longer appear in the document.
Comment History
Comment history can be accessed from the header above the menu. Comments can filtered by All, For You, Open, and Resolved making it easier to locate specific comments.
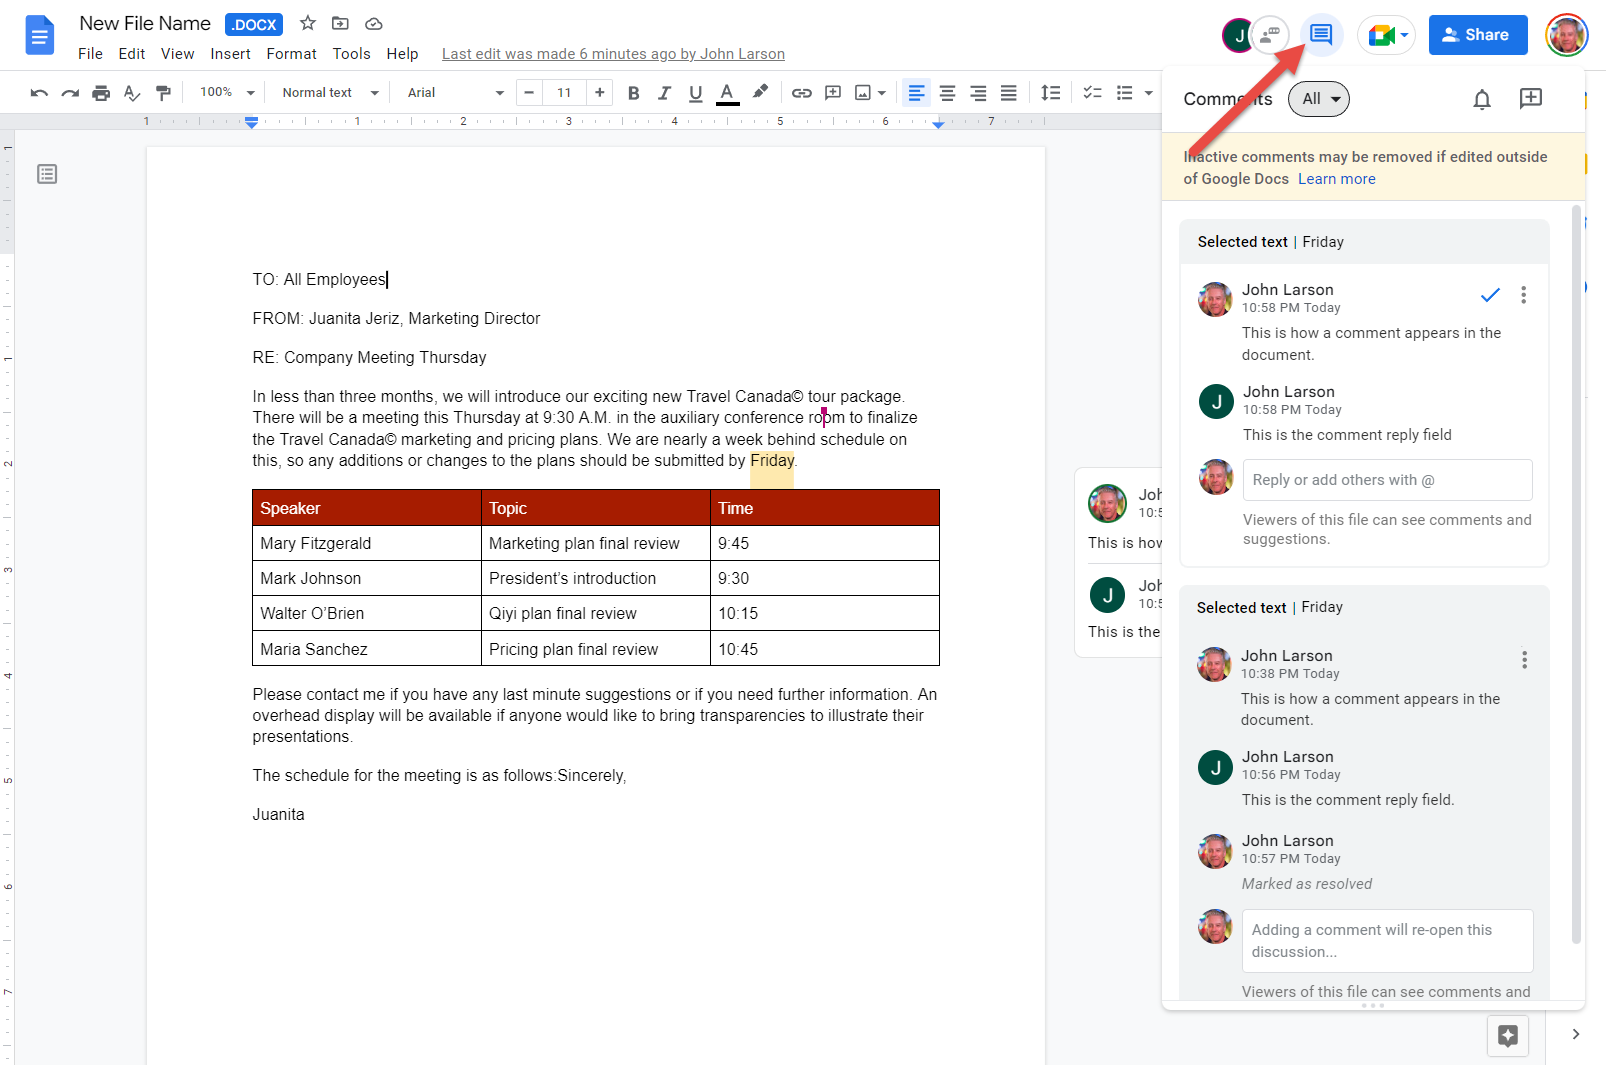
1. Click the Comment Text icon in the header.
Comment history will open in the sidebar with a history of all comments and replies.
NOTE: You can close the Comment history panel by clicking anywhere outside of the open pane.
How to Suggest Edits in Google Docs
When you are working on a shared document in Google Docs, your changes will automatically be visible to everyone who has access to the document. However, you can choose to switch to a “suggest edits” mode, where your changes will be highlighted but not immediately applied to the document. Alternatively, you can switch to a “view-only” mode, where you can view the document but cannot make any changes.
Edit with Suggesting Mode
“Edit with Suggest Mode” is a feature in Google Docs that allows you to suggest changes to a document, rather than directly making them. When you are in suggest mode, any changes that you make to the document will be highlighted and displayed as suggestions to the document owner or other collaborators. The document owner or other collaborators can then review your suggestions and choose to accept or reject them. This feature can be useful in a collaborative setting, as it allows multiple people to contribute to the document without overwriting each other’s changes.
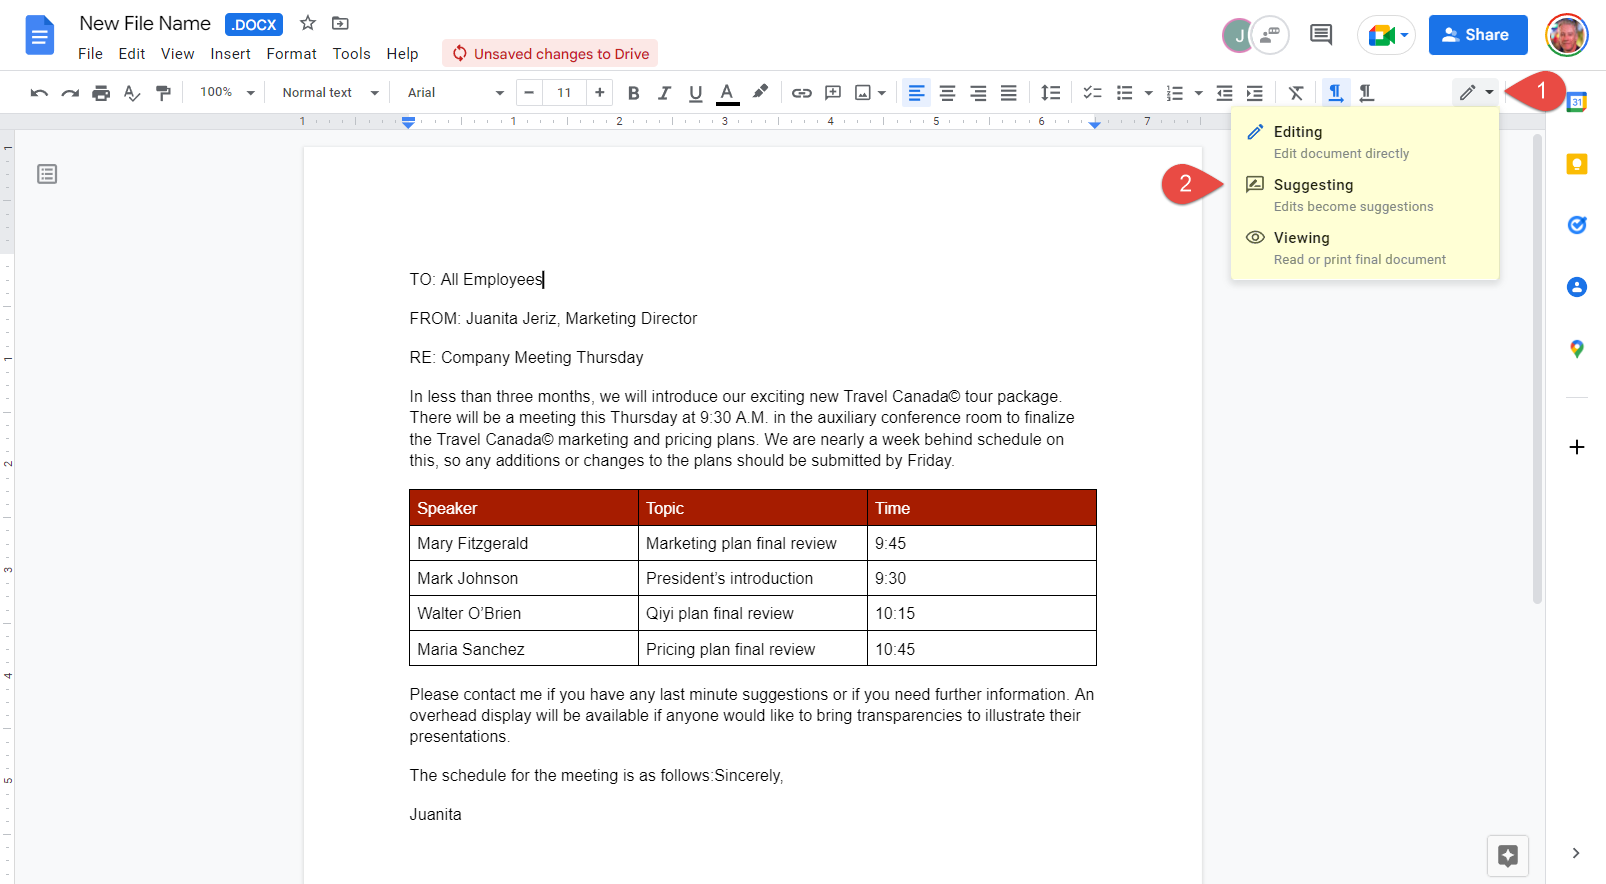
1. Click the Editing mode icon in the upper right.
From this menu, you can select one of three modes:
- Editing mode: You can edit the document directly. This is the default mode.
- Suggesting mode: You can make suggested edits to a document that other people can review.
- Viewing mode: Read-only mode. The document can be read in final view or printed.
2. Select Suggesting.
Document is in Suggestion mode. Each edit is marked as a suggestion with authorship details stored in a comment in the margin.
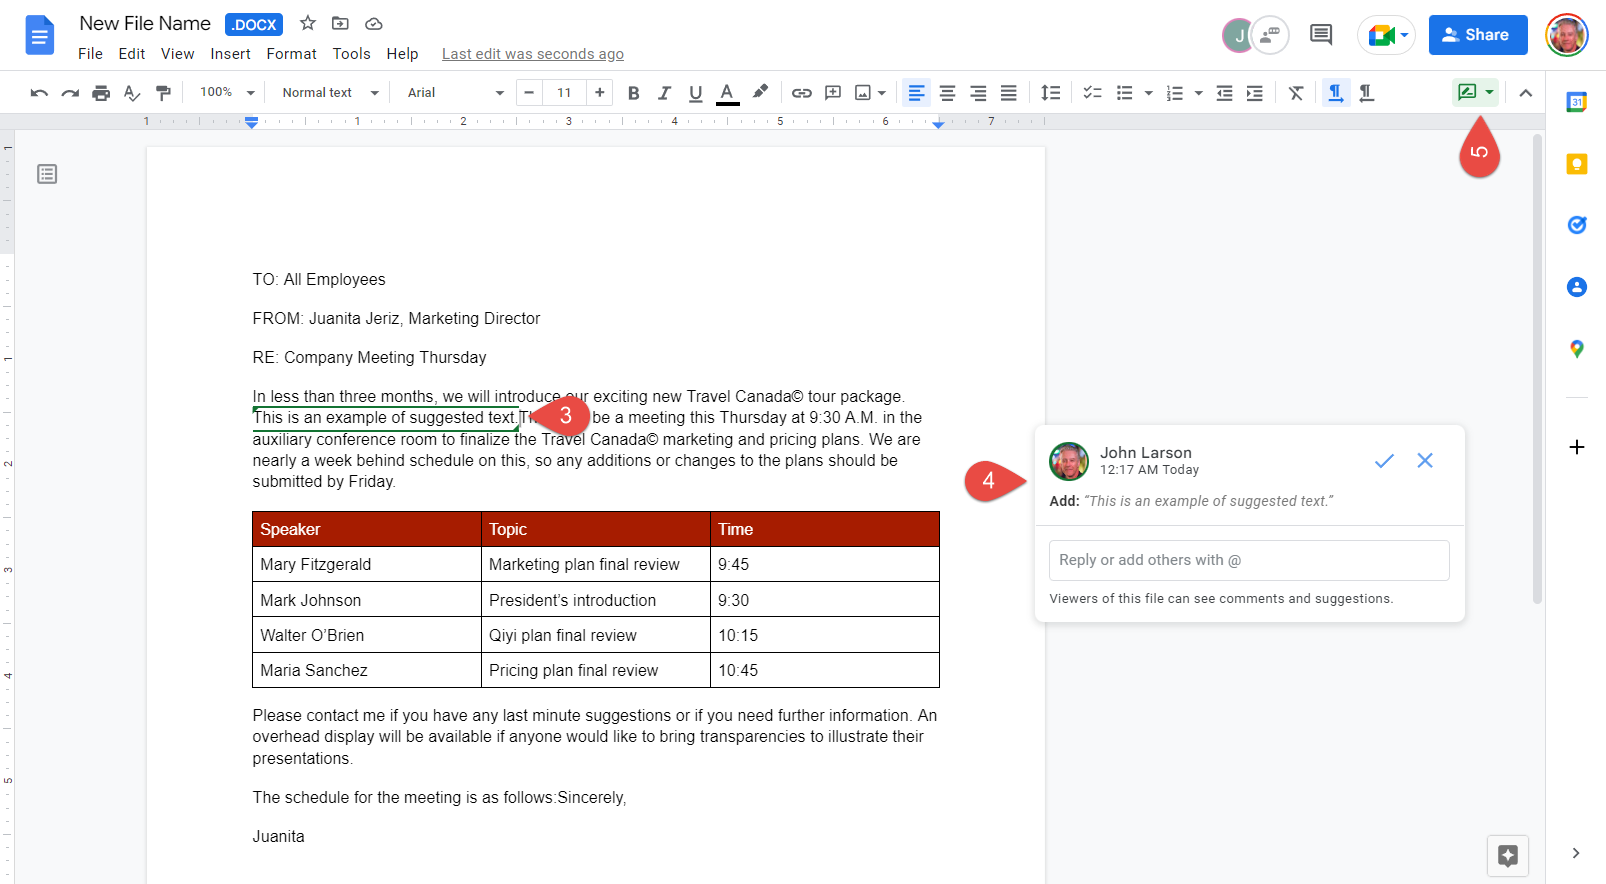
3. Click into the document where you want to make a suggested edit and begin typing.
4. The edit suggestion(s) will appear in the margin.
5. The document will remain in Suggestion mode until click the Edit icon and change the mode.
Accept or Reject Suggested Edits
You can accept or reject any suggested edits that other users have posted.
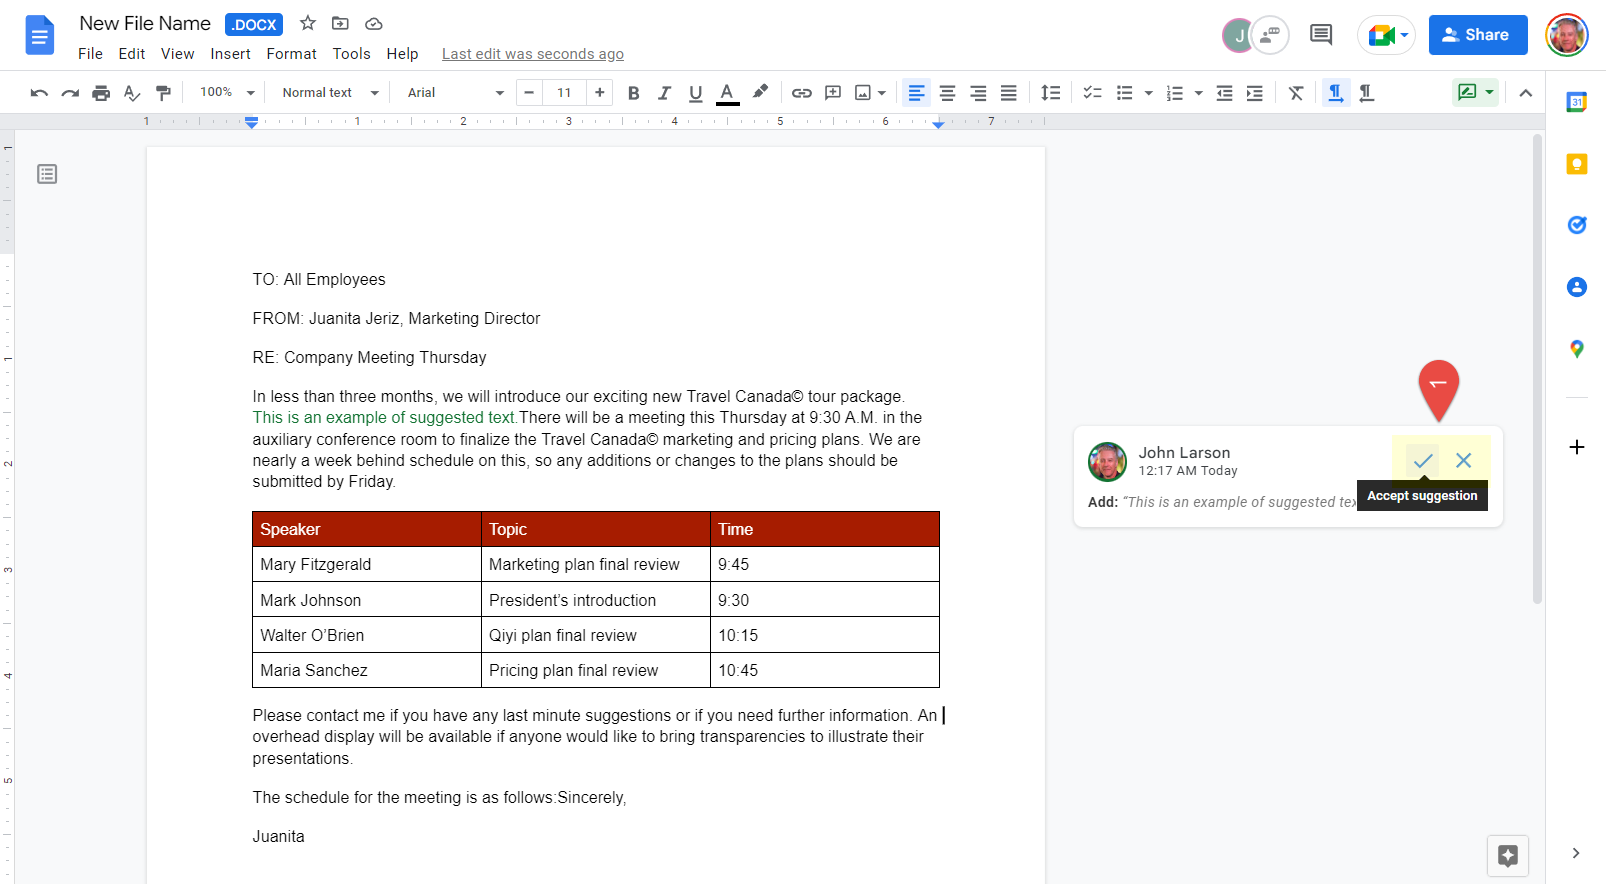
1. Click the Accept (✔) or Reject (✖) button for the edit or be accepted or deleted.
Edit changes are made to the document of the suggested edit is deleted.
Working with Versions in Google Docs
“Version History” is a record of all changes that have been made to a document over time. It includes information about who made the changes, when they were made, and what the changes were. This can be useful for tracking the progress of a document, seeing how it has evolved over time, and reverting back to an earlier version if needed.
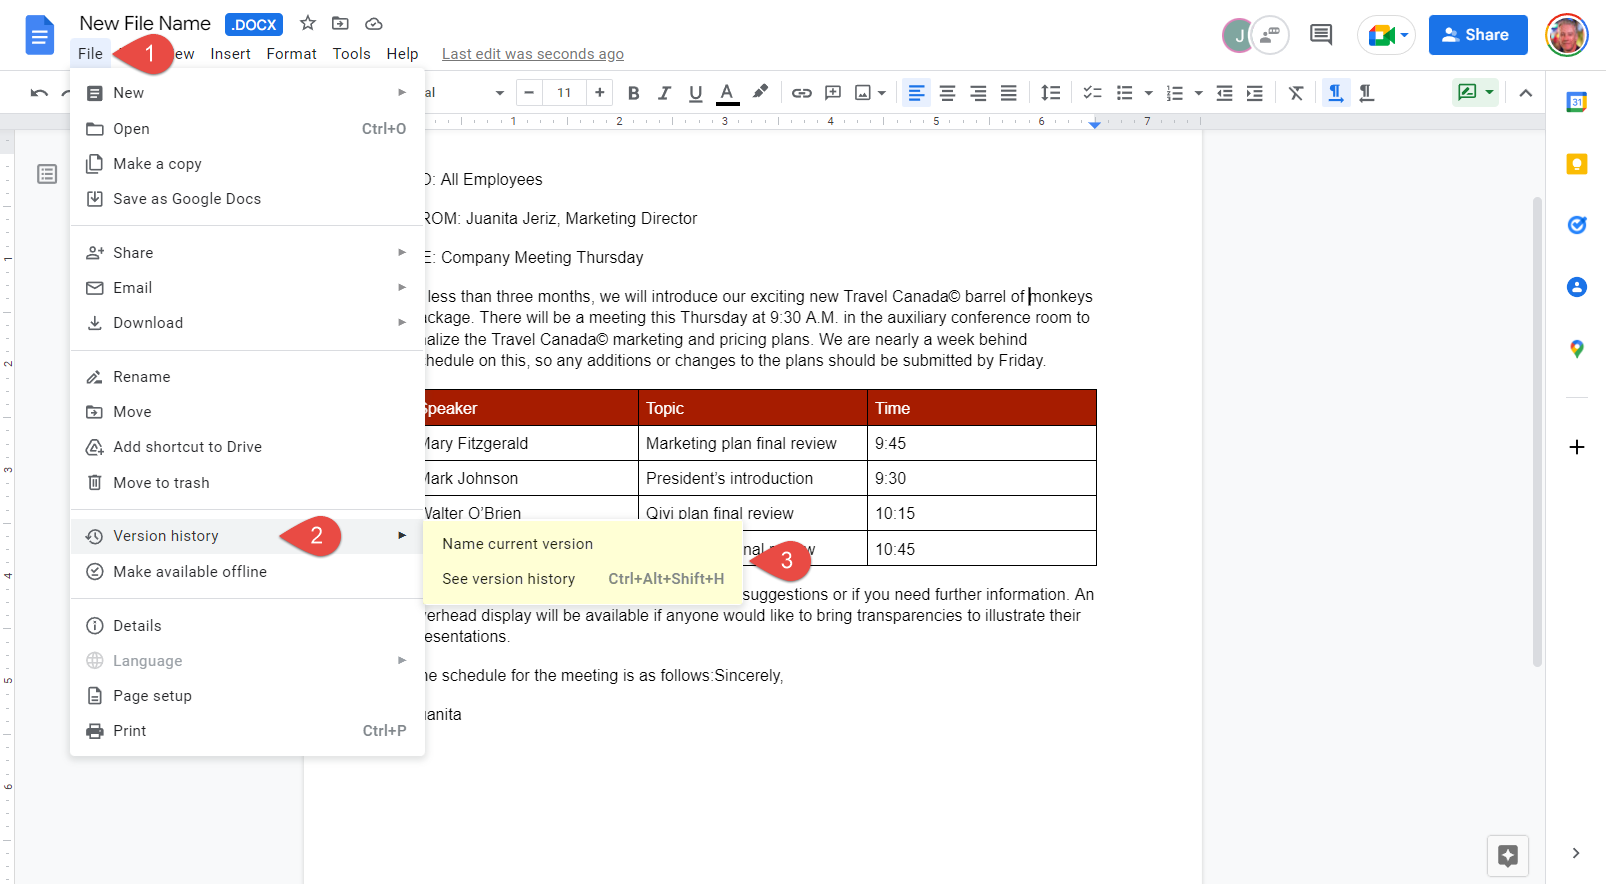
1. Click File on the menu bar.
2. Select Version history.
3. Select See version history.
The Version history pane appears at the right showing all previous versions that have been autosaved.
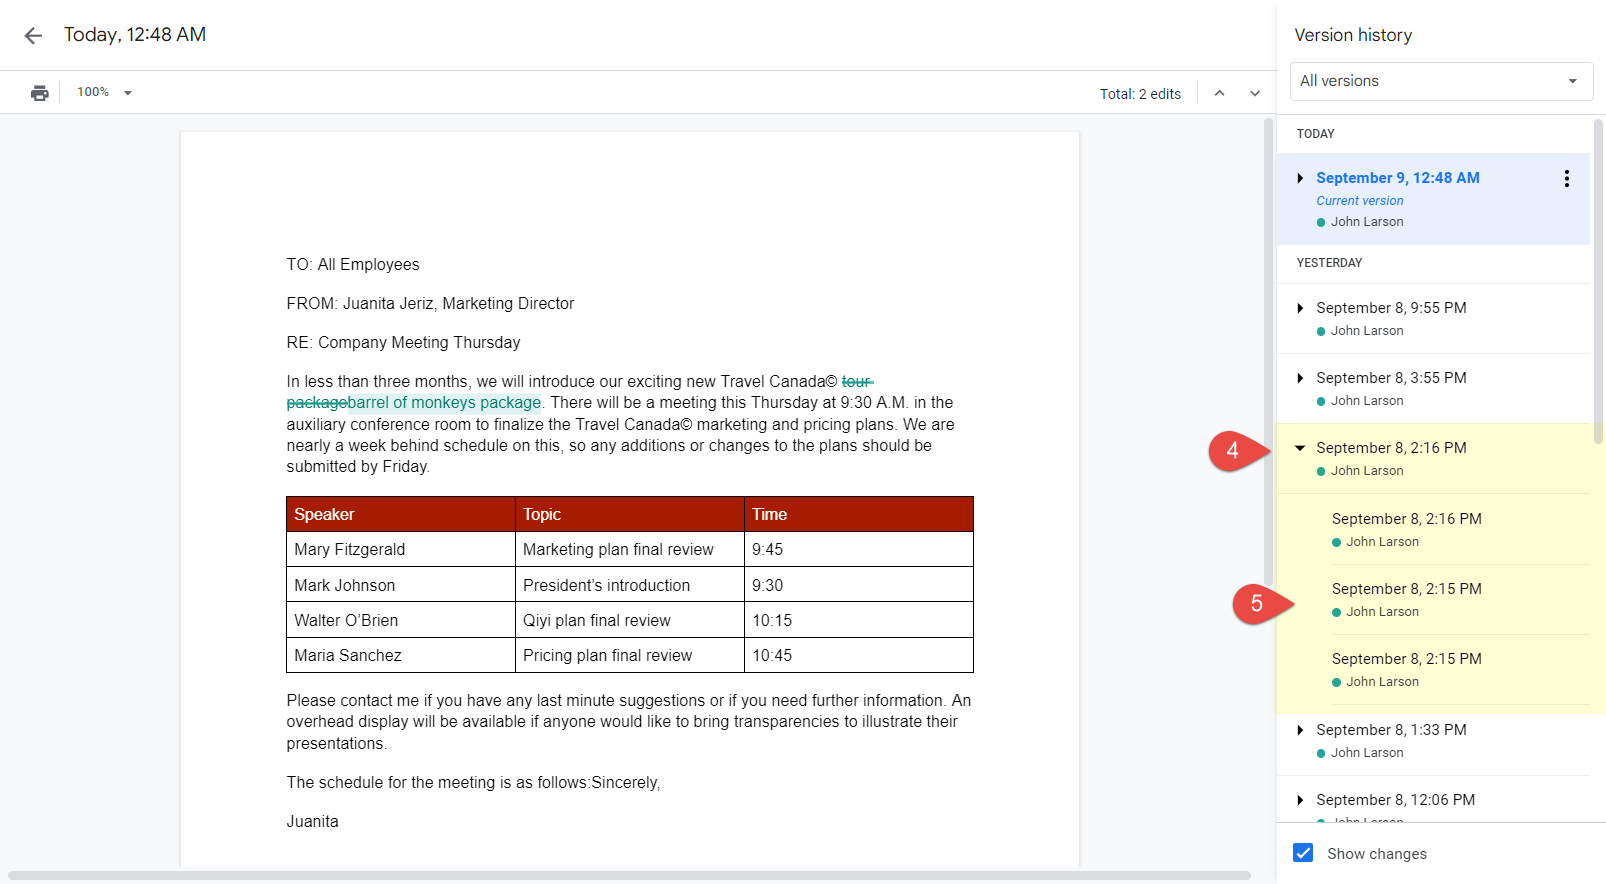
4. Select a different version of the document.
You’ll see a preview of that version at the left.
5. And a dropdown history of the changes that were made to that version.
Any changes that were made are timestamped with the edit time.
Create a Named Version
You can name a version to make it easier to find.
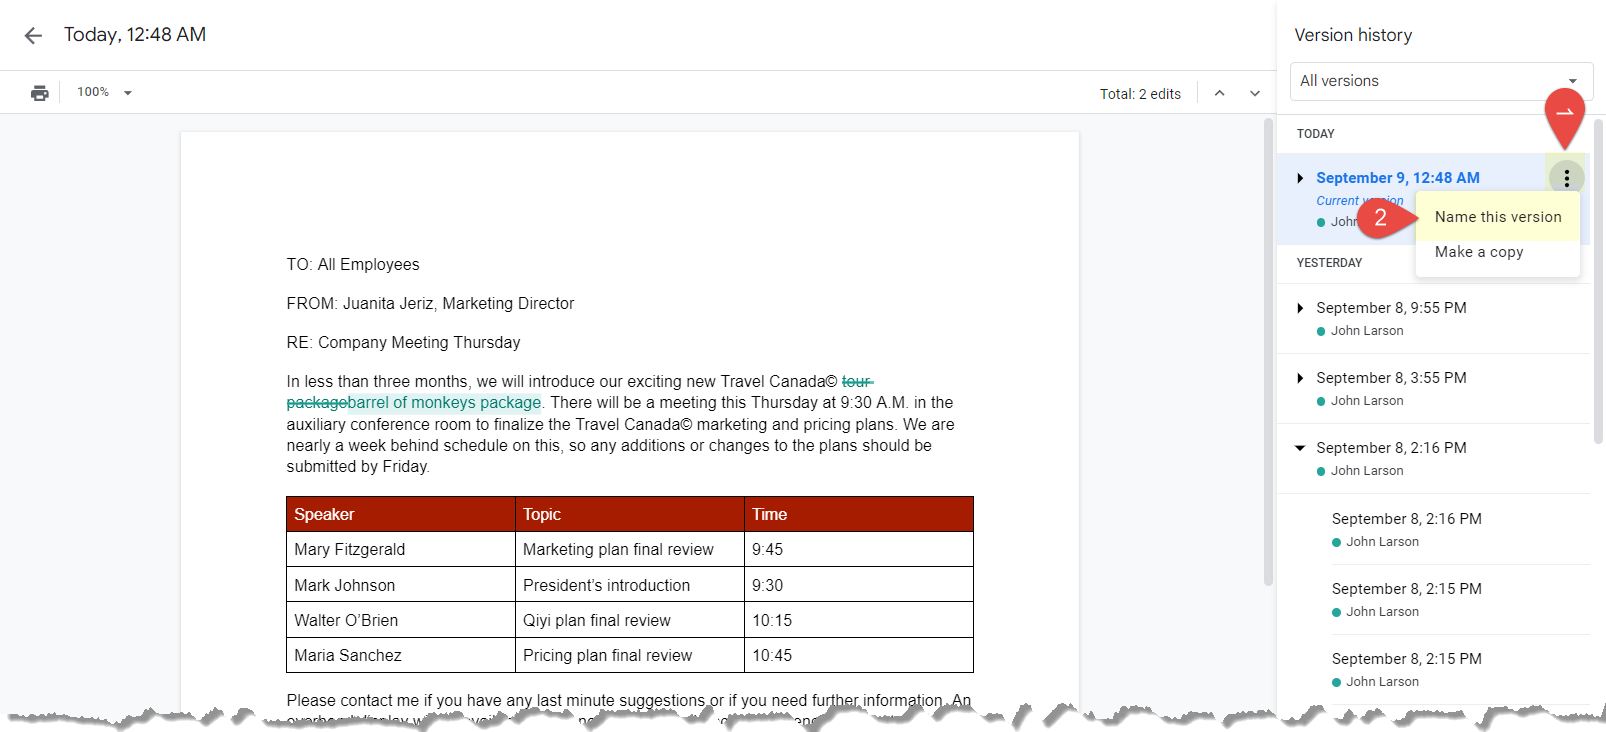
1. Click the More actions button for the version you want to name in the Version history pane.
2. Select Name this version.
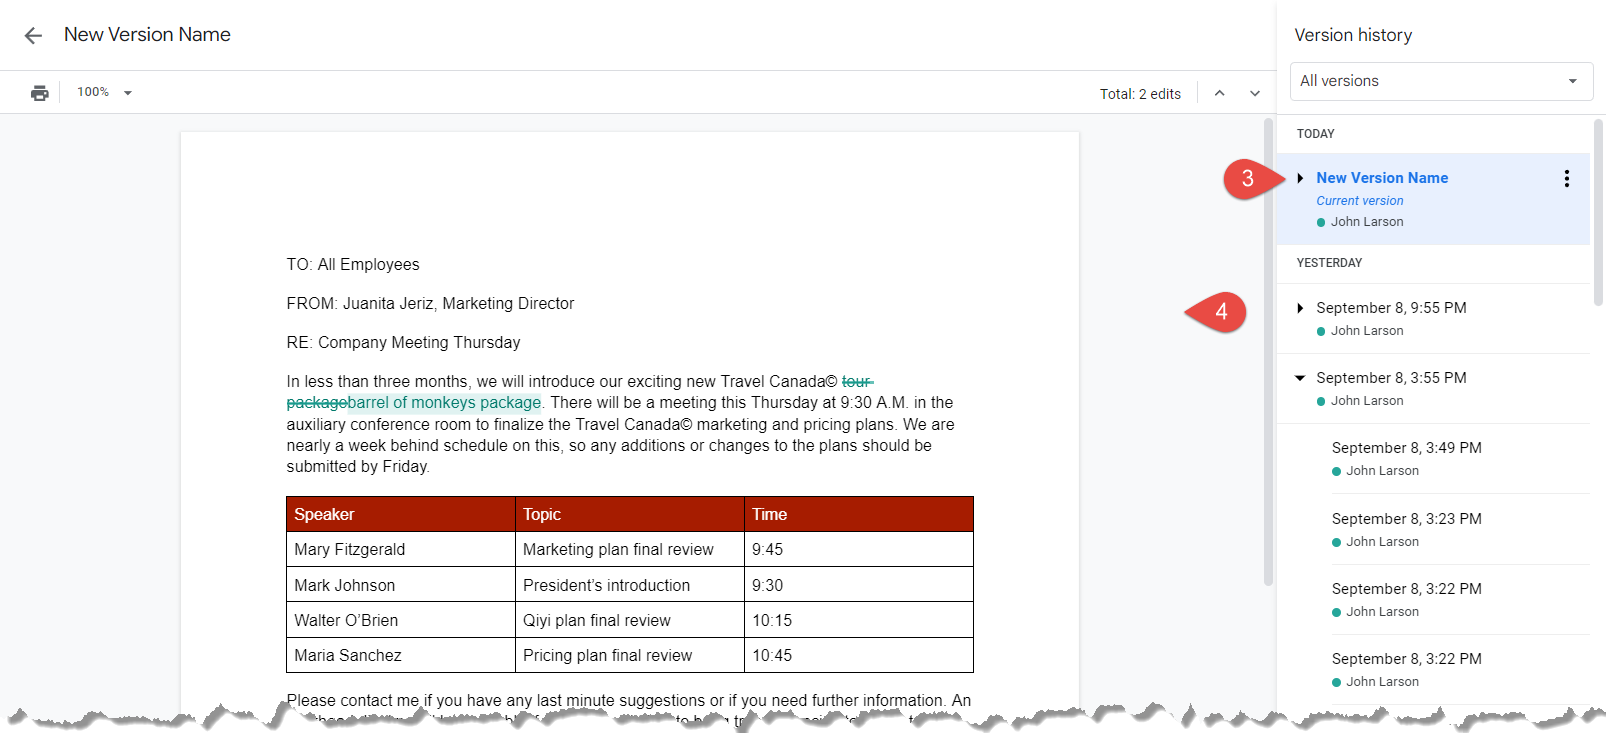
3. Type a name for the version.
4. Click outside the name field.
The version is named.
Restore a Version
This is a helpful feature if you need to revert back to an older version of the document or if you want to see how a document has evolved over time. Viewing previous versions in the history panel does not automatically bring the version back – it only displays a preview of that specific version. To restore a previous version, you must make a confirmation before the file is updated to the selected version.
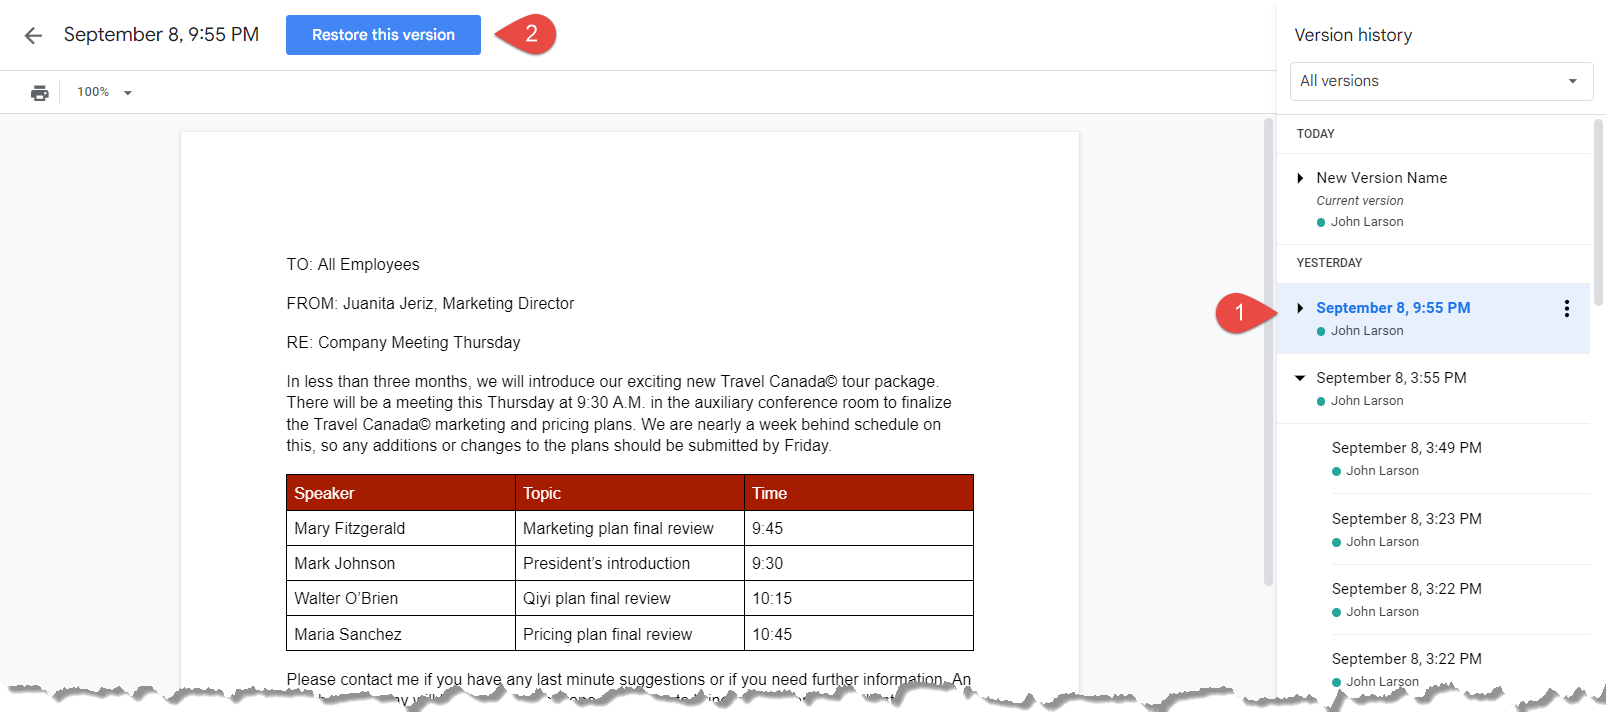
1. Select the version you want to restore in the version history pane.
2. Click the Restore this version button.

3. Click Restore to confirm.
The older version is restored to the active version and you can continue making edits.
How to Install Add-Ons in Google Docs
Google Docs Add-Ons are third-party tools (software) that you can use to enhance the functionality of Google Docs. There are dozens of add-ons to choose from, things like equation editors, additional fonts, table styles, and so much more. Some add-ons are free to use, while others require a subscription or one-time payment. You can access and install add-ons from the Google Docs Add-ons store, which can be found in the “Add-ons” menu within a Google Docs document.
Install an Add-On

1. Click Extensions on the menu bar.
2. Select Add-ons.
3. Select from Get add-ons or Manage add-ons.

4. You can scroll through the Google Workspace Marketplace listing of add-ons or use the Search field.
5. Click on the add-on you want to install.
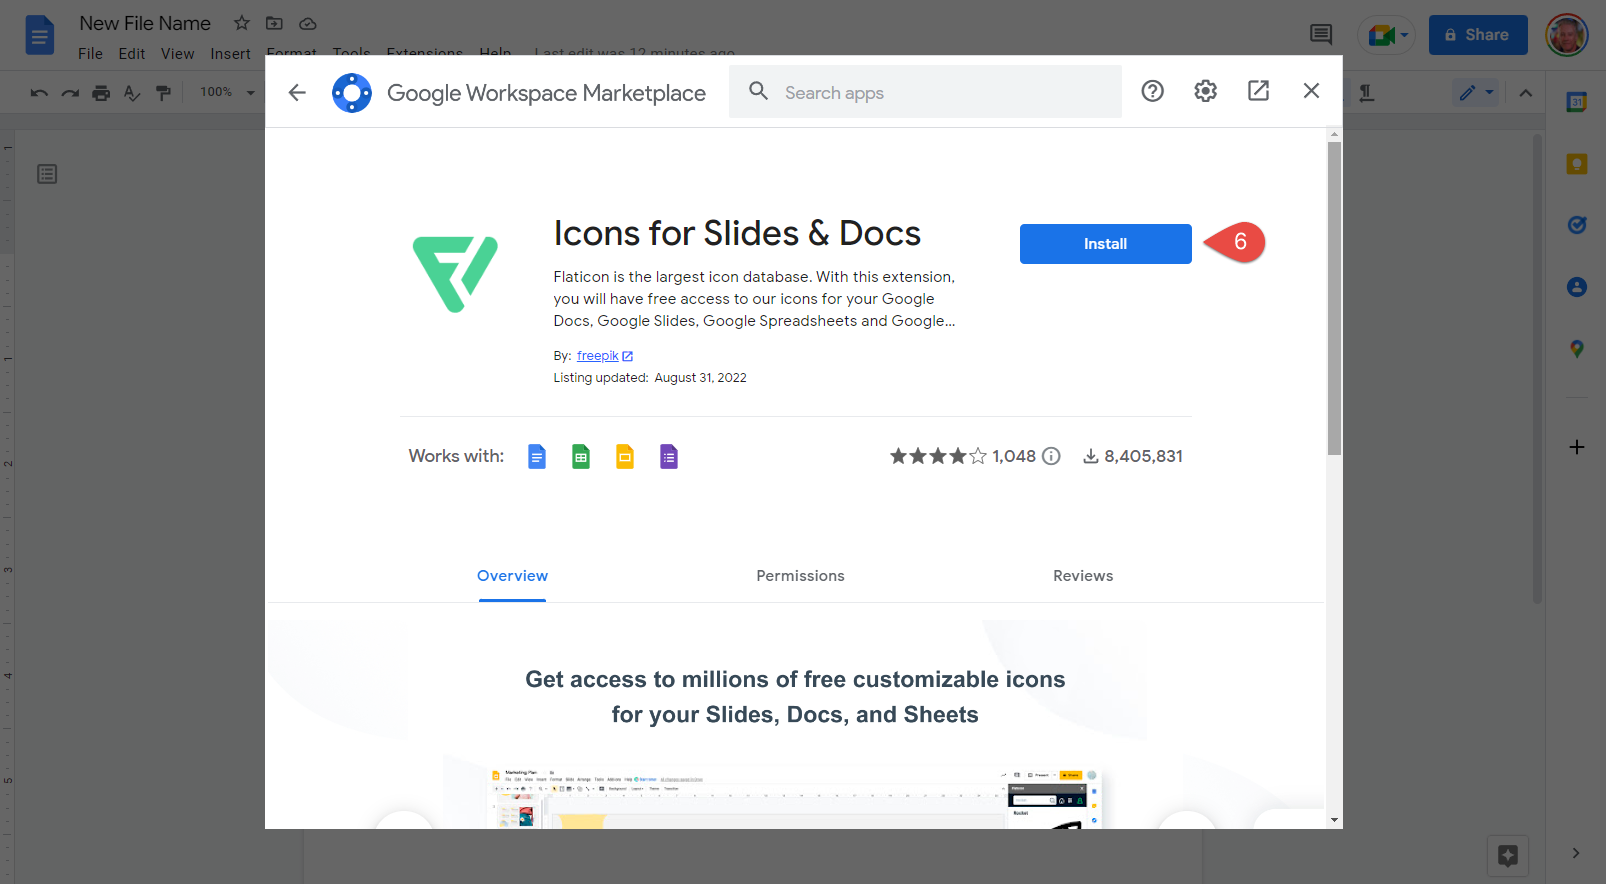
6. Click the Install button. You may need to grant permission to install the add-on to your Google account.
The add-on is installed to Google Docs.
Access Add-Ons
All of your installed add-ons are available in the Add-ons menu.
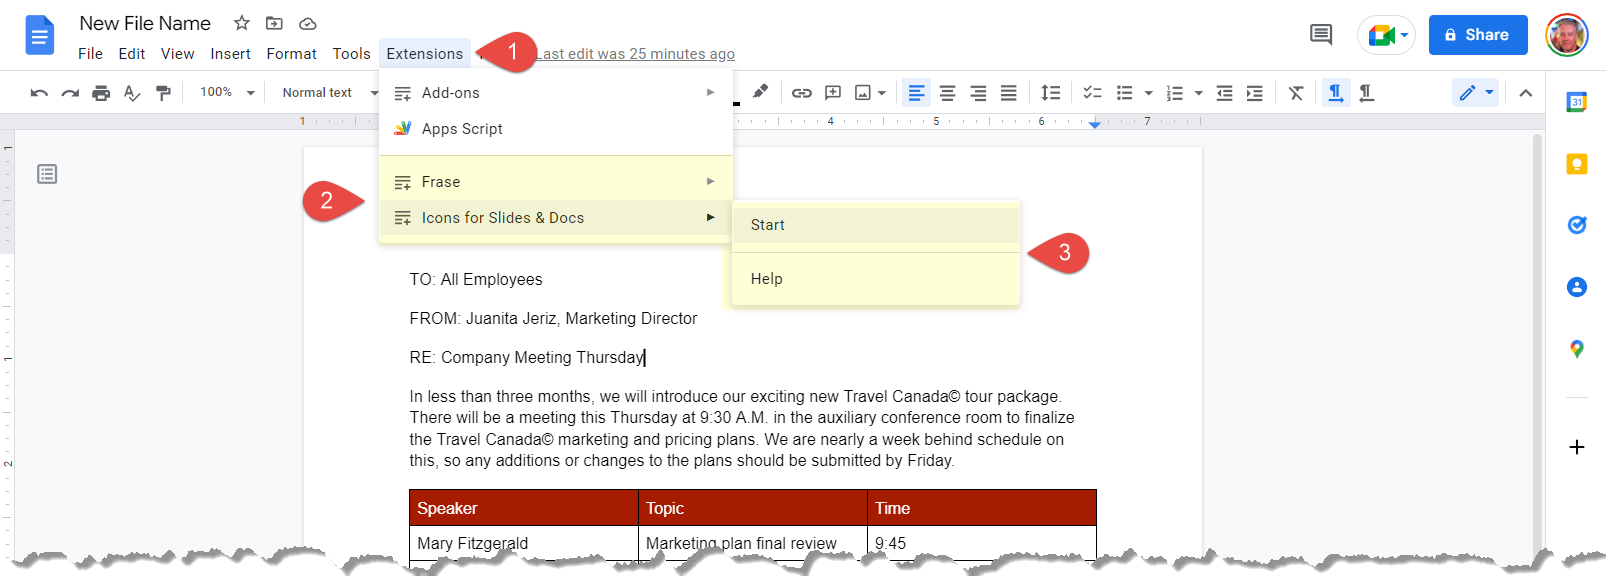
1. Click Extensions on the menu bar.
2. Select an add-on.
3. Select the add-on option you wish to use.
The options will vary depending on the type of add-on.