Your Inbox
Discover your Outlook inbox for the first time and see how everything’s organized.
Overview of Outlook layout
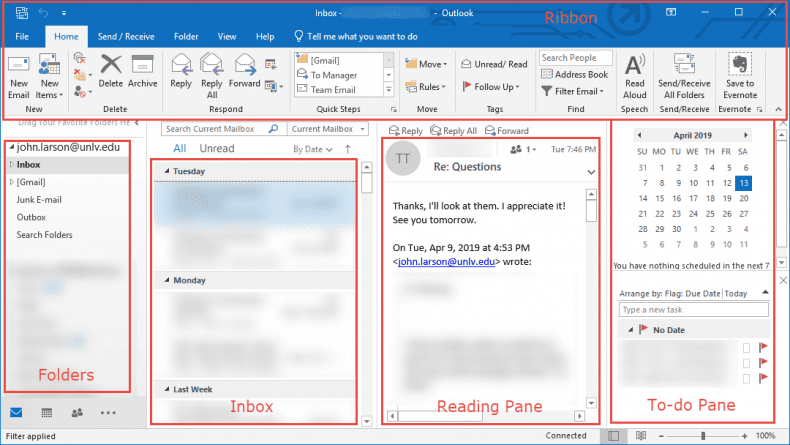
- Folders are available in the Folder Pane. Some folders are pre-populated, or you can create new ones.
- Inbox is located in the Message List.
- Emails open in the Reading Pane.
- A To-Do bar lets you see your calendar, schedule, and people you work with.
- The Ribbon gives you more options to organize emails.
Change the appearance of your email
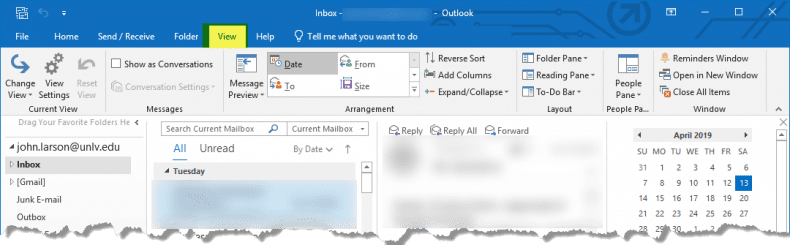
1. Select View.
From here, you can:
- Change the size of the Folder Pane.
- Move the Reading Pane.
- Turn the To-Do bar on or off.
See more email options

- Right-click folders in the Folder Pane to see common organization actions.

- Right-click an email in the Message List to show more message options.
- Right-click the Reading Pane for additional email commands such as translation.
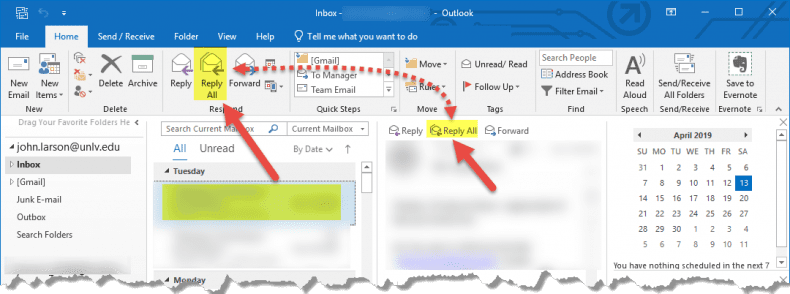
Create and Send Email
Create and send an email, reply to an email message, and forward one.
Create and send an email
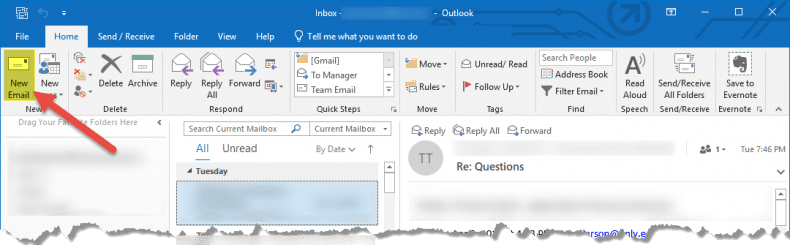
1. Select Home > New Email.
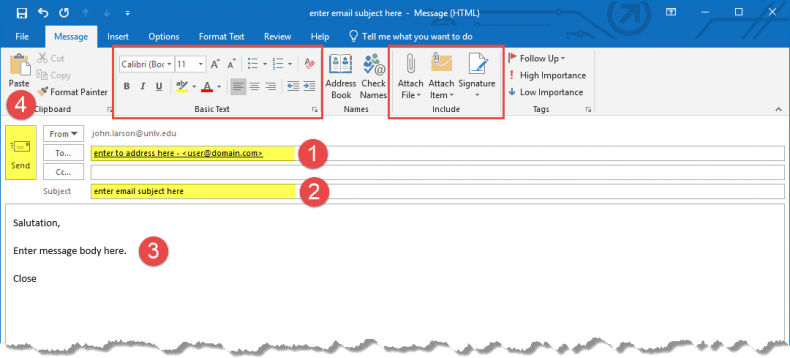
2. Add 1) attendees, 2) subject, 3) and a message in the email body.
3. Select 4) Send.
Reply to an email
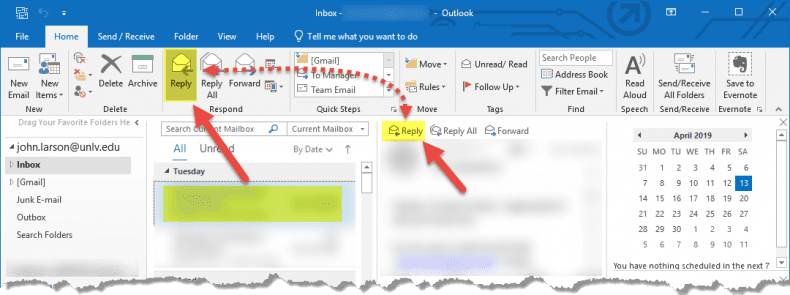
1. Select an email to reply to.
2.Select Reply.
3. Type a response in.
4. Select Send.
Forward to share email with others
1. Select an email to forward.
2. Select Forward.
3. Type in who you’d like to forward to.
4. Add a note in the email body if you’d like.
5. Select Send.
Create an Email Signature
Create custom signatures that can be automatically added to your email messages. Email signatures can include text, images, your electronic business card, a logo, or even your handwritten signature.
Create an email signature
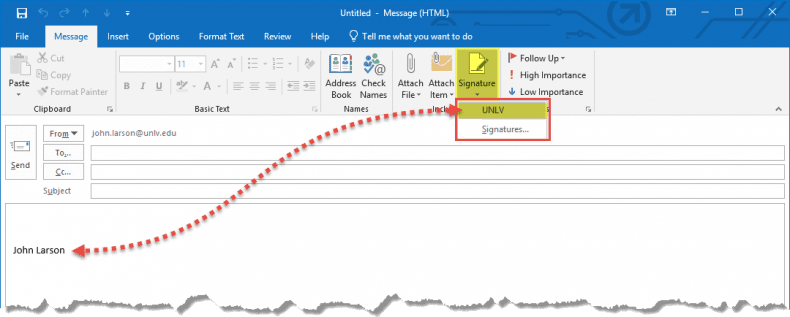
1. Select New Email.
2. Select Signature > Signatures.
3. Select New, type a name for the signature, and select OK.
4. Under Edit signature, type your signature and format it the way you like.
5. Select OK and close the email.
6. Select New Email to see the signature you created.
Sending and Receiving Attachments
Send a file with your email message by adding an attachment.
Add an attachment
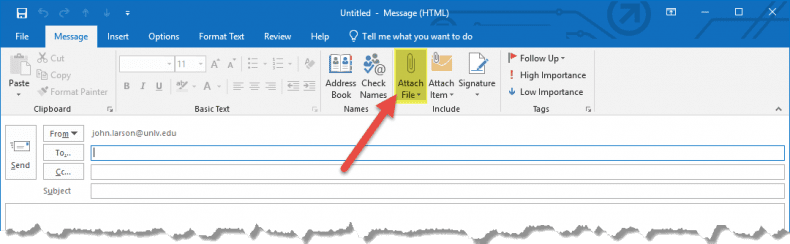
1. Select Home >New Email.
Or, for an existing email, select Reply/Reply All or Forward.
2. Select Home >Attach File, and choose an option:
- Recent items – select a file from the list of the files you have saved or worked with recently. These files could be saved locally, or they might exist on internal network locations and Group Files.
- Browse Web Locations – select files from OneDrive, SharePoint sites, or Group Files that you have accessed earlier.
- Note: By default, recipients have permission to edit the attachment, but you can override this before sending the attachment. To change the permissions, see Manage the items attached to an email.
- Browse This PC – select a file from your local computer.
- Outlook Item – attach an email message as text or as an attachment.
- Business Card – attach an electronic business card to the message.
- Calendar – insert a calendar, with specific date range and other details.
- Signature – add your signature to the message.
3. To attach an item, select Attach Item, and then select one of the following options.
4. You can see the size of an attached file and its name if you hover your mouse cursor over it. If you want to remove an attached file, select the down arrow, and then select b in the drop-down list.
Retract or Replace a Sent Email
If you and your recipients are all on Microsoft Exchange and in the same organization, you can recall or replace an email message that you sent.
1. Select File > Info.
2. Under AccountInformation, make sure the account you sent the email from is selected.
If your account is a Microsoft Exchange account and your email message recipients are all on the same email system, you can use recall or replace.
If your account is a MAPI or POP account, recall won’t work.
3. Select the Back button ![]() .
.
4. In the navigation pane, select the Sent Items folder.
5. Double-click the email message that you want to recall or replace.
6. Select Message > Actions > Recall This Message.
Or, select File > Info > Resend or Recall > Recall This Message…
7. In the Recall This Message box, select an option:
a. Select Delete unread copies of this message to recall the sent message.
b. Select Delete unread copies and replace with a new message to replace the sent message with a new message.
8. Select the Tell me if recall succeeds or fails for each recipient check box.
9. Select OK.
Note: If you selected Delete unread copies and replace with a new message, the original message opens for editing. When you select Send, the original email message will be deleted from the recipient’s mailbox and replaced with the newly edited one.