Presentation with Notes in Presenter View
If you’re using PowerPoint 2013 or a newer version, just connect the monitors and PowerPoint automatically sets up Presenter View for you. In Presenter view, you can see your notes as you present, while the audience sees only your slides. (For you, the notes appear on the right side of the window, below the thumbnail image of the Next Slide.)
- If the Presenter view appears on the wrong screen, you can swap the display quickly.
- Turn off the Presenter view if you prefer not to use it.
Start presentation
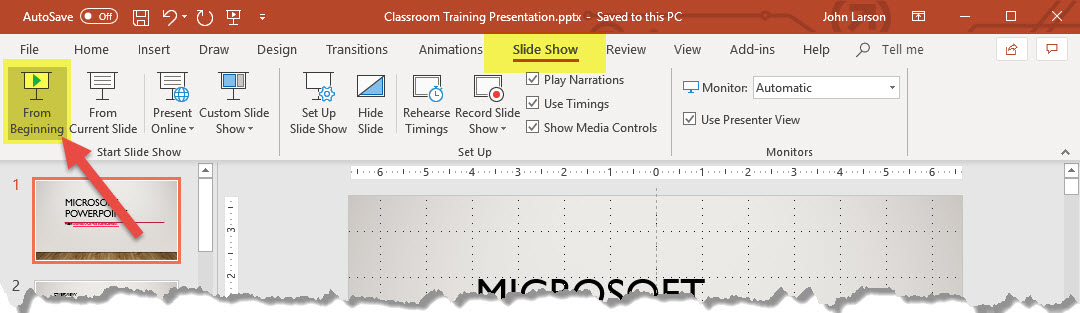
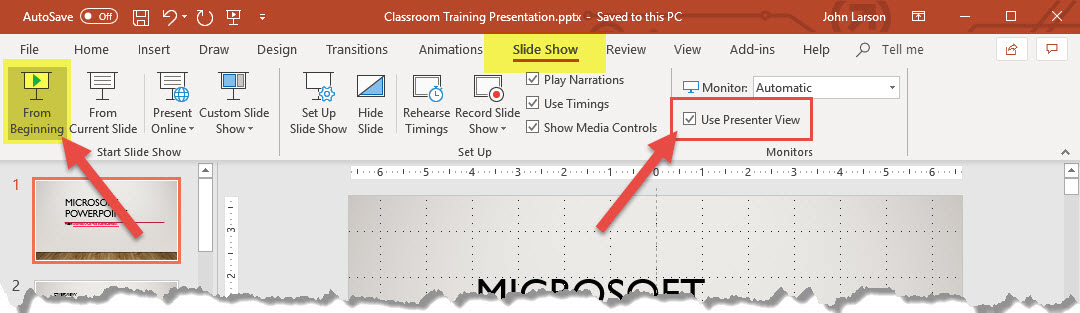
1. On the Slide Show tab, in the Start Slide Show group, select From Beginning.
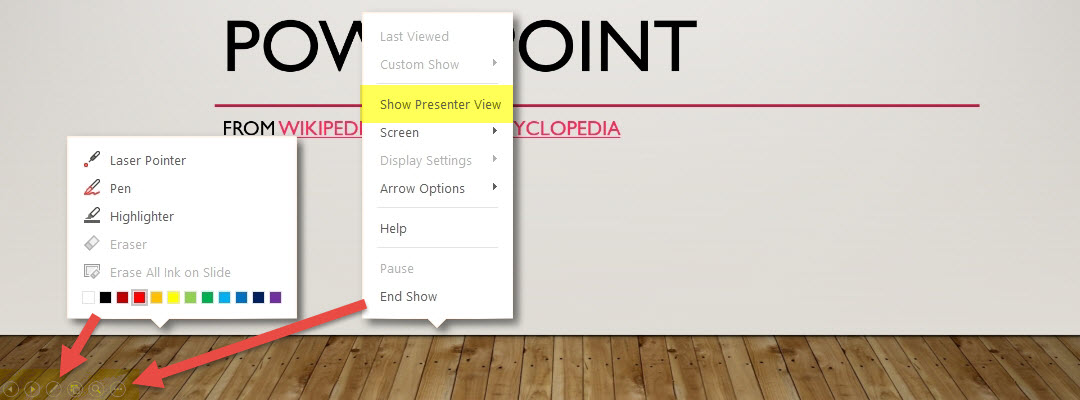
Now, if you are working with PowerPoint on a single monitor and you want to display Presenter view, in Slide Show view, on the control bar at the bottom left, select Show Presenter View button in PowerPoint, and then Show Presenter View.
Use the controls in Presenter view
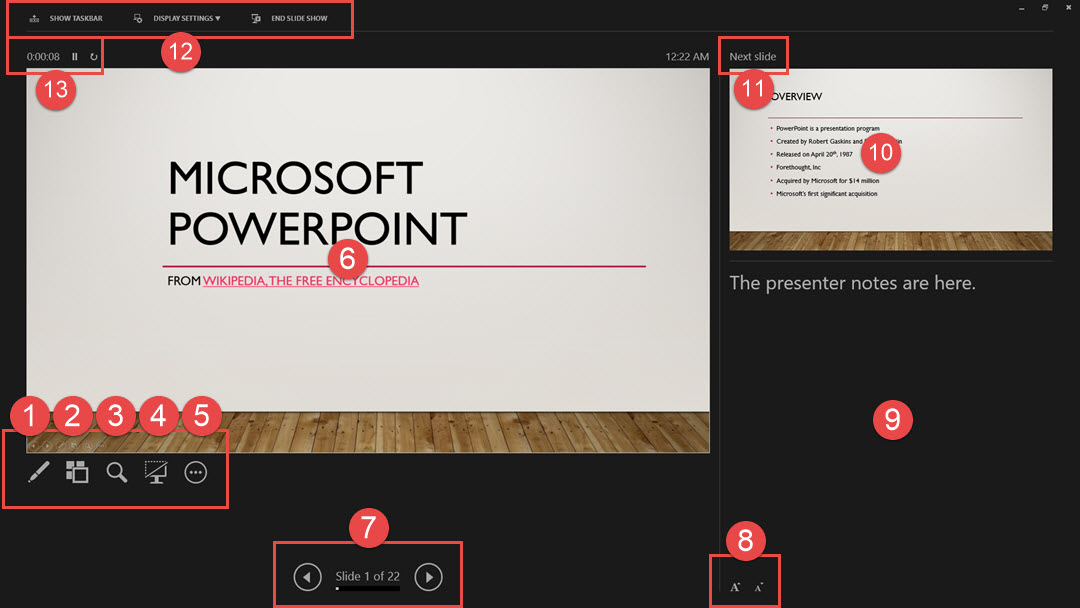
1. To point to or write on your slides as you present, select Pen and laser pointer tools. Press the Esc key when you want to turn off the pen, laser pointer, or highlighter.
2. To view all the slides in your presentation, select See all slides.
3. To view a detail in your slide up close, select Zoom into slide, and then point to the part you want to see.
4. To hide or unhide the current slide in your presentation, select Black or Unblack slide show.
5. More slide options – Presenter view, Black/White screen.
6. Slide presentation view.
7. To move to the previous or next slide, select Previous or Next.
8. Note font size.
9. Slide notes.
10. Next slide preview window.
11. Next slide label.
12. Show taskbar / Display settings / End slideshow.
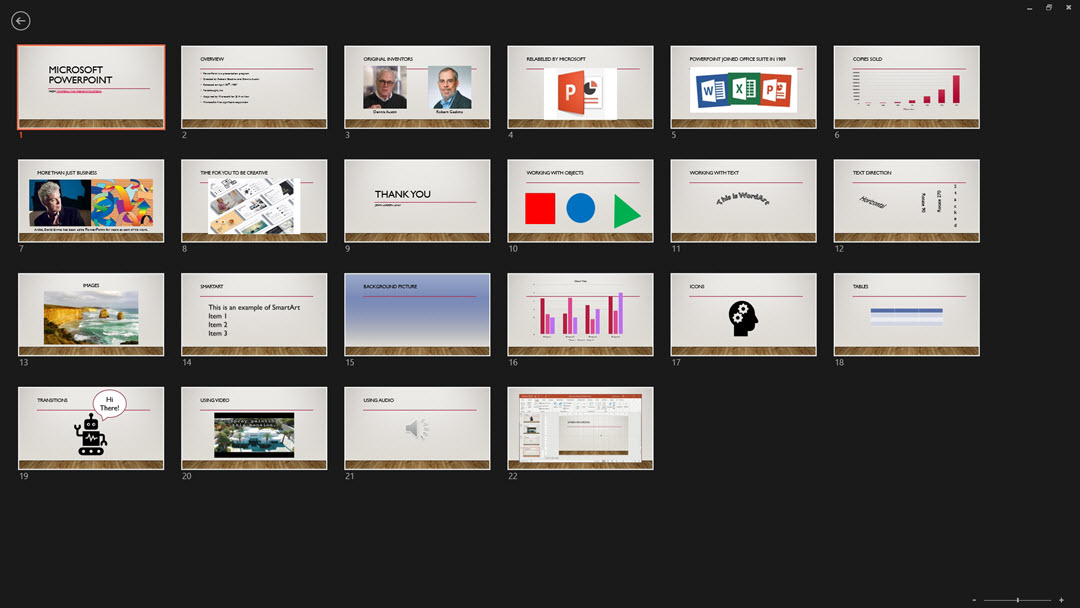
Tip: You’ll see thumbnails of all the slides in your presentation (as shown below), making it easy to jump to a specific slide in the show.
Note: You can use PowerPoint on your smartphone as a remote control to run your presentation and view your speaker notes.
Turn off Presenter view
If you want Presenter view turned off while you are showing your presentation to others:
On the Slide Show tab of the ribbon, clear the check box named Use Presenter View.
Add speaker notes to your slides
When you’re creating a presentation, you can add speaker notes to refer to later while delivering the slide show in front of an audience.
During your presentation, the speaker notes are visible on your monitor but aren’t visible to the audience. So the Notes pane is the place to store talking points that you want to mention when you give your presentation.
Add notes while creating your presentation
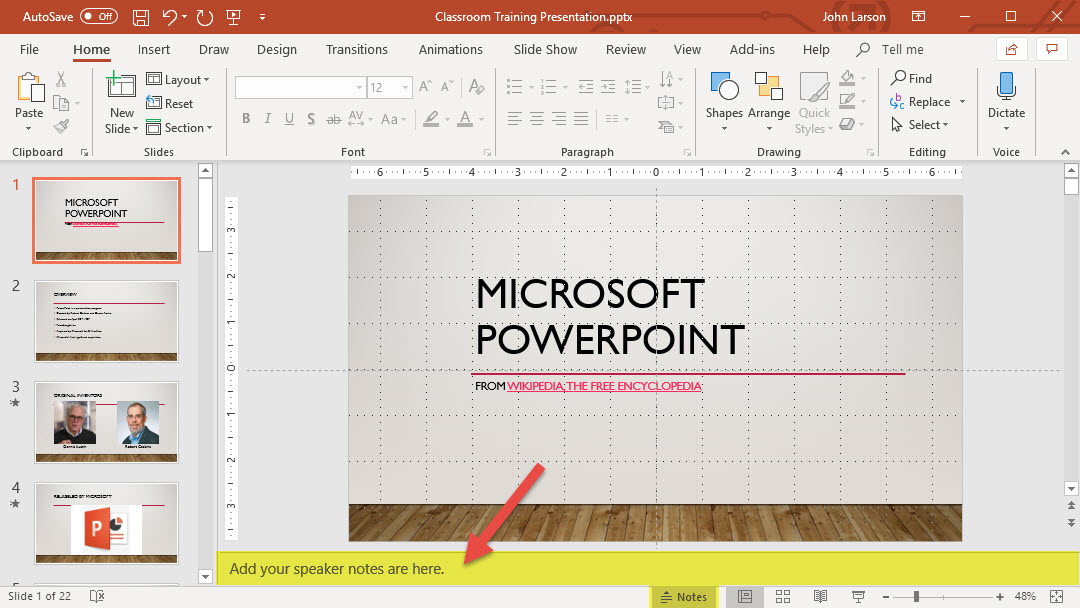
The Notes pane is a box that appears below each slide. (It is outlined in magenta in the picture below.) An empty Notes pane will prompt you with text that says, Click to add notes. Type your speaker notes there. If you don’t see the Notes pane or it is completely minimized, click Notes on the task bar across the bottom of the PowerPoint window (also marked in red in the picture above).
If your notes exceed the allotted length of the Notes pane, a vertical scroll bar appears on the side of the pane. You can also enlarge the Notes pane by pointing your mouse at the top line of the pane and then dragging upward after the pointer turns into a double-headed arrow.
Print speaker notes
See Printer Setting for details on printing slides with or without speaker notes.
Rehearse and Timing your Delivery
PowerPoint helps you record and time a presentation before you present it to an audience.
Rehearse the presentation

1. Select Slide Show > Rehearse Timings.
2. Select Next, click the mouse or press the Right Arrow key to go to the next slide.
3. The time for the current slide is shown to the right of the Pause icon. The time to the right of that is the time for the whole presentation.
4. Select Pause to pause the recording. Select Resume Recording to resume.
5. Select Yes to save the slide timings, or No to discard them. You can also press Esc to stop the recording and exit the presentation.
View the timings
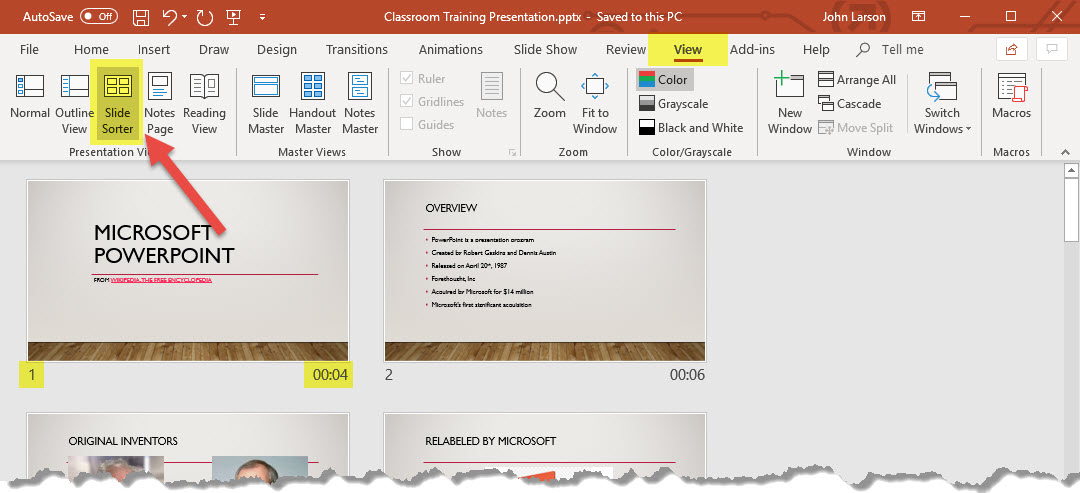
1. Select View > Slide Sorter. The amount of time allotted to a slide is shown at the bottom-right of the slide.
Turn off recorded slide timings before you give a presentation
To prevent slides from automatically advancing, use the recorded slide timings as follows:
1. Select Set Up > Slide Show.
2. Clear the Use Timings or Use Rehearsed Timings check box.
To turn the slide timings on again, select Use Timings.
Recording Narration and Slide Timings
Narrations and timings can enhance a web-based or self-running slide show. If you have a sound card, microphone, and speakers, and (optionally) a webcam, you can record your PowerPoint presentation and capture narrations, slide timings, and ink gestures.
After you have made the recording, it’s like any other presentation that can be played for you or your audience in Slide Show—or you can save the presentation as a video file.
(The ability to record is available both to Office 365 subscribers and non-subscribers. Subscribers get a few extra features.)
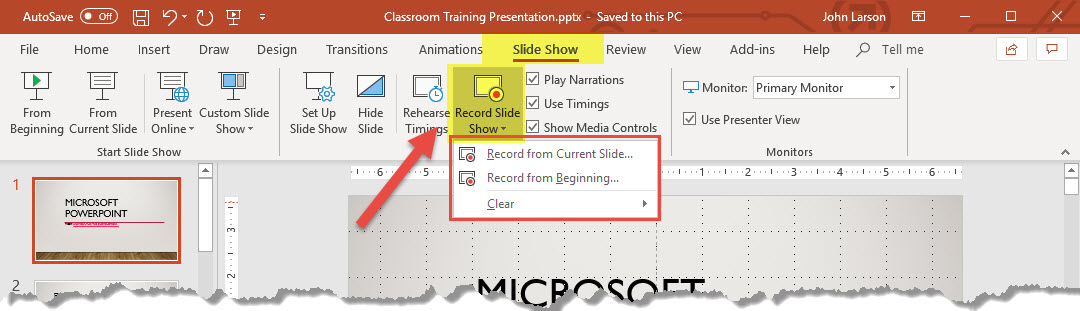
1. You can also record by going to Slide Show > Record Slide Show.
- To Add a Recording tab to the ribbon: On the File tab of the ribbon, click Options. In the Options dialog box, click the Customize Ribbon tab on the left. Then, in the right-hand box that lists the available ribbon tabs, select the Recording check box. Click OK.
2. To get ready to record, select Record Slide Show on either the Recording tab or the Slide Show tab of the ribbon.
- Clicking the upper half of the button starts you on the current slide.
- Clicking the lower half of the button gives you the option to start from the beginning or from the current slide.
(The Clear command deletes narrations or timings, so be careful when you use it. Clear is grayed out unless you have previously recorded some slides.)
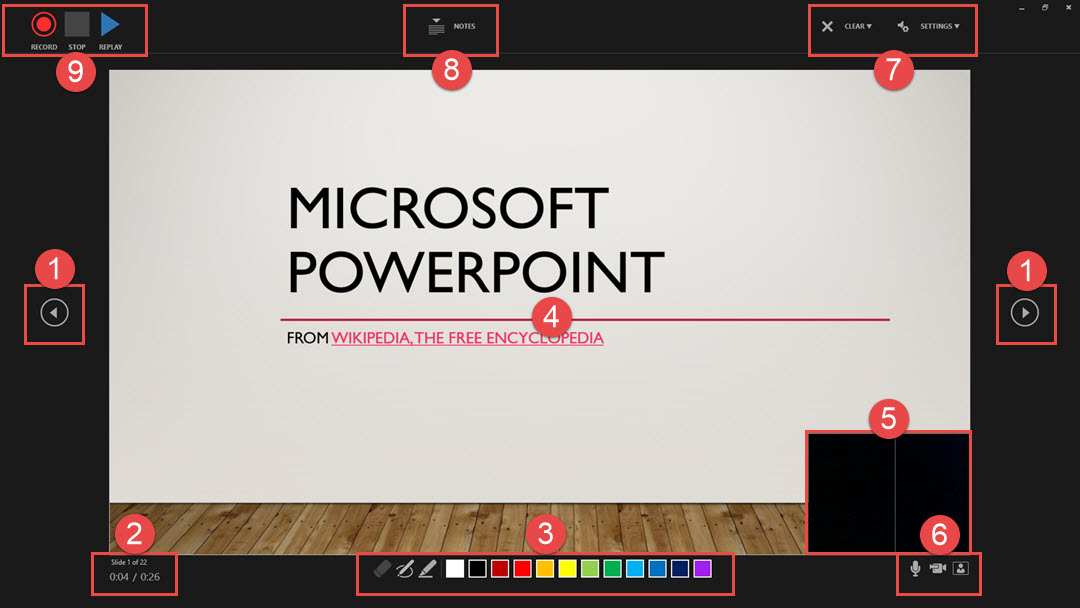
3. The slide show opens in the Recording window (which looks similar to the Presenter view), with buttons at the top left for starting, pausing, and stopping the recording. Click the round, red button (or press R on your keyboard) when you are ready to start the recording. A three-second countdown ensues, then the recording begins.
1. Navigation arrows on either side of the current slide allow you to move to the previous and next slides.
2. PowerPoint for Office 365 automatically records the time you spend on each slide, including any Animated text or object steps that occur, and the use of any triggers on each slide.
3. You can pick a pointer tool (pen, eraser, or highlighter) from the array of tools just below the current slide. There are also color selection boxes for changing the color of the ink. (Eraser is grayed out unless you have previously added ink to some slides).
- If you use the pen, highlighter, or eraser, PowerPoint records those actions for playback also.
4. The current slide is shown in the main panel of the Recording window.
5. Picture-in-picture window from computer camera. This can be turned off in #6 buttons.
6. You can record audio or video narration as you run through your presentation. The buttons at the lower-right corner of the window allow you to toggle on or off the microphone, camera, and camera preview:
- If you re-record your narration (including audio and ink), PowerPoint erases your previously recorded narration (including audio and ink) before you start recording again on the same slide.
7. Clear narration recordings, computer settings for camera and microphone.
8. Presenter notes.
9. Record, stop, and replay buttons.
- To end your recording, select the square Stop button (or press S on your keyboard).
When you finish recording your narration, a small picture appears in the lower-right corner of the recorded slides. The picture is an audio icon, or, if the web camera was on during the recording, a still image from the webcam.
The recorded slide show timing is automatically saved. (In Slide Sorter view, the timings are listed beneath each slide.)
In this process, what you record is embedded in each slide, and the recording can be played back in Slide Show. A video file is not created by this recording process. However, if you need one, you can save your presentation as a video with a few extra steps.
Preview the recorded slideshow
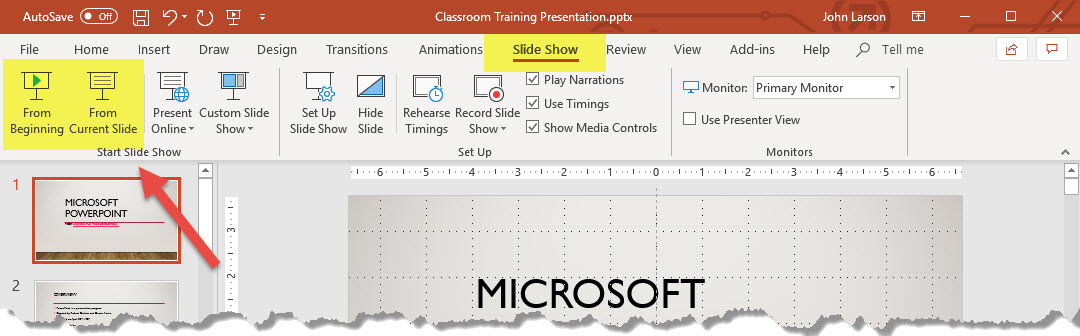
1. On the Slide Show tab, click From Beginning or From Current Slide.
- During playback, your animations, inking actions, audio, and video will play in sync.
Preview the recorded sound
In the Recording window, the triangular Play button near the top left corner lets you preview the recording of the slide that currently has the focus in that window.
In Normal view, click the sound icon or picture in the lower-right corner of the slide, and then click Play. (When you preview individual audio in this way, you won’t see recorded animation or inking.)
You can pause playback while previewing the audio.
Set the slide timings manually
PowerPoint for Office 365 automatically records your slide timings when you add narrations, or you can manually set the slide timings to accompany your narrations.
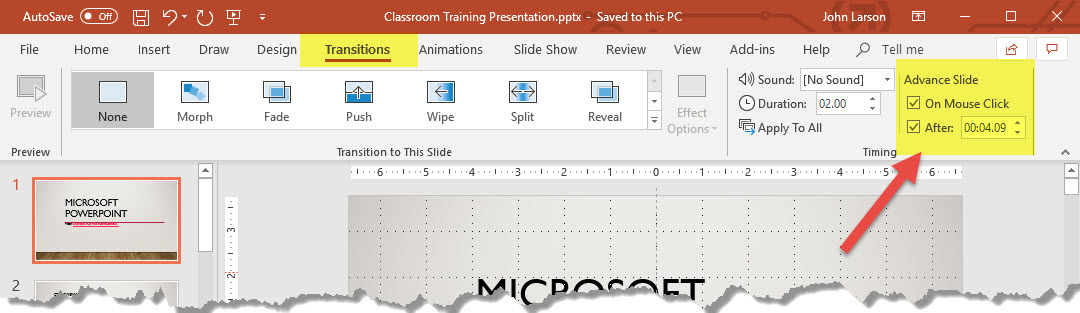
1. In Normal view, click the slide that you want to set the timing for.
2. On the Transitions tab, in the Timing group, under Advance Slide, select the After check box, and then enter the number of seconds that you want the slide to appear on the screen. Repeat the process for each slide that you want to set the timing for.
If you want the next slide to appear either when you click the mouse or automatically after the number of seconds that you enter — whichever comes first — select both the On Mouse Click and the After check boxes.
You can use manual slide timings to trim the end of a recorded slide segment. For example, if the end of a slide segment concludes with two seconds of unnecessary audio, simply set the timing for advancing to the next slide so that it happens before the unnecessary audio. That way you don’t have to re-record the audio for that slide.
Delete timings or narration
![]()
The Clear command is for deleting timings or narration from your recording that you don’t want or that you want to replace.
In the Recording window, the Clear command in the top margin of the window allows you to:
- Clear recordings on the current slide
- Clear recordings on all slides
In Normal view, there are four different Clear commands that allow you to:
- Delete the timings on the currently selected slide
- Delete the timings on all slides at once
- Delete the narration on the currently selected slide
- Delete the narration on all slides at once
1. If you do not want to delete all the timings or narration in your presentation, open a specific slide that has a timing or narration that you do want to delete.
2. On the Recording tab of the PowerPoint for Office 365 ribbon, on the Record Slide Show button, click the down arrow, point to Clear, and then choose the appropriate Clear command for your situation.
Turn off timings or turn off narrations, and ink
After you’ve recorded your PowerPoint for Office 365 presentation, any timings, gestures, and audio you performed are saved on the individual slides. But you can turn them all off if you want to view the slide show without them:
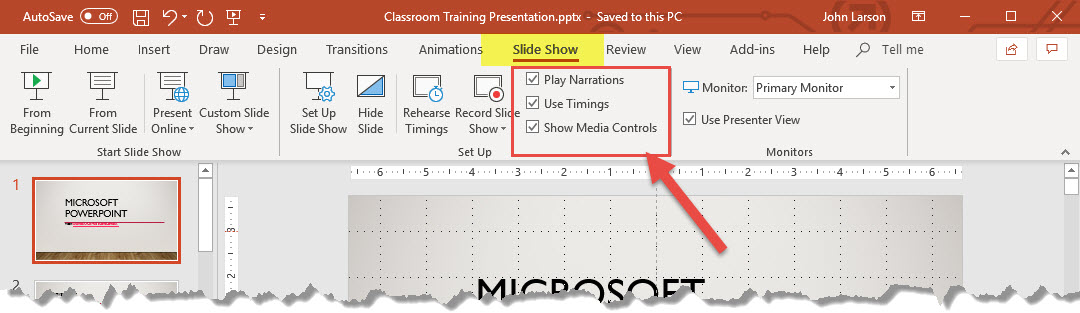
- To turn off recorded slide timings: On the Slide Show tab, clear the Use Timings box.
- To turn off recorded narrations and ink: On the Slide Show tab, clear the Play Narrations box.
Recording tips
- Recordings are added to the presentation on a per-slide basis, so if you want to change a recording, you only have to re-record the affected slide or slides. Also, you can rearrange the order of slides after recording without having to re-record anything. This also means it’s easy to pause for a break while recording a presentation.
- PowerPoint doesn’t record audio or video during transitions between slides, so don’t speak while advancing the slide. Also, include a brief buffer of silence at the beginning and the end of each slide to make the transitions smooth and ensure that you don’t cut off audible narration while transitioning from one slide to the next.
- You can’t record narration in PowerPoint Online. Use a desktop version of PowerPoint to record your narration.
- You can adjust and edit the size of the video and ink in edit view.
- It’s possible that your audience may use PowerPoint Online to experience the recording, use the transitions that are supported by PowerPoint Online (Cut, Fade, Push, Wipe, Split, Random Bars, Shape, Morph).
- Presentation recording works best with touch-screen PCs that have a web camera.
- Use video preview to make sure everything is set up correctly before recording.
- For slides that you want to record gestures (such as ink) on, make multiple copies of the slide so that you can easily record multiple takes. Then delete the extraneous slides when you’re done.
- Record a few seconds of silence by turning off audio and video to advance after a set time.
- For higher quality, use an external webcam and/or microphone.
- Built-in cameras and microphones are suitable for most tasks. But if you want a more professional-looking video, consider using an external webcam, if you’re able. If you’re using PowerPoint on a tablet or laptop and you’re inking with a stylus, an external camera and microphone allows you to minimize stylus noise.
- You will want to make sure your audio and video sound and look the way you expect – as soon as you finish your first slide recording, play it back to make sure the results are satisfactory.
Printing your Slides, Handouts, or Notes
In PowerPoint, you can print your slides, speaker notes, and create handouts for your audience.
Print your presentation
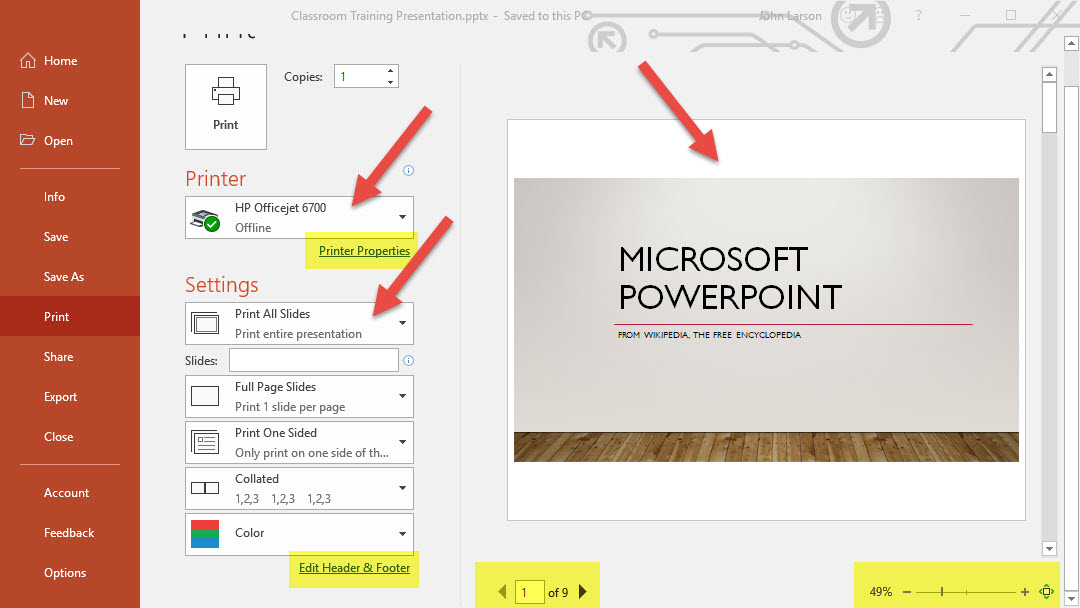
1. Select File > Print.
2. For Printer, select the printer you want to print to.
3. For Settings, select the options you want:
- Slides: From the drop-down, choose to print all slides, selected slides, or the current slide. Or, in the Slides box, type which slide numbers to print, separated by a comma.
- Print Layout: Choose to print just the slides, just the speaker notes, an outline, or handouts.
The Outline prints only the text in the slides, without images. The Notes of a presentation show the slide and the related speaker notes below it. If you choose to print Handouts, you can print several slides on one page using a variety of layouts, some with space for note-taking.
- Collated: Choose whether you want the sheets collated or uncollated.
- Color: Choose whether you want color, grayscale, or pure black and white.
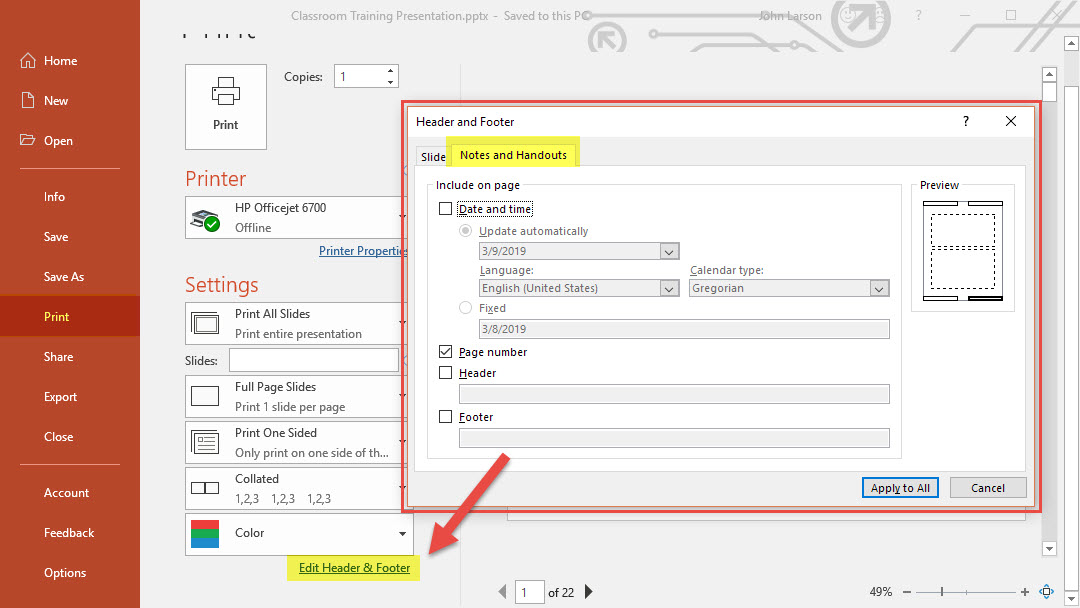
- Edit Header & Footer: Select to edit the header and footer before printing.
4. For Copies, select how many copies you want to print.
5. Select Print.
Printed handouts: Add or remove slide numbering
This is a subscriber-only feature This feature is available to Office 365 Subscribers only.
By default, in PowerPoint for Office 365 (beginning with version 1810), printed handouts include a slide number below each slide image.
You can turn this option off by going to File > Options > Advanced > Print. Clear the option named Print slide numbers on handouts.
Create Self-running Presentations
You can use a self-running presentation to run unattended in a booth or kiosk at a trade show or convention, or you can save it as a video and send it to a client.
Set up a self-running presentation
To set up a PowerPoint presentation to run automatically, do the following:
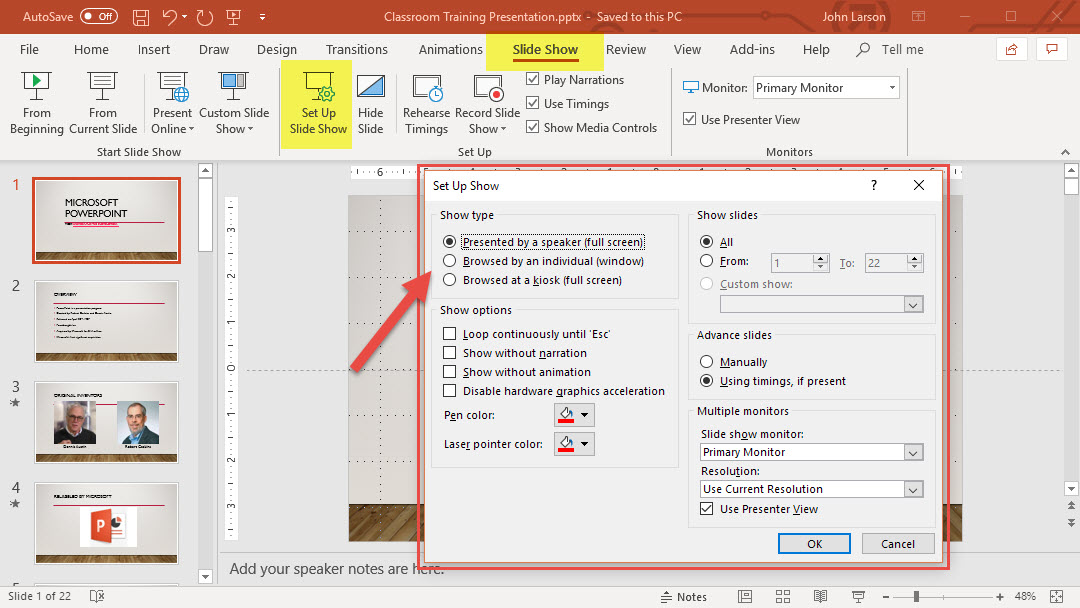
1. On the Slide Show tab, click Set Up Slide Show.
2. Under Show type, pick one of the following:
- To allow the people watching your slide show to have control over when they advance the slides, select Presented by a speaker (full screen).
- To present your slide show in a window, where control over advancing the slides is not available to the people watching, select Browsed by an individual (window).
- To loop your slide show until the people watching press Esc, select Browsed at a kiosk (full screen).
Rehearse and record slide timings
When you choose the following show types: Presented by a speaker (full screen) and Browsed at a kiosk (full screen), you’ll want to rehearse and record timings for effects and slides.
1. On the Slide Show tab, click Rehearse Timings.
Note: The presentation timer begins immediately when you click Rehearse Timings.
The Rehearsal toolbar appears, and the Slide Time box begins timing the presentation.
2. While timing your presentation, you can do one or more of the following on the Rehearsal toolbar:
- To move to the next slide, click Next.
- To temporarily stop recording the time, click Pause.
- To restart recording the time after pausing, click Pause.
- To set an exact length of time for a slide to appear, type the length of time in the Slide Time box.
- To restart recording the time for the current slide, click Repeat.
3. After you set the time for the last slide, a message box displays the total time for the presentation and prompts you to do one of the following:
- To keep the recorded slide timings, click Yes.
- To discard the recorded slide timings, click No.
Slide Sorter view appears and displays the time of each slide in your presentation.
Add narration or sound
To record a narration, your computer requires a sound card and a microphone, and a microphone connector if the microphone is not a part of your computer.
1. On the Slide Show tab, in the Set Up group, click the arrow on the Record Slide Show button.
2. Select one of the following:
- Start Recording from Beginning
- Start Recording from Current Slide
3. In the Record Slide Show dialog box, select the Narrations and laser pointer check box, and if appropriate, select or deselect the Slide and animation timings check box.
4. Click Start Recording.
Tip: To pause the narration, in the Recording shortcut menu in Slide Show view, click Pause. And to resume your narration, click Resume Recording.
5. To end your slide show recording, right-click the slide, and then click End Show.
6. The recorded slide show timings are automatically saved, and the slide show appears in Slide Sorter view with timings beneath each slide.
You can record a narration before you run a presentation, or you can record it during the presentation and include audience comments. If you do not want narration throughout your entire presentation, you can record separate sounds or comments on selected slides or objects.