Tags, Tags, & More Tags!
![]() Web pages are assembled using source code and search engines can pick up ranking signals from specific elements. This module is about some of the most important elements to achieve SEO success.
Web pages are assembled using source code and search engines can pick up ranking signals from specific elements. This module is about some of the most important elements to achieve SEO success.
Meta Tags
Meta Content Type
Title Tag
Meta Description
Viewport
Header Tags
Image Tag
Robots Tags
Canonical
Social Media
Meta Keywords
Site Verification
Other Tags
-> Meta Tags
Meta tags are the beginning of SEO training. They reside in the head section of an HTML document and are used to indicate coded information and specify metadata. They don’t appear on a web page and site visitor don’t see them, but user agents (like browsers and search spiders) can read them.
The formula for declaring metadata follow the same structure – an element is first defined and then assigned a content.
Code Sample:
<head>
<meta name=”name of element” content=”assigned index”>
</head>
Although their influence on ranking have decreased in recent years, metadata plays an important role in search engine optimization and are an important for metasearch engines and local search scripts. They also define instructions to control search spiders crawling your web page.
Like most things in life – less is more… Don’t use tags you don’t need, they only create code bloat.
-> Meta content type
This tag declares the character set of your web page and necessary on every page of your website. If your page was missing this tag, your page might not render correctly in the visitors browser.
Code Sample:
<head>
<meta http-equiv=”content-type” content=”text/html; charset=utf-8″>
</head>
-> Title Tag
Title tags (technically called title elements), are used to define the title of a document. They are required for all HTML/XHTML documents.
Code Sample:
<head>
<title>Example Title</title>
</head>
The title element of a web page is the main text that describes an online document and <title> tags have always been and will remain one of the most important signals (second only to page content) that search engines use to understand what a page is about.
The title tag is displayed in three key places:
1. Browsers
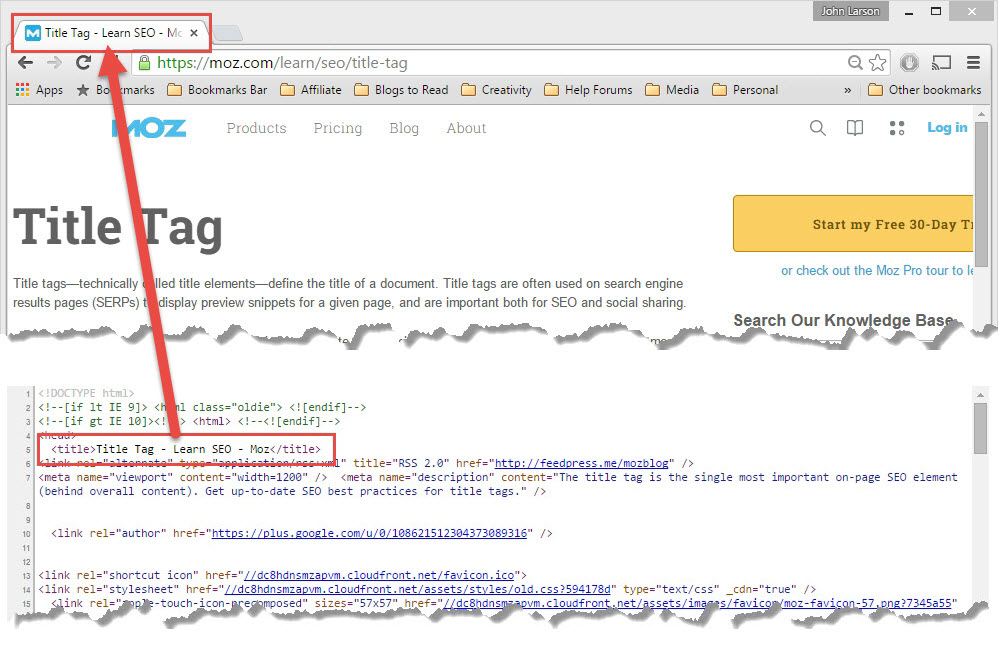
Title tags show up on the top of a browser window or in the tabs.
2. Search Engine Results Pages (SERPs)

Title tags show up in search results.
3. External Websites
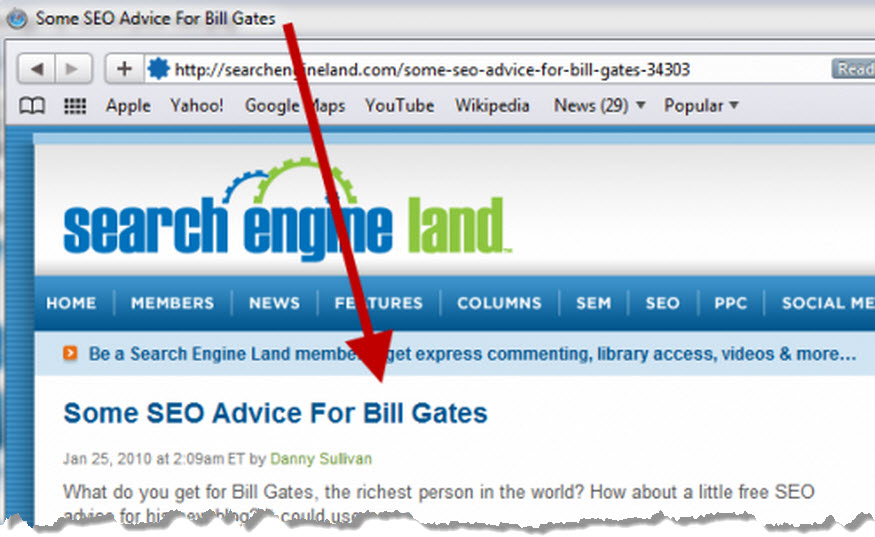
Many external websites (especially social media sites) will use the title tag as their link anchor text.
Best Practices
Creating a keyword rich title tag is an important consideration in search engine rankings. Here are some recommendations for optimizing your title tag:
Format Examples:
Primary Keyword – Secondary Keyword | Brand Name
or
Brand Name | Primary Keyword and Secondary Keyword
Title Length
That’s not an easy answer anymore… Google redesigned the SERP page in 2014 and made the results title larger while keeping the overall container the same size as before. This created created less space to display the larger title. Another length factor, Google uses Arial for the title font which is a proportionally spaced font (i.e., different characters have different widths).
Example: The following two titles are both exactly 40 characters long:

As you can see, these two 40-character titles vary greatly. Why? Let’s break it down:
(1) Narrow letters are narrow
The first title is full of lowercase l’s and i’s which take up relatively little space. Meanwhile, m’s and w’s take up quite a bit more space. In this font, three lowercase l’s are actually narrower than one lowercase w.
(2) ALL CAPS take up more space
Capital letters are wider than lowercase letters. All-caps titles also tend to be hard to read and are the visual equivalent of online “shouting.” In some cases, like “LEGO” above, capitalization is important and necessary. In other cases, like “BRIDGEWATER COMMONS”, it’s just unnecessary noise.
(3) Width varies with the query
Google highlights (bolds) the queried keywords, so a longer query will bold more keywords. Bolded characters will take up slightly more space – meaning the actual display of that title would change depending on the keywords searchers use to find it.
(4) Cut-off titles have fewer characters
Google is using CSS to limit title width, and the browser appends “…” whenever a title is truncated. What will happen – a title that’s just slightly too long and gets cut will actually be shorter than a title that barely squeaks in under the width limit, due to the additional space required by “…”.
What Title Length Should You Use?

You want to find a reasonable title length at which you can be fairly confident that your titles won’t get cut off. Here are the cut-off lengths at five different levels of confidence:
80% – 57 characters (81.6%)
90% – 56 characters (91.6%)
95% – 55 characters (95.8%)
99% – 53 characters (98.7%)
99.9% – 49 characters (99.9%)
Since character lengths are integers, you can’t hit the 80%, 90%, etc. marks right on the money, so these are the closest numbers (the actual percentages are in parentheses) and the best you can do is play the averages.
There’s No Magic Number
Google typically displays the first 50-60 characters of a title tag. If you keep your titles under 60 characters, research suggests that you can expect about 90% of your titles to display properly. There’s no exact character limit (due to character width variances) and Google’s display titles max out (currently) at 600 pixels.
In addition, a cut-off title isn’t a penalty – Google still processes keywords beyond the cut-off (this includes ranking purposes), and other formats, like vertical results and Google+, may display your full titles.
Move Important Keywords Close to the Beginning
The closer you place your keywords to the start of the title tag, the more helpful they’ll be for ranking and the more likely a user will be to click them in the search results.
Leverage Your Brand
By ending your title tag with your brand name helps increase brand awareness and creates a higher click-through rate for people who are familiar with the brand. Sometimes it makes sense to place your brand at the beginning of the title tag, such as your homepage. Keywords at the beginning of the title tag carry more weight so consider what you are trying to rank for.
![]() READ: For a better understanding of title tags, read this article by SearchEngineLand founder, Danny Sullivan: “Writing HTML Title Tags for Humans, Google & Bing.”
READ: For a better understanding of title tags, read this article by SearchEngineLand founder, Danny Sullivan: “Writing HTML Title Tags for Humans, Google & Bing.”
-> Meta Descriptions
The meta description tag is one of the oldest supported HTML elements and provides information about the contents of web pages. Although the page does not have any influence in Google results it’s still very important. Meta descriptions are commonly displayed on search engine result pages (SERPs) and provide a preview for the web page, like the “blurb” on the back of a book cover describing the book.
Code Sample:
<head>
<meta name=”description” content=”This is an example of a meta description.”>
</head>
In 2009 Google announced that meta descriptions were no longer a ranking factor in their algorithms for search results, but don’t think of meta descriptions as an SEO factor – they are a ‘Marketing’ factor… 160 characters of ad copy that will directly influence searchers on whether to click through to your content or not.
Meta descriptions are the primary source of content for the snippet of text displayed beneath a listing in the search results and are one of the first factors influencing search query visitors to click through to your website. Meta description that contain the actual word used for a search query will be displayed with bold styling which might catch the searcher’s attention and a well crafted meta description may help ‘sell’ that result. Because the meta description can be so influencing on clicks, it makes sense to count them as a marketing factor.
Be warned, having a meta description tag does not guarantee that your description will actually get used. Search engines may create different descriptions based on what they believe is most relevant for a particular search query.
Best Practices

The meta description tag serves as advertising copy, providing search query users with a snippet of text that you can use to draw those readers to your web page – a very important part of search marketing. By creating a compelling description using your keywords, Google will display the description in the SERP’s with your keywords bolded – providing you with more exposure and influence clicks.
Length
Meta descriptions can be any length you want but search engines generally truncate snippets longer than 160 characters (see image above).
Avoid Duplicate Descriptions
Similar to <title> tags, it is important to create unique meta descriptions on each page. This requires special considerations if you are utilizing automated pages.
Using Special Characters in Meta Descriptions
You need to be aware that Google truncates a meta description when it finds special characters (such as quotation marks – “”). To prevent this from occurring, it is best to remove all non-alphanumeric characters from meta descriptions. If quotation marks are important part of your description, you can change them to single quotes rather than double quotes to prevent truncation.
No Meta Description
In the absence of meta descriptions, search engines will create the search snippet from other elements of the page. Contradictory to logic, this may be a valid tactic when trying to target multiple keywords and topics.
When choosing this tactic, consideration for other sites linking (like social sharing sites) which may use the web pages’ meta description on their sites. Without the meta description tag, social sharing sites may just use the first characters of text they find and this might not create a good user experience.
-> Viewport
Viewport refers to the user’s visible area of a web page. Before the days of smart phones and tablets, web pages were designed for standard desktop monitor screen dimensions. Now that smart phones have surpassed desktops for internet surfing, those fixed web page design displays too large for those devices.
HTML 5 introduced a new tag that allows designers the opportunity to take control over the viewport through the use of a tag.
Code Sample:
<head>
<meta name=”viewport” content=”width=device-width, initial-scale=1.0″>
</head>
- “width=device-width” sets the width of the page to follow the screen-width of the device. Since screen dimensions and width in CSS pixels vary widely between devices, content should not rely on a particular viewport width to render well.
- “initial-scale=1.0” sets the initial zoom level when the page is first loaded by the browser.
-> Header Tags
Header tags specify a header for a document or section. The <header> element should be used as a container for introductory content or set of navigational links. You can have several <header> elements in one document, however, you cannot place a <header> tag within a <footer>, <address> or another <header> element.
Code Sample:
<h1>HTML H1 Header Tag Example</h1>
<h2 class=”example”>Example of a H2 tag</h2>
<p>A header for an article</p>
Best Practices
Use header tags to identify key sections of a web page. Search engines have long used them as clues to what a page is about. If the words you want to be found for are in header tags, you have a slightly increased chance of appearing in searches for those words.
Web pages can display H1 to H6 tags which rank from most important to least important.
- See the headline up at the top of this page? Behind the scenes HTML code is using an <h1> header tag to indicate that is the “primary” content on this page.
- See the sub-headlines on the page? Those are notated with an <h2>tag indicating they are the next “level” down from the <h1> tag.
Prior to HTML5 markup, it was best practice to only use one <h1> tag per page and this tag should indicate the primary subject matter of the page. With the advent of HTML5 it’s now possible to have multiple <h1> level headings per webpage that will make sense to search engines and in most cases it’s actually the recommended course.
![]() READ: For more information about <h1> use and HTML5, source code examples and possible problems caused from using multiple <h1> tags, check out this article by Kezz Bracey – The Truth About Multiple H1 Tags in the HTML5 Era.
READ: For more information about <h1> use and HTML5, source code examples and possible problems caused from using multiple <h1> tags, check out this article by Kezz Bracey – The Truth About Multiple H1 Tags in the HTML5 Era.
Make It Easy
Going overboard with header tags will not help rank your web page… Header tags are as much for making content easy to read for users as it is for search engines.
Header tags are useful when they reflect the logical structure (or outline) of a page. If you have a main headline, use an <h1> tag. Relevant subheads should use an <h2> tag and sub-subheads use <h3> tags and so on. Use header tags as they make sense and they may reinforce other ranking factors.
-> Image Tags
The “Alternative Text” tag or alt text are vital to making your pages more accessible to your visitors. Screen readers (browsers utilized visually impaired individuals) rely on the alt text to explain the images on the web page to the user.
Search spiders cannot see your images like the human eye can so they also rely on the alt text to understand the content of your images.
Code Sample:
<img alt=”the alternative text goes here” src=”/the-location-of-the/image.jpg”>
Best Practices
- Images take time to load and can slow down your web page. If an image is there only for design, it is recommended to use CSS. If CSS isn’t possible – leave the alt tag empty so that readers skip over it.
- Make your alt text descriptive (like your were describing the image) – but short (limited to one sentence).
- Alt text does influence SEO so it is recommended to include keywords in your description – but don’t spam.
- Images can also support title tags. These elements show up when hoover over an image like the example below.

Code Sample:
<img alt=”alternative text” title=”title goes here” src=”/image-location.jpg”>
-> Robots Tags
Meta tags can be used to control search spiders (for all major search engines) activity on a web page.
Code Sample:
<head>
<meta name=”robots” content=”noindex, nofollow”>
</head>
There are two important considerations when using the robots <meta> tag:
- Robots can ignore your <meta> tag. Especially malware robots that scan the web for security vulnerabilities or email address harvesters used by spammers.
- The NOFOLLOW directive only applies to links on this page. It’s entirely likely that a robot might find the same links on some other page without a NOFOLLOW (perhaps on some other site), and so still arrives at your undesired page.
DO NOT confuse this NOFOLLOW with the rel=”nofollow” link attribute.
There are several ways a web developer can utilize the <meta> tag to control how spiders treat a web page:
- index/noindex
Tells the search spider whether the page should be crawled and kept in the engines’ index for retrieval or not. If you choose to use the “noindex” value, the web page will be excluded from the search engines. By default, search engines assume they can index all pages, so using the “index” value is unnecessary.
- follow/nofollow
Tells the search spiders whether links on the page should be crawled or not. If you use the “nofollow” value, the spiders will disregard the links on the page both for discovery and ranking purposes. By default, all pages are assumed to have the “follow” attribute.
- noarchive
This value is used to restrict search spiders from saving a cached copy of the page. By default, the search engines will maintain visible copies of all pages they indexed through the “cached” search results.
- nosnippet
This value informs the search spiders to refrain from displaying a descriptive block of text next to the page’s title and URL in the search results.
- noodp/noydir
Although DMOZ and YD are no longer the dominating sites they once were, some search engines still pull data from them and include the information in your SERP listing.
These values are specialized tags telling the engines not to use the descriptive snippet about a web page from the Open Directory Project (DMOZ) or the Yahoo! Directory for display in the search results.
Best Practices
- Search engine spiders index websites (crawl) by default so including a “follow” command is redundant and unnecessary.
- Don’t rely on your robots.txt file for “No Indexing” instructions. Disallowing a web page (or folder) does not mean that the page will not be indexed. The best practice would be to use the “No Index” meta tag.
- Including “No Follow” meta tag instructions will include all links on the web page – that includes internal and outbound. That solution is wrong as you want Google (and other search spiders to crawl all of your content (via links).Code Sample:
<a href=”outbound-domain.com” rel=”nofollow”>anchor text</a> - A better practice would be the use of the “NoFollow” tag in the specific outbound link (especially affiliate links, guest posts, and any links you do not want to “vouch” for.
- It’s best practice to use the “No Index” tag for any syndicated content or duplicate content from other sites. This will prevent Google from thinking it’s duplicate content.
-> Canonical Tags
The Canonical tag is often misunderstood… They are used to help Google differentiate between similar (or duplicate) content and identify which web page should be consider the “main” URL (the canonical point).
Code Sample:
<link rel=”canonical” href=”the-main-page.com” />
Canonical tag are not 301 redirect statements! If there is no technical reason, the best practice would be to use a 301 redirect if a web page URL have changed to a new location.
Examples:
- You have a recipe website and have a “normal” web page with the recipe and a second page of the recipe ready for printing (a similar page minus all of the header, footer and sidebar content).
- You have an eCommerce website with a list of products on one URL sorted by size and a second web page (identical to the first) with the same products sorted by price.
Best Practices
- It’s best practice to use absolute URL’s in your canonical tag even if using relative URL’s is faster for the developer. Relative paths can cause problems indexing content correctly.
- Do not point canonical tags to an “all” URL (or the first page of a multiple page post). Each page should have it’s on canonical tag.
-> Social Media Tags
Today’s SEO’s not only need to worry about how their website appears to search engines – they also need to be concerned with how they look on social media networks like Google+, Facebook, Twitter, and Pinterest.
Through the use of special meta tags called Open Graph, Twitter Cards, Snippets, and Rich Pins, SEO’s can define exactly how titles, descriptions, images and more appear on social media sites.
The use of these tags will not increase the “ranking” of a website but they certainly “influence click through rates” and will increase your exposure on these social media sites.
![]() For a deeper understanding, here is some additional (and recommended) reading regarding social media tag and their use:
For a deeper understanding, here is some additional (and recommended) reading regarding social media tag and their use:
- Moz: Must-Have Social Media Tags for Twitter, Google+, Facebook and More
- CSS-Tricks: The Essential Meta Tags for Social Media
- Bruce Clay: What Are Social Meta Tags?
- Metatags.co – Social Media Meta Tag Generators and Validators
Open Graph
In April of 2010, Facebook launched it’s “Open Graph” API and it opened a new set of tools that marketers and developers could use. Not only does it allow for Facebook to be connected to a website, it also allows webmasters the ability to control how their sites appear on Facebook.
The controls include a series of meta tags published in the head content that look similar to:
<head>
<!– Open Graph data –>
<meta property=”og:title” content=”Title Here” />
<meta property=”og:type” content=”article” />
<meta property=”og:url” content=”http://www.example.com/” />
<meta property=”og:image” content=”http://example.com/image.jpg” />
<meta property=”og:description” content=”Description Here” />
<meta property=”og:site_name” content=”Site Name Here” />
<meta property=”fb:admins” content=”Facebook numeric ID” />
</head>
![]() If you are interested in adding OG tags to your website (and you should), I highly recommend you read the following resources:
If you are interested in adding OG tags to your website (and you should), I highly recommend you read the following resources:
- Facebook Developers: Sharing Best Practices for Websites & Mobile Apps
- Kissmetrics: What You Need to Know About Open Graph Meta Tags
- SproutSocial: Best Practices before Submitting a Facebook open Graph Action
- HubSpot: How to Optimize Blog Images for Social Sharing: Intro to Open Graph
- H3XED: Ideal Open Graph Image Meta Tag Size for Facebook & Reddit Sharing
Twitter Cards
Sometime in mid 2013, Twitter released their Twitter Cards protocol which allows developers the opportunity to “attach” photos, videos, and other media to Tweets using meta tags. There are different “Card” types that offer a different experience. They include:
- Summary Card: Title, description, and thumbnail.
- Summary Card with large Image: Similar to the Summary Card but with a featured image.
- App Card: A Card with a direct download to a mobile app.
- Player Card: A Card that provides video, audio, and/or media.
The controls include a series of meta tags published in the head content that look similar to this:
<head>
<!– Twitter Card data –>
<meta name=”twitter:card” content=”summary”>
<meta name=”twitter:site” content=”“>
<meta name=”twitter:title” content=”“>
<meta name=”twitter:description” content=”“>
<meta name=”twitter:creator” content=”“>
<– Twitter Summary card images must be at least 120x120px –>
<meta name=”twitter:image” content=”“>
</head>
Twitter also provides a validator tool to test your URL’s for any potential problems.
![]() If you are interested in adding Twitter Cards to your website (and you should), I highly recommend you read the following resources:
If you are interested in adding Twitter Cards to your website (and you should), I highly recommend you read the following resources:
- Twitter: Optimize Tweets with Cards
- Twitter Blog: Tips and Tricks for better Twitter Cards
- Bufferapp: The Everything Guide to Twitter Cards
- Adparlor: The Definitive Guide to Twitter Cards
- SliceWorks: 12 Best Practices for Twitter Cards
Rich Snippets
As Google continues to provide a great user experience for their website, they also continue to expand on the tools developers and marketers can use to increase their visibility and their audiences experience.
Beginning in 2015, one of those tools is the inclusion of a “Snippet” (based on Structured Data markup) which allows developers to “organize” their data so that it consistently presented across the internet.
See the next section below for more about Structured Data.
The controls include a series of meta tags published in the head content that look similar to this:
<!– Schema.org markup for Google+ –>
<meta itemprop=”name” content=”“>
<meta itemprop=”description” content=”“>
<meta itemprop=”image” content=”“>
Google also provides a Structured Data testing tool to test for any potential problems prior to publishing your content.
![]() Here is some additional reading suggestion on including Rich Snippets and Social Media to your website:
Here is some additional reading suggestion on including Rich Snippets and Social Media to your website:
- Technicians: Social Media Meta Tags – Technical Guide to Optimize Post for Social Media
- Sympli: How to Boost Social Media Engagement with Meta Tags
- Scotch: All Search and Social Media Meta Tags Starter Template
- Social Debug: Why are Social Meta tags important?
Rich Pins
Pinterest’s Rich Pin tag pulls metadata directly from your website and into a Pinterest Board using Open Graph and/or Schema.org. You’ll need to add the markup to your website first, then apply to their Rich Pin program in order to use the feature.
They also provide a Rich Pin validator tool test for any potential problems.
![]() If you are interested in expanding your marketing to include Pinterest, I highly recommend you read the following resources:
If you are interested in expanding your marketing to include Pinterest, I highly recommend you read the following resources:
- Pinterest for Business: Tools
- Pinterest for Business: 3 Ways to Create Better Pins
- Warefareplugins: Everything You Need to Know: Open Graph, Twitter Cards & Rich Pins
- Yoast: Getting Rich Pins for Your Articles
-> Meta Keywords
In 2009, Google announced that the keyword tag will no longer be a ranking factor in their algorithm for search results.
![]() If you’re interested in the history of keywords and why they are no longer a factor, read “Meta Keywords Tag 101” from SearchEngineLand.
If you’re interested in the history of keywords and why they are no longer a factor, read “Meta Keywords Tag 101” from SearchEngineLand.
-> Site Verification
Verifying website ownership often requires the use of a verification tag – especially with Google and Bing services. These tags do not “hurt” your website but the do add an extra instruction to browsers and search spiders.
A better practice would be to verify your site using an external file, DNS, or directly linking with your account.
-> Other Tags
There are dozens of other tag options for use. Some of them may be relevant to your application – others not. Here is a basic list of other tags you might want to use:
Unavailable After
This tag is used for content that will live for a finite period of time (think seasonal items). This will avoid users from finding your content after it’s usable time frame.
Tag would be added to the head section of your page and is written in RFC 850 format. Once the expiration time is reached, Google will remove the page from the SERP’s but the page will remain indexed in their database.
Code Sample:
<meta name=”googlebot” content=”unavailable_after:25-AUG-2007 15:00:00 EST”>
Refresh
This is tag is a substitute for a 301 redirect. Best practice would be use a server-side 301 redirect and avoid this tag if possible.
Cache Control
This tag is used to control and how a web page is cached in the browser. Given the wide number of browsers (especial with mobile) a best practice would be to do this within the HTTP header.
As I stated previously, this is not a complete list. As you discover new tags, I recommend you do some searching and discover their use, are they still viable, and best practices. Below is some recommended reading:
![]() READ: Although this site looks like it’s written in the 1990’s, Metatags.org provides a good dictionary of meta tag descriptions, how to use them, examples of using Meta tags in markup, a dictionary of Meta tags and their use, Meta tag generator and Meta tag analyzer tools, and basic suggestions to site ranking.
READ: Although this site looks like it’s written in the 1990’s, Metatags.org provides a good dictionary of meta tag descriptions, how to use them, examples of using Meta tags in markup, a dictionary of Meta tags and their use, Meta tag generator and Meta tag analyzer tools, and basic suggestions to site ranking.