
Topics:
- The Importance of a Good Cover
- Cover Design Elements
- DIY Cover Design vs. Professional Design
- DIY Cover Design & Resouces
- Testing and Feedback
- KDP Cover Specification
- Designing a Cover with Canva
A compelling book cover is not just artwork; it’s one of the most important elements of your marketing toolbox. A well-designed cover can make a significant difference in attracting potential readers and convincing them to purchase your book. It visually communicates the book’s genre, sets the tone, and triggers curiosity.
The Importance of Good Design
Your book cover is the first point of contact with potential readers. It’s your #1 marketing tool and must visually communicate the book’s genre, tone, and be indicative of the book’s content. Moreover, a well-designed cover can help in building an author’s brand, especially for a series.
The Book Cover is a Marketing Tool
- First Impressions Count: The cover is often the first point of contact between your book and potential readers. Within 10ths seconds, it must convey the essence of your story, attract attention, and make a memorable impression. A compelling cover design can set the tone for the reader’s experience and differentiate your book in a crowded market.
- Visual Communication: A book cover communicates vital information about the book’s genre, theme, and tone through its imagery, color scheme, typography, and overall aesthetic. Effective cover design aligns with genre expectations while offering something unique to intrigue readers.
- Brand Identity: For authors with multiple publications, cover design contributes to building a recognizable author brand. Consistency in design elements across your books can help readers easily identify your work and foster loyalty.
Impact on Visibility
- Online Bookstores: In the digital realm, where browsing involves scrolling through thumbnails, the cover design plays a pivotal role in catching the eye of potential readers. A striking and readable cover can increase click-through rates and improve your book’s discoverability on platforms like Amazon.
- Physical Bookstores: In brick-and-mortar stores, the cover design must stand out on the shelves among hundreds of other titles. The spine design, in particular, becomes crucial here, as it’s often the first thing a shopper sees. A well-designed spine can entice readers to pull the book off the shelf for a closer look.
- Social Media and Advertising: A good cover design is also an asset in marketing campaigns, from social media posts to online ads. An attractive cover image can enhance engagement with your promotional content, leading to increased awareness and sales.
8 Tips for Book Cover Design
- Give readers a sneak peek of what’s to come.
- Indicate the book’s genre.
- Understand your audience.
- Set the appropriate tone.
- Pay attention to the details.
- Follow the rules of design.
- Have a distinct style.
- Consider working with a professional.
The importance of a good cover cannot be overstated. It functions as a key marketing tool, creating the crucial first impression that can either draw readers in or push them away. Investing time in your cover design is an investment in your book’s success, enhancing its appeal, visibility, and marketability across various platforms.
Key Elements of Book Cover Design
A book cover is a visual summary of the story within, crafted to capture attention and invite readers into the world you’ve created. Each element of cover design—imagery, color scheme, typography, and layout—plays a specific role in achieving this goal. Understanding how to effectively utilize these elements is crucial for creating a cover that stands out.
The layout of a book cover typically consists of the front cover, back cover, and spine, each playing a vital role in the book’s overall presentation.
- Front Cover: Focuses on clarity and evoking the right emotions, featuring the book title, author’s name, and sometimes a subtitle or quotation.
- Back Cover: Contains the blurb and author information, designed to be catchy and demonstrate the author’s competence.
- Spine Design: Should feature sharp contrast for legibility and include the book title and author’s name.
Cover design is dissected into key elements: imagery, color, typography, and layout. Each element serves a specific purpose:
- Imagery sets the visual tone and often hints at the book’s content.
- Role: Imagery, whether photography or illustration, sets the visual tone of the book and often provides a snapshot of the content or theme.
- Genre and Tone: The choice of imagery should align with the book’s genre and tone. For example, a romance novel might feature intimate human figures, while a science fiction book might opt for futuristic landscapes or technology.
- Symbolism: Effective imagery often includes symbolic elements that hint at deeper themes or plot points in the book, engaging readers’ curiosity.
- Color Scheme evokes emotions and sets the mood, aligning with the book’s genre and tone.
- Emotional Impact: Color has a profound impact on emotions and can instantly set a mood. The color scheme of a book cover should reflect the emotions you want to evoke in your readers.
- Genre Conventions: Certain colors are associated with specific genres—bright colors for children’s books, dark hues for mystery or horror, etc. Understanding these conventions can help in choosing a color scheme that appeals to genre fans.
- Typography, including the choice of font for the title and author’s name, plays a significant role in readability and aesthetic appeal.
- Legibility: The title and author’s name should be easily readable, even in thumbnail size for digital marketplaces.
- Personality: The font choice conveys the personality of the book. A whimsical font might be used for a comedy, while a sleek, modern typeface suits a contemporary novel.
- Hierarchy: Typography should guide the reader’s eye in a logical order, usually from the title to the author’s name, and then to any additional text.
- Layout ensures a balanced and cohesive presentation of all elements. Together, these components must work in harmony to convey the book’s genre and tone at a glance, appealing directly to the target audience.
- Balance and Focus: A well-designed layout balances different elements on the cover, ensuring that none overwhelm the others, and the focus remains on the most important information.
- Spacing: Proper use of space, including margins and the space between elements, contributes to the overall readability and aesthetic appeal of the cover.
- Alignment: Alignment of text and images should create a cohesive look that feels intentionally designed rather than haphazard.
By mastering these design elements, authors and designers can create compelling covers that capture attention, convey the book’s essence, and ultimately, drive sales.

Designing a book cover that not only captures the essence of your narrative but also stands out in the ever-competitive bookshelves is crucial to the success of your book. This comprehensive article by Miblart, How to Design a Book Cover, provides expert insights, practical tips, and creative strategies to ensure your book makes a lasting first impression.
DIY vs. Professional Cover Design
The decision between designing your book cover or hiring a professional designer is pivotal in the self-publishing process. Your choice not only affects the visual appeal of your book but also its potential success in the market.
Factors to Consider
- Budget: Assess your financial resources to determine if professional design services are within your reach.
- Design Skills: Consider your current design skills and your willingness to invest time in learning design principles and software.
- Cover Complexity: Evaluate the complexity of the cover design you envision. Simple designs might be more feasible for DIY, while complex covers could benefit from a professional’s touch.
DIY Cover Design
Pros:
- Cost Savings: The most apparent advantage of DIY cover design is the potential cost savings, making it an attractive option for authors on a tight budget.
- Full Creative Control: Designing your own cover gives you complete creative freedom to bring your vision to life without compromises.
- Skill Development: The process of designing your cover can enhance your design skills, which could be beneficial for future projects.
Cons:
- Time Investment: DIY cover design can be time-consuming, especially for those who are learning design principles and software from scratch.
- Quality Concerns: Without professional design experience, achieving a cover that competes with traditionally published books in terms of quality and appeal can be challenging.
- Limited Access to Resources: Professional designers often have access to a wider range of design resources, tools, and commercial licenses for images and fonts, which might not be readily available to DIY designers.
Professional Design
Pros:
- Professional Quality: A professional designer can deliver a high-quality, polished cover that meets industry standards and appeals to your target audience.
- Expertise and Experience: Professional designers bring their expertise in design principles, market trends, and genre-specific conventions, which can significantly enhance your book’s marketability.
- Efficiency: Hiring a professional can save you time, allowing you to focus on writing and marketing your book.
Cons:
- Cost: Professional design services can be expensive, with costs varying widely depending on the designer’s experience and the project’s complexity.
- Less Direct Control: While professional designers work closely with authors to realize their vision, the collaborative nature of the process means you might not have as much direct control over every design decision.
Finding and Hiring Professional Cover Designers
- What to Look For: Seek designers with experience in your book’s genre. Review their portfolios to ensure their style aligns with your vision. Pay attention to their communication style and responsiveness.
- Where to Find Them: Platforms like Reedsy, 99designs, and Fiverr host directories of professional cover designers with varied styles and price ranges. Author communities and social media groups can also provide recommendations.
- Communicating Your Vision: Provide a clear brief detailing your book’s genre, themes, and any specific ideas or elements you envision for your cover. Reference examples of covers you admire and be open to the designer’s creative input.
Choosing a book cover designer can be an intimidating task… What is the cost, will it turn out like I want, will I recoup my investment through book sales, and so much more? Luckily, you have Google and the ability to find dozens of professional cover designers and design services to fit most budgets. In this article by Scott Lorenz, 50 Book Cover Designers to Create Your Best-Selling Cover, you’ll learn some important considerations as well as a selection of potential designers for your next book.
DIY Cover Design & Resouces
For those inclined to design their own covers, several resources are available:
Design Inspiration
- Online Galleries: Websites like Behance, Reedsy, and Dribbble showcase the work of professional designers, offering a wealth of creative book cover designs across various genres.
- Design Award Sites: Platforms such as The Book Designer’s Monthly eBook Cover Design Awards and Self-Publishing and Book Marketing Blog highlight outstanding book covers, providing insights into current design trends and award-winning concepts.
- Genre-Specific Design Examples: Exploring genre-specific galleries on sites like Goodreads or Amazon can help identify trends and elements that resonate with readers in your genre.
For DIY designers, tools range from free options like Canva and Visme to professional-grade software like Adobe Photoshop. Each offers different features suited to various levels of design experience. High-quality stock images and fonts are essential for creating a professional-looking cover, regardless of the chosen tool.
Resources for DIY Designers
Templates & Tools
- KDP Create a Paperback Cover
- KDP Print Cover Calculator and Templates
- KDP Cover Creator
- Bookow Cover Template Generator
Royalty-Free Images
There are dozens of pad and free image sites for you to choose from. Here is a sample list of free stock image sites that offer images for commercial use:
- Envato Elements
- Shopify Burst
- Unsplash.com
- Icons8
- Stocksnap.io
- Vecteezy.com
- Gratisography.com
- Morguefile.com
- Pixabay.com
- Rawpixel.com
- Reshot.com
- Same.Energy
Font Libraries
Google Fonts and Adobe Fonts provide extensive collections of free and premium fonts for commercial use, but there 100’s more for you to choose from:
- Creativetacos
- DaFont
- Creative Market
- MyFonts
- FontSpace
- FontBundles
- Befonts
- Abstract Fonts
- Font Squirrel
- UrbanFonts
- The League of Movable Type
Cover Design Software
A variety of tools and software are available for cover design, from simple, user-friendly options like Canva to professional-grade choices like Adobe Photoshop and Illustrator. The guide likely emphasizes the importance of selecting the right tool based on the author’s design skills and the specific needs of the project. Tips for navigating these tools include sourcing high-quality images, selecting appropriate fonts, and adhering to genre-specific design conventions.
Here are 5 applications that help you make a book cover. The first three are desktop programs and are comparable to Photoshop. The other two are app/browser-based and are great for creating a cover quickly if you don’t have complex photo-editing needs.
| Features | Krita | GIMP | Paint.net | Canva | Abobe Express |
|---|---|---|---|---|---|
| Format | Desktop Program* | Desktop Program* | Desktop Program | Browser | Browser |
| Photo Manipulation | X | X | X | ||
| Dynamic Layers | X | X | X | ||
| Text Effects | X | X | X | X | |
| Integrated Stock Images | X | X | |||
| Premade Designs | X | X | |||
| Social Layouts | X | X | |||
| Paid Upgrades | X | X | |||
| Tutorial | Krita | GIMP | Paint.net | Canva | Adobe Express |
* Open Source software.
Testing & Feedback
Before finalizing your cover, consider testing it with your target audience to gather feedback. Tools like PickFu enable A/B testing of different designs, helping you refine your cover based on reader preferences and feedback.
Strategies for Testing Cover Designs
- A/B Testing: This method involves creating two versions of your book cover (A and B) and testing them with a segment of your target audience to see which one performs better. You can conduct A/B testing through email newsletters, social media polls, or dedicated landing pages. Focus on one variable at a time (e.g., title font, cover image) to understand what influences the audience’s preference.
- Social Media Feedback: Share your cover designs on social media platforms and ask your followers for their opinions. Platforms like Facebook, Instagram, and Twitter can provide a broad range of feedback. Be specific in your questions to gather actionable insights (e.g., “Does this cover convey the book’s suspenseful tone?”).
- Author Platforms and Communities: Utilize author forums, writing groups, and platforms like Goodreads to share your cover designs and solicit feedback from fellow authors and avid readers. These communities often provide detailed and genre-specific advice.
Importance of Gathering Feedback
- Refining Your Design: Feedback helps identify elements that work well and those that may need adjustment. This iterative process ensures your cover not only looks professional but also appeals to your target audience.
- Understanding Reader Preferences: Feedback sessions can reveal preferences and trends among your potential readers, allowing you to align your cover design more closely with their expectations.
- Marketing Insights: Testing and feedback can also offer early marketing insights, such as how your book is perceived within its genre and what messaging resonates with readers.
Leveraging Feedback for Final Refinement
- Analyze Responses: Collect and analyze the feedback to identify common themes or suggestions. Look for patterns that indicate strong preferences or aversions among your audience.
- Iterate Based on Insights: Use the insights gained from testing and feedback to make informed adjustments to your cover design. Consider working with your designer to implement changes based on the feedback received.
- Final Validation: Once revisions are made, consider a final round of feedback to validate the effectiveness of the changes. This step ensures the final cover design is well-received and ready for launch.
Your book cover is a critical marketing tool that requires careful consideration and execution. Whether you decide to design it yourself or hire a professional, ensure that it effectively represents your book and attracts your target audience. With the right approach, a well-designed cover will significantly contribute to your book’s success on Amazon KDP.
KDP Cover Specifications
Designing a paperback cover involves more than just aesthetic appeal; it is a critical aspect of your book’s presentation and marketability. This guide outlines the essential steps and considerations for creating a cover that meets Amazon KDP’s specifications and appeals to your readers.
Cover File Specifications
- Single PDF File: Your cover design should be a single PDF that integrates the back cover, spine, and front cover into one cohesive image, with a recommended size of 40MB or less to avoid conversion issues.
- Spine Text Eligibility: Books must have a minimum of 79 pages to include spine text. Covers with spine text on books with fewer pages will be rejected.
- Cover Finish Options: Choose between a glossy or matte finish for your cover.
- Glossy finish is shiny. It makes black covers darker and artwork more striking. It’s typical for textbooks, children’s books, and nonfiction.
- Matte finish has minimal sheen and a subtle, polished look. It’s typical for novels and other fiction.
- Cover Dimensions: Incorporate bleed settings by adding 0.125″ (3.2 mm) to the top, bottom, and outside edges to ensure your cover extends fully to the edge after trimming.
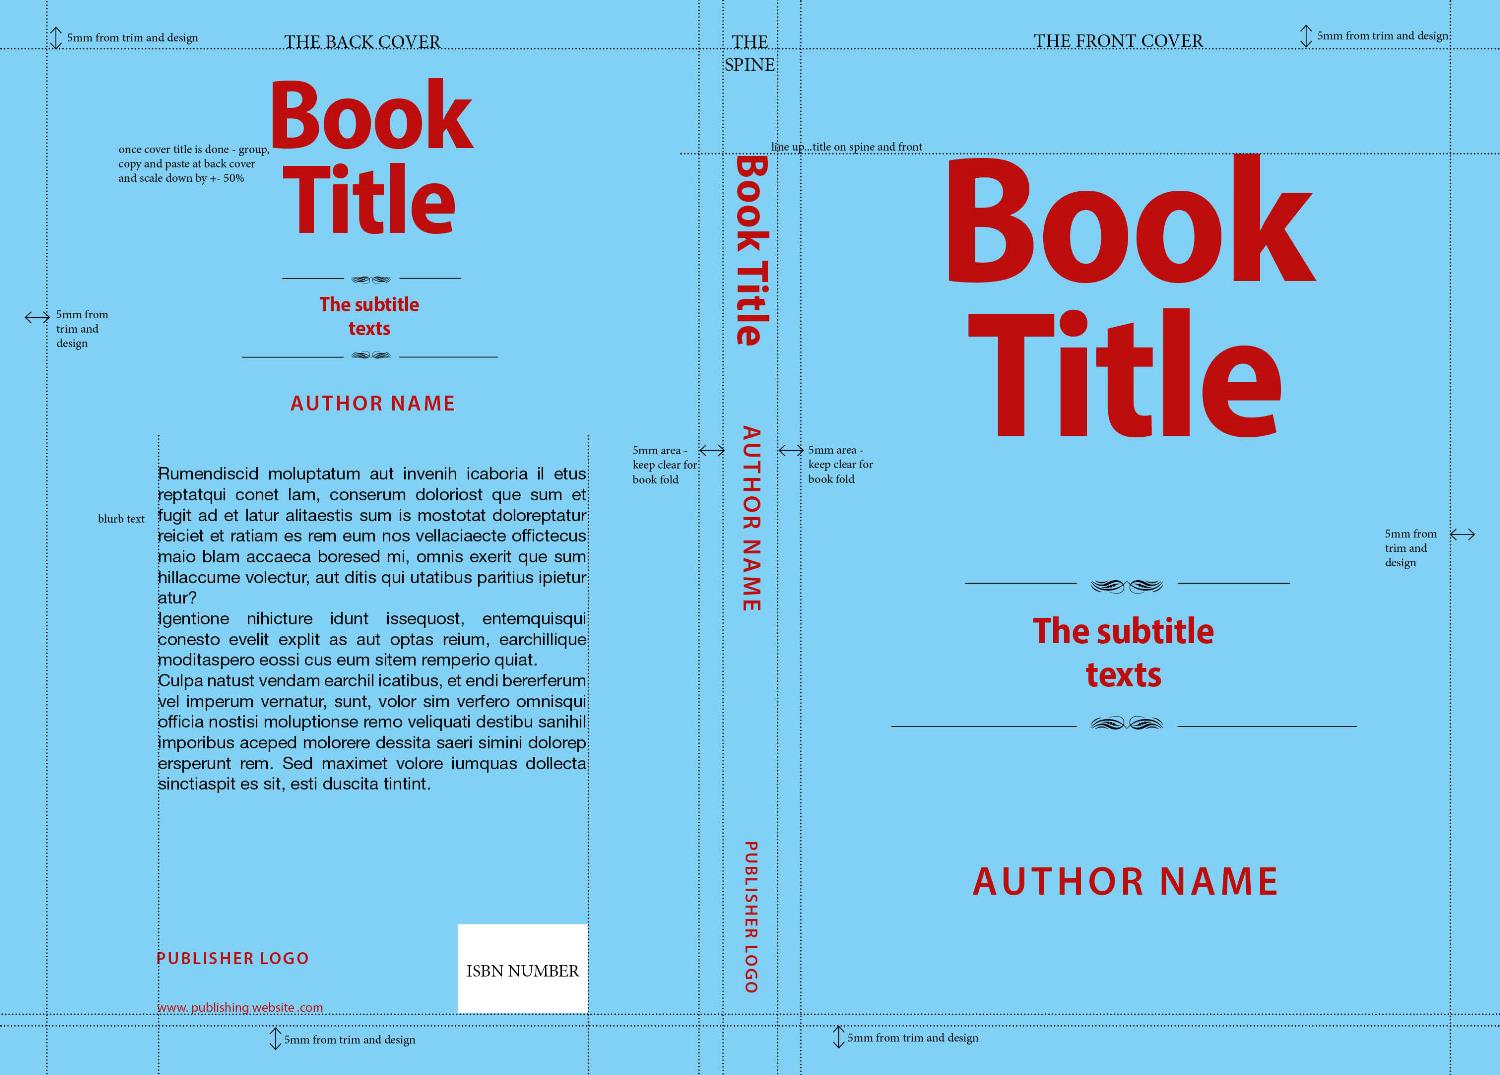
Setting Cover Size
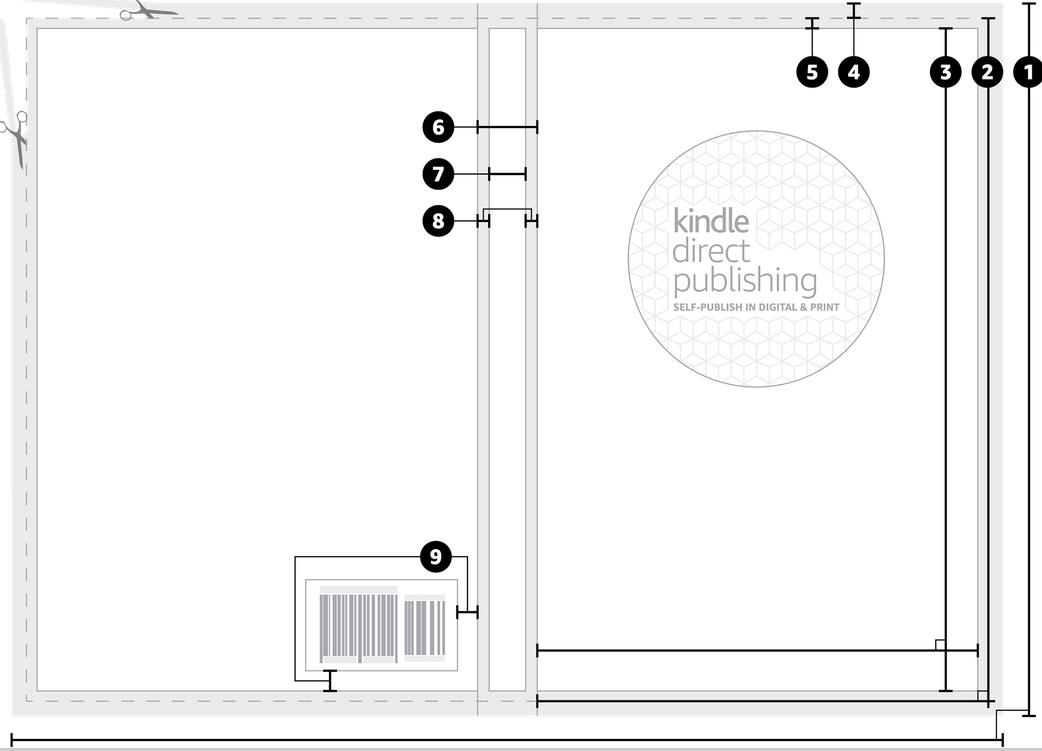
- Full cover: Total width and height of the cover file, including front, back, spine, and wrap.
- Front cover: Width and height of the visible cover area after it’s printed (it’s the same for the back cover).
- Safe area: All text and images must be placed within this area, so they don’t shift to the front or back cover during printing.
- Bleed: Properly setting bleed ensures printed objects reach the edge of the page. Accounting for bleed is important because it prevents a white border from appearing at the edge of the page when the book is trimmed.
- Margin: Do not place text or images in this area, unless they’re intended to wrap to the inside cover.
- Spine: The outside edge of the book where the pages are gathered and bound. Your book must have a minimum page count of 79 pages to include text on the spine.
- Spine safe area: Place all spine text and images within this area, so they don’t shift to the front or back cover during printing.
- Spine margin: Do not place text or images in this spine area because they could shift to the front or back cover during printing.
- Barcode margin: This area ensures that the barcode doesn’t shift during printing and scans properly.
Note: For Right to Left content, the cover calculator and template generator will generate a layout with the front cover placed to the left of the spine and the back cover to the right of the spine. The barcode will be placed at the lower left-hand corner of your book’s back cover.
Spine Measurement Formula
To format your paperback cover, you’ll first need to calculate the spine measurements.
Insert the spine measurements, selected trim size width and height, and the 0.125″ (3.2 mm) bleed requirement into the following equations to find your cover size:
- Cover Width = Bleed + Back Cover Width + Spine Width + Front Cover Width + Bleed
- Cover Height = Bleed + Trim Height + Bleed
Spine measurements for black and white books
- White paper: page count x 0.002252″ (0.0572 mm)
- Cream paper: page count x 0.0025″ (0.0635 mm)
Spine measurements for color books
- Color paper: page count x 0.002347″ (0.0596 mm)
Formatting Cover
- Bleed: All covers have bleed. If adding a background (e.g. color or image), make sure it extends 0.125″ (3.2 mm) beyond the final trim line on all outside edges. All books are trimmed to size, and, to ensure that the background fills the page, it needs to extend 0.125″ (3.2 mm) past where the book will be trimmed on the top, bottom, and outside edges. This will prevent a white border from appearing at the edge when your book is trimmed.
- Illegible text: When choosing a background, consider how much it contrasts with the text. If the colors are too similar, the text might blend into the background and be hard to read.
- Borders: You must allow for a 0.125″ (3.2 mm) production variance that may trim the border or cause it to appear uneven. If your file includes borders, they should cover at least 0.25″ (6.4 mm) inside the trim line.
- Spine shift: The spine may shift up to 0.0125″ (3.2mm) in either direction as a production variance. If the shift is greater, the copy is considered defective.
Adding images
- Bleed: When adding images, make sure they extend 0.125″ (3.2 mm) beyond the final trim line on all edges. This will prevent a white border from appearing at the edge when your book is trimmed.
- Image color, size, and quality: Images should be in CMYK color to ensure your cover looks good in print. All images should be sized at 100%, flattened to one layer, and placed in your document at a minimum resolution of 300 DPI (dots per inch). Learn more about high-resolution images.
Adding text
- Front and back cover text: When adding text, make sure it’s at least 0.125″ (3.2 mm) inside the trim lines. Also, no front or back cover text should extend into the spine area.
- Spine text: Your book must have at least 79 pages to add spine text. If your book has fewer than 79 pages, don’t add spine text. Also, spine text needs at least 0.0625″ (1.6 mm) on either side so the text doesn’t wrap onto the front or back cover.
- Book details: As you add text to your cover, make sure it exactly matches the book details (e.g., title, author name, edition, ISBN) entered during title setup. Note that if you’re publishing a low-content book using the “Publish without an ISBN option”, you do not need to add ISBN information on your cover.
- Font size and color: Text should be at least 7-point font so it’s large enough for customers to read. Also, make sure the text doesn’t blend into the background. This may happen if the text and background colors are too similar.
Barcode size and placement
- You can upload a cover with or without a barcode. If you choose not to provide your own barcode, KDP will automatically place one on your back cover.
Color requirements
- Color profiles: Do not add color profiles to your file. Color profiles can produce unexpected results and they are automatically removed before publishing.
- Spot colors: KDP recommends converting spot colors to CMYK. Spot colors are used in offset printing and aren’t compatible with KDP’s print-on-demand model.
- Color spaces: Describes color numerically, such as RGB (digital cameras and computer monitors), CMYK (full-color printing), and grayscale (black and white printing). Do not use multiple color spaces in a file because it can cause color variance and unexpected results when your book is printed.
- Color Variance: Keep in mind that the KDP print-on-demand model has an acceptable level of color tolerance. Most color variance happens as a result of environmental and mechanical factors. Color variance occurs for many reasons that are not related to your file, however, taking all the steps you can to perfect your file will reduce the chances of it occurring.
Pre-publication checklist
Before you upload your file to KDP, make sure you:
- Save as a PDF: Your cover must be a single PDF that includes the back cover, spine, and front cover as one image.
- Flatten all transparencies: These can cause the file to print with missing or distorted content. Consult your software’s documentation to learn how.
- Embed your fonts: Consult your software’s documentation to learn how.
- Remove crop marks, color bars, and template text: Crop marks are lines showing where pages should be trimmed. Color bars are strips with a series of patches used to ensure color balance during printing. Also, remove any template text, PDF creation guides, or software references.
- Ensure your cover image meets the minimum resolution of 300 DPI (dots per inch).
- Optimize PDFs: Optimization is useful to reduce your file size, allowing for higher performance when transferring, uploading, viewing, and printing files.
- Remove file security: Locked or encrypted files will fail review.
- Check for missing or blank pages: Manuscripts with missing pages, or excessive blank pages will be rejected.
Conclusion
Creating a well-designed paperback cover is essential for the success of your book on Amazon KDP. By following these guidelines and utilizing the available tools, you can ensure your cover not only looks professional but also meets the technical requirements necessary for successful printing and distribution.
Designing a Paperback Cover
Creating an engaging paperback cover is a pivotal step in your journey as an Amazon KDP author. The cover not only captures the attention of potential readers but also sets the tone for the content inside. While Adobe Photoshop is a renowned tool for such designs, its complexity can be daunting. Fortunately, Canva offers a user-friendly alternative that even beginners can master.
Why Choose Canva for Your KDP Paperback Cover?
Canva simplifies graphic design with its intuitive interface and accessibility, making it an ideal choice for authors who prefer a straightforward tool. Although Canva does not support PDF or PNG formats directly from the KDP Paperback Cover Template, this limitation can be easily circumvented with a few simple steps.
Step-by-Step Process to Design with Canva
- Template Preparation
- Visit Amazon’s template site and input your book’s specifications like trim size, page count, and paper color to download the appropriate template.
- Unzip the downloaded folder and use Microsoft Paint to open the PNG file. Convert this file to JPEG by saving it via the ‘Save as’ option. This format adjustment is crucial as Canva does not support PDF uploads and the default PNG might exceed Canva’s upload limits.
- Finding the Right Images
- Use resources free image resources to find high-resolution, copyright-free images suitable for commercial use. Be sure the images are labeled “Free to use” and “No attribution required” to avoid any legal complications.
- Creating Your Cover in Canva
- Log into Canva and select ‘Create a design’ using custom dimensions that match the specifications of your KDP cover.
- Upload the JPEG template and your chosen background image to Canva. Begin by positioning the background image to cover the entire design area, then overlay the template image.
- Designing and Finalizing the Cover
- Adjust the transparency of the template layer to seamlessly integrate your background image.
- Add and customize the text for your book title and author name, ensuring it fits within the designated areas of the template.
- Once your design satisfies your expectations, remove the template layer, and download your final design as a ‘PDF Print’ format for the best quality.
Conclusion
Designing your KDP paperback cover with Canva not only simplifies the process but also empowers you with creative control over the presentation of your book. By following these steps, you can create a cover that not only meets KDP’s requirements but also visually communicates the essence of your book to potential readers.